Install and Config IRECA WordPress Theme
- created: 08/14/2018
- latest update: 10/17/2019
- by: ovatheme
- themeforest.net/user/ovatheme/portfolio
- email: ovatheme@gmail.com
Overview
We would like to thank you for purchasing our theme! We are very pleased you have chosen our theme for your website, you will not be disappointed! Before you get started, please be sure to always check out these documentation files. We outline all kinds of good information, and provide you with all the details you need to use our theme.
Wordpress Information
WordPress Information
To install this theme you must have a working version of WordPress already installed.
To install this theme you must have a working version of WordPress already installed. If you need help installing WordPress, follow the instructions in WordPress Codex or you can watch the Instructional Video. Below are all the useful links for WordPress information.
Some settings for Server/Hosting
max_execution_time = 180
max_input_time = 600
post_max_size = 128M
upload_max_filesize = 256M
• WordPress Codex – general info about WordPress and how to install on your server
• Instructional Video – How To install wordpress
• First Steps With WordPress – general information that covers a wide variety of topics
• FAQ New To WordPress – the most popular FAQ’s regarding WordPress
• WP101 Basix Training videos – some great videos from WPTuts on WordPress
Requirements For Our Theme
- To use theme, you must be running WordPress 4.4 or higher, PHP 5.6 or higher, and mysql 5 or higher. Follow below checklist to ensure your host can work well with theme:
+ Your web host has the minimum requirements to run WordPress.
+ They are running the latest version of WordPress.
+ You can download the latest release of WordPress from official WordPress website.
+ You did create best secure passwords FTP and Database.
Support
The our team are always happy to help you with any questions or recommendations you have about the our theme.
If you need any help or support please contact us through Forum: https://ovatheme.ticksy.com . Note you have to choose theme that you bought.
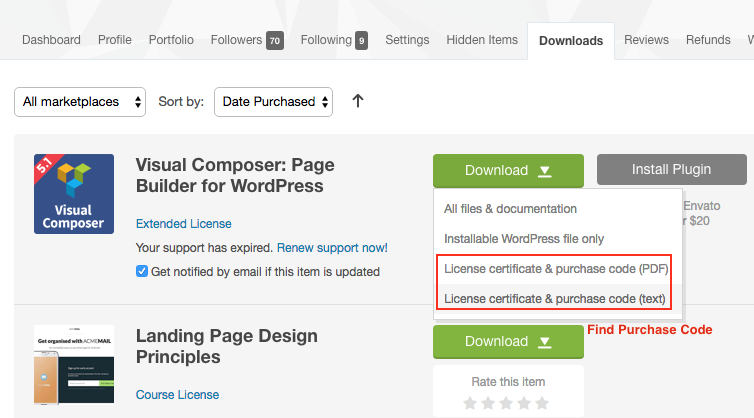
Then open file and find "Item Purchase Code" like
Item Purchase Code: cdf581e0-ed42-41a2-ab3f-26bb5fb9c874
Install Theme
Download Theme Package
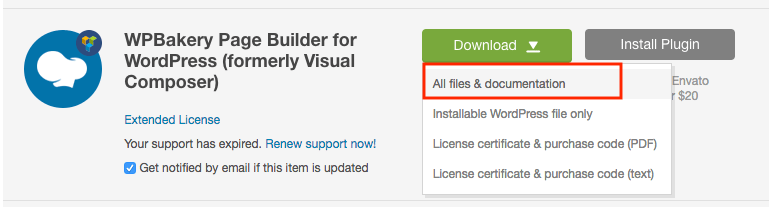
After purchasing our theme from Themeforest, you will need to download theme package for your use. To download the package, please login to your Themeforest account, navigate to “Downloads”, click the “Download” button in the left of the theme, choose “All files & documentation” to download our theme package to your computer. The theme package includes:
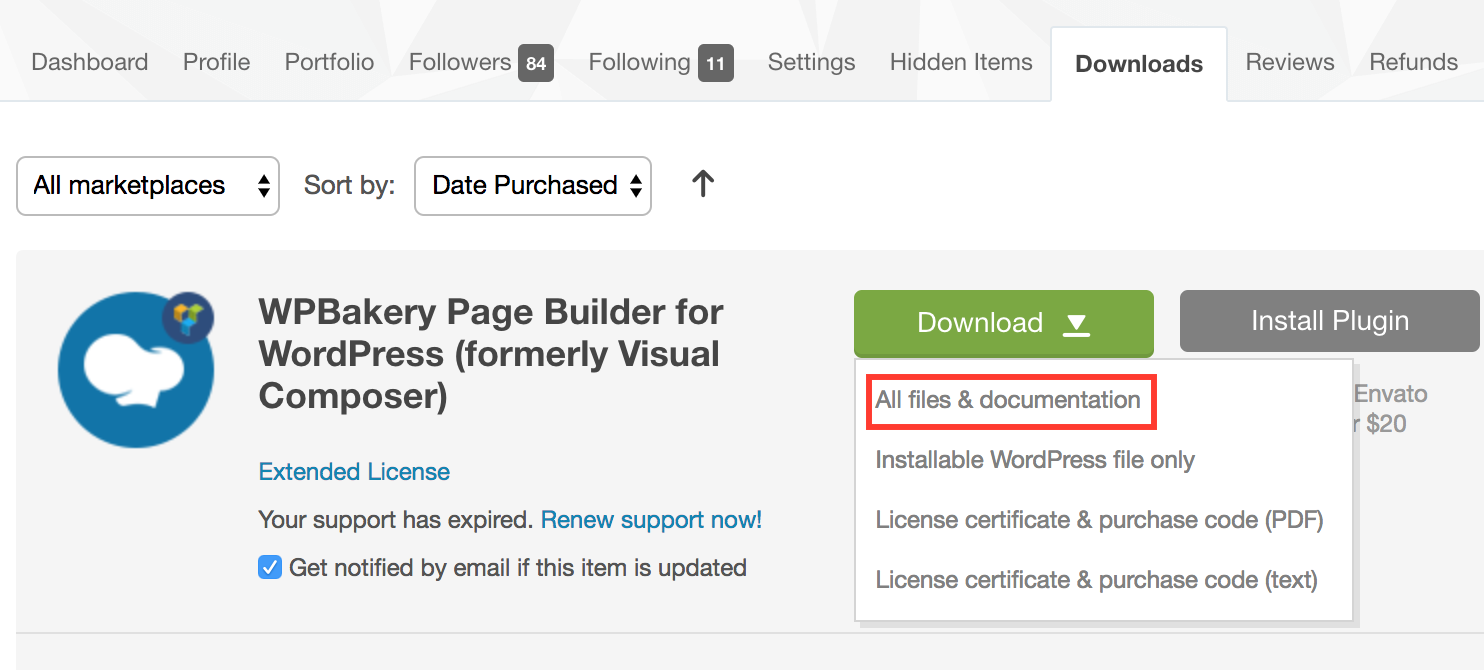
Theme File: Includes ireca.zip file that consists of everything you need to install the theme.
Child Theme File: Includes ireca-child.zip file
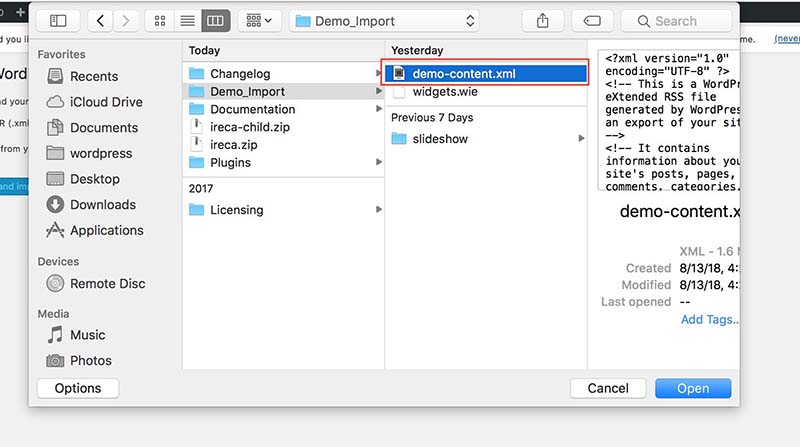
Demo Import Folder: Includes .xml, .wie, file slideshow folder for import content, slideshow, widget
Plugins Folder: Include all local plugins use in theme
Changelog file: Include readme.txt. Read to know changes in all version.
Documentation Folder: Includes Documentation file that helps you get to know about theme and guides you to build your site with our theme.
Licensing Folder: Includes the licensing files of Themeforest purchase.
Install Theme
The theme supports 2 way to install theme: Manual Install and Auto Install
1: Install Theme
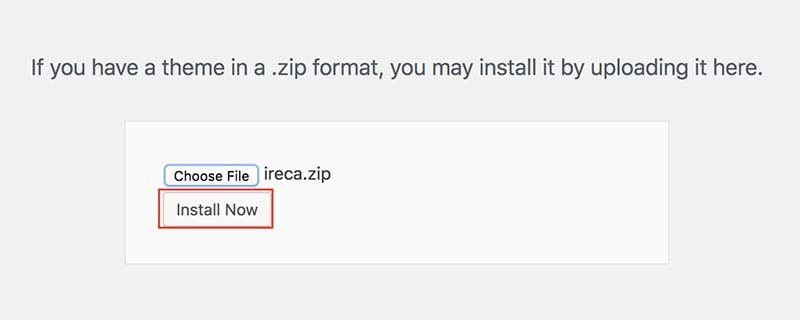
Step 1 : From Admin Menu click Appearence >> Themes >> Add New
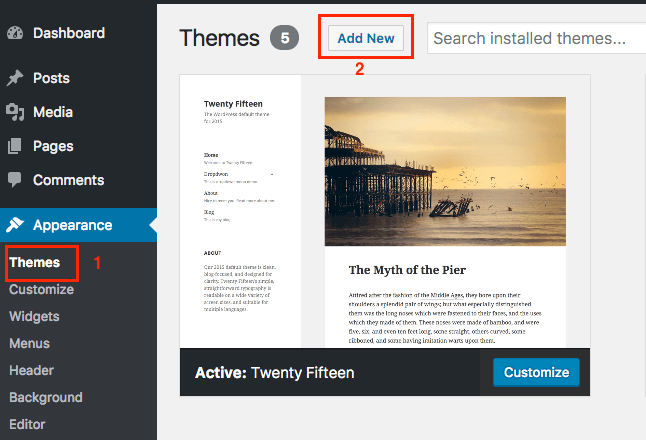
Step 2: Install Parent Theme ireca.zip

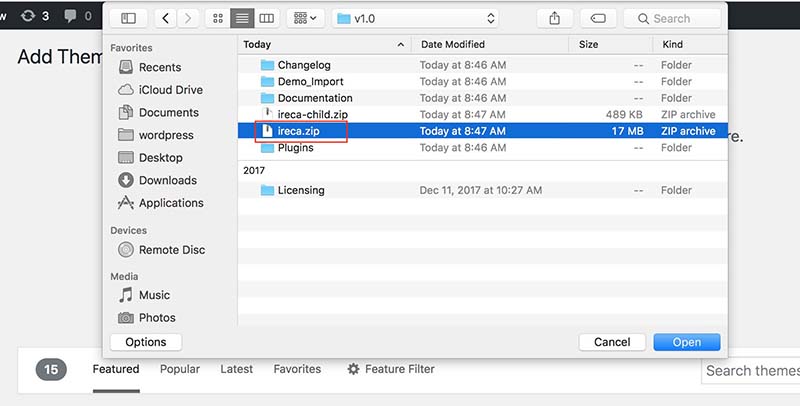
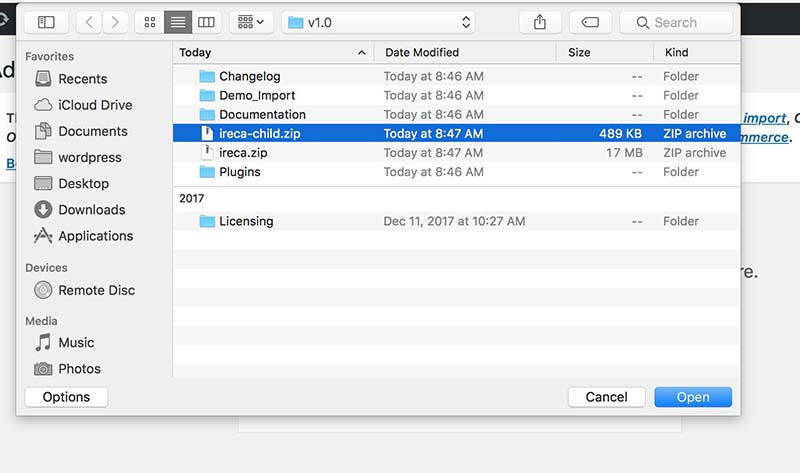
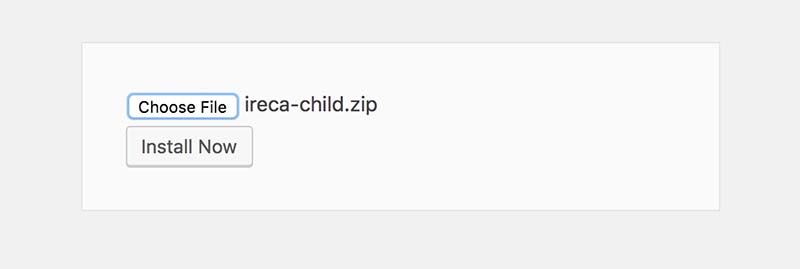
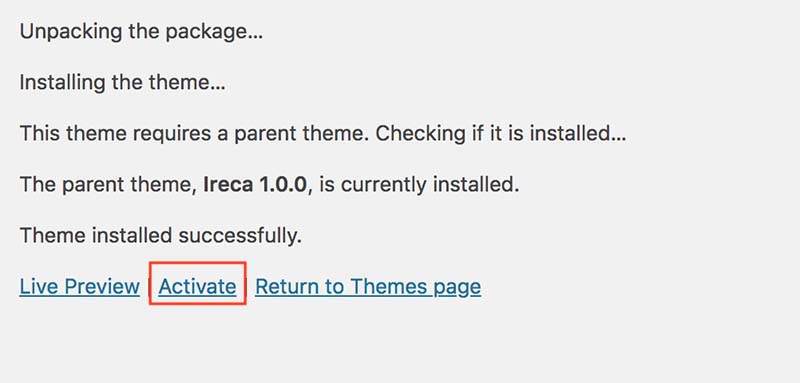
Step 3: Install and Active Child Theme ireca-child.zip
Active Child theme
Step 4: Install and Active Plugins

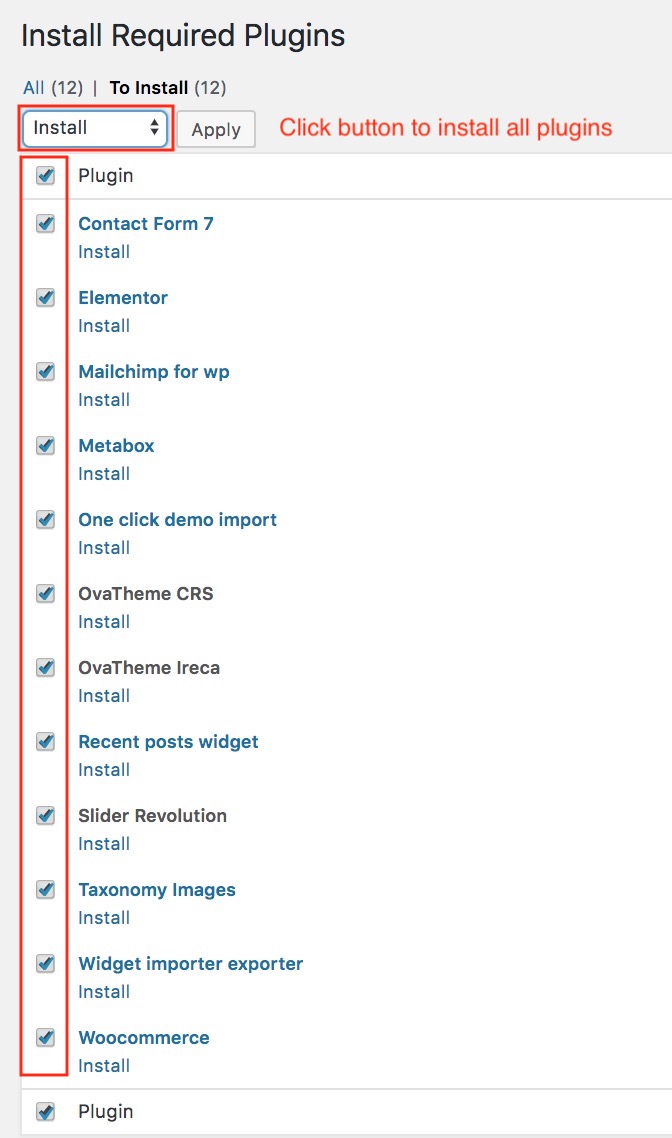


You don't need make some pages like Car, My account, Checkout because it included when you import demo data.

After you install theme, you have to import demo data
2: Import Content, Widget Data:
We have 2 way to import demo data. 1: Auto Import, 2: Manual Import
You should use 2: Auto Import
1: Auto Import
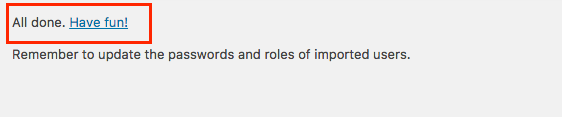
- 1.1: From Admin Menu click Appearance >> Import Demo Data >> Wait about 5 minutes to import data
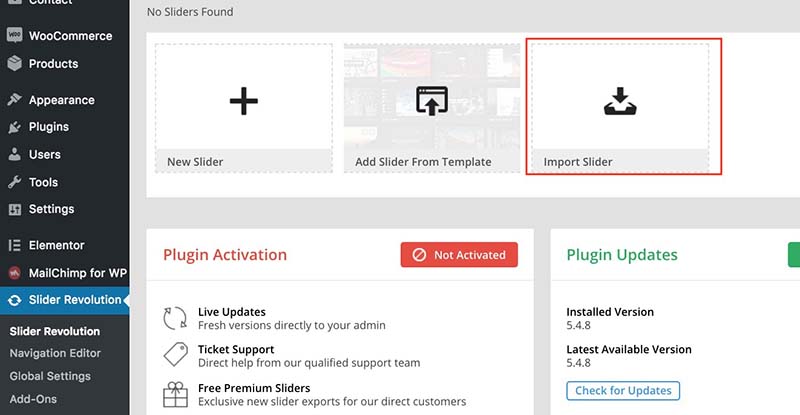
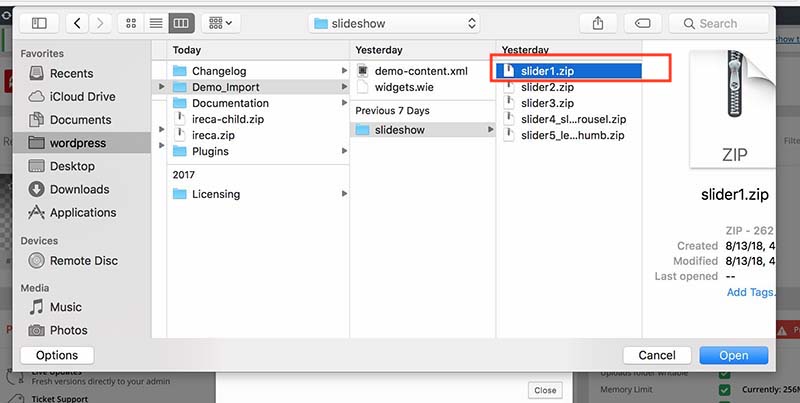
- 1.2: Import slideshow data
From Admin Menu click Slider Revolution >> Click Import Slider
Note you have to chooser slider to import with order slider1.zip, slider2.zip, slider3.zip, slider4_slidecarousel.zip, slider5_left_thumb.zip
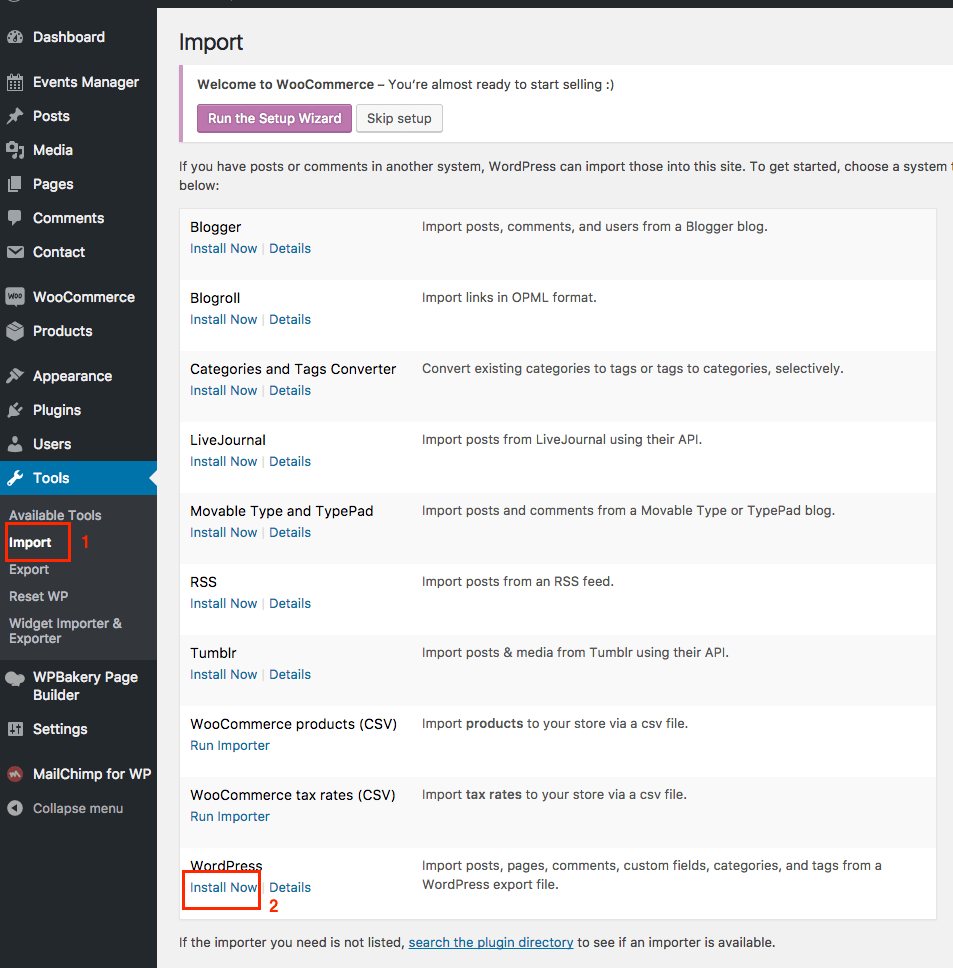
2: Manual Import
2.1: Import Content (Post, Page)
From Admin Menu click Tool >> Import >> Install Now
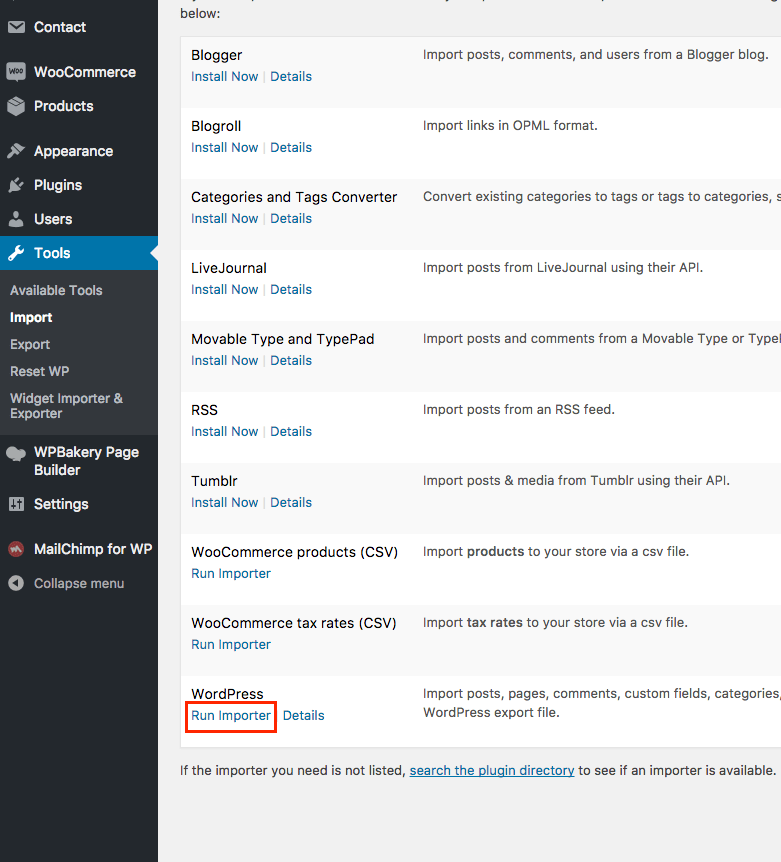

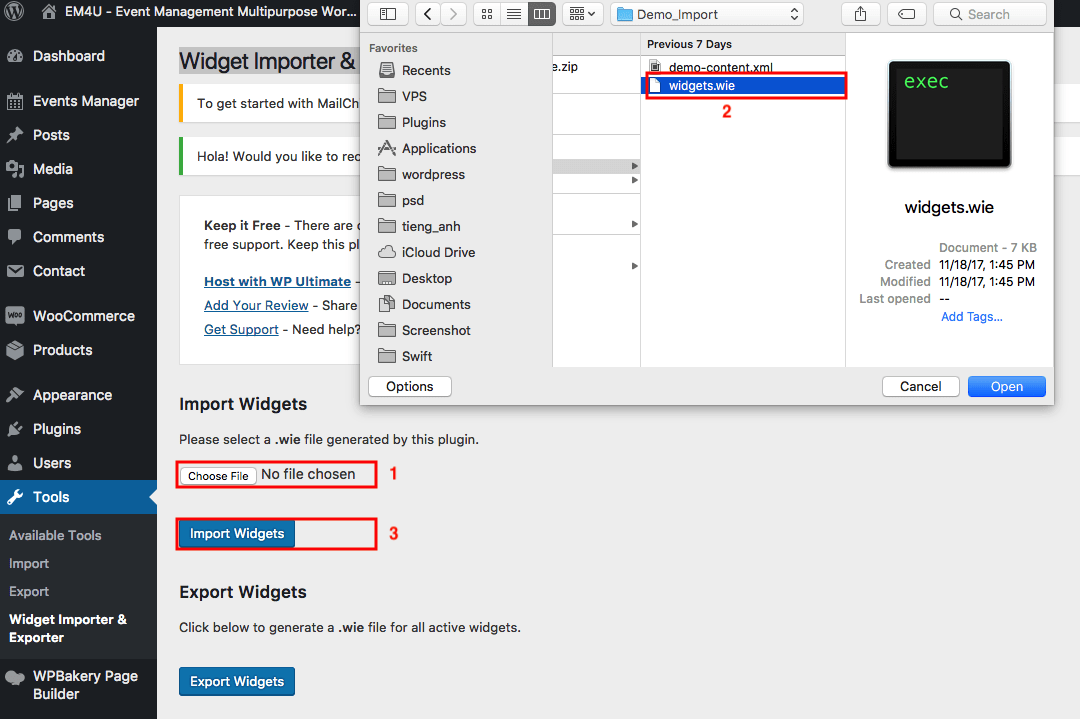
2.2 Import widget data: Tool >> Widget Importer & Exporter
2.3: Config Menu
From Admin Menu click Appearance >> Menus

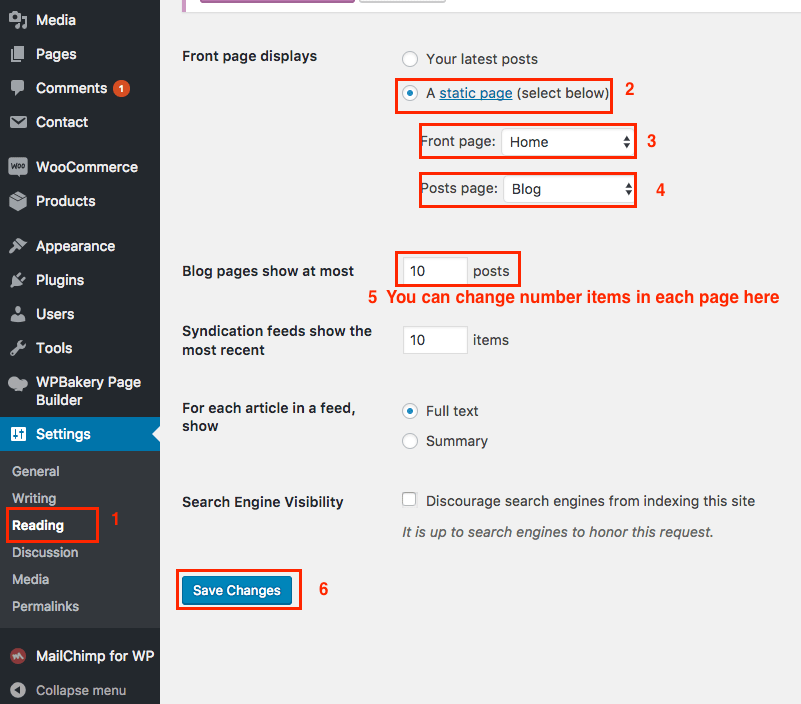
2.4: Choose Home Page and Blog Page
From Admin Menu click Seetings >> Reading
2.5: Import Slideshow data
From Admin Menu click Slider Revolution >> Click Import Slider
Note you have to chooser slider to import with order slider1.zip, slider2.zip, slider3.zip, slider4_slidecarousel.zip, slider5_left_thumb.zip
2.7 Go to frontend to enjoy your results !
Update Theme
1: Automatically updated the theme when a new version is released:
Read more : http://www.wpexplorer.com/envato-market-plugin-guide/
2: Update theme by manually via FTP or via WordPress Admin Panel :
Customize - Theme Option
Font, Color Theme
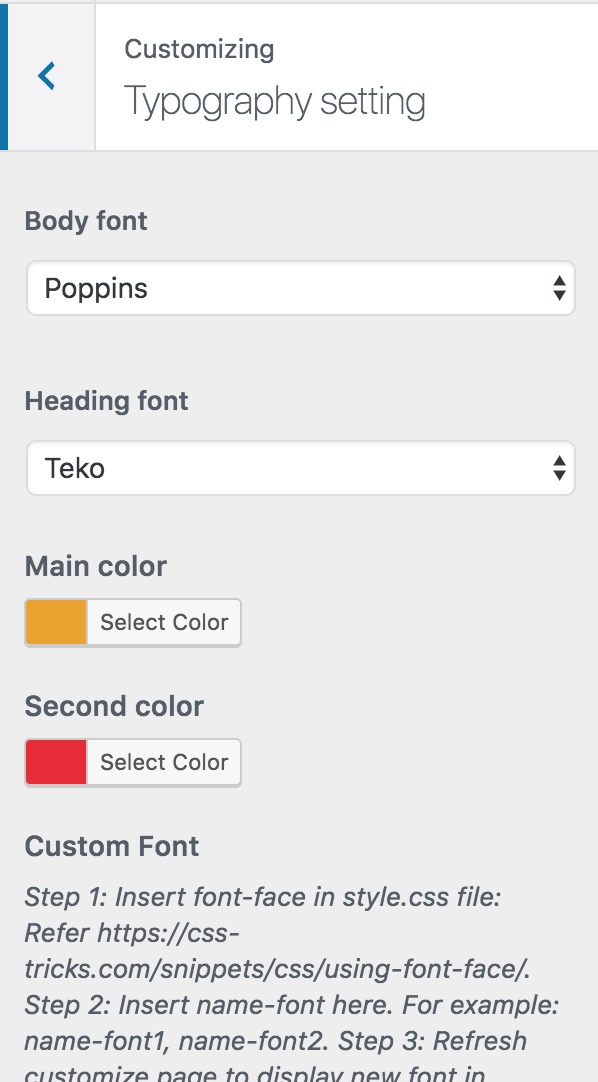
Appearance >> Customize >> Typography setting
- Body Font
- Heading Font
- Main color
- Second color
- Custom font
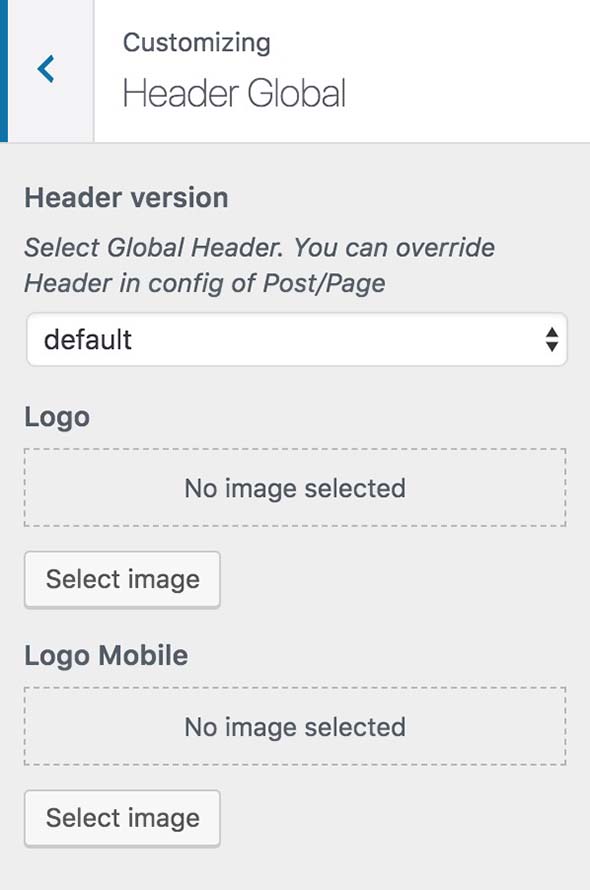
Header Style
Appearance >> Customize >> Header Global
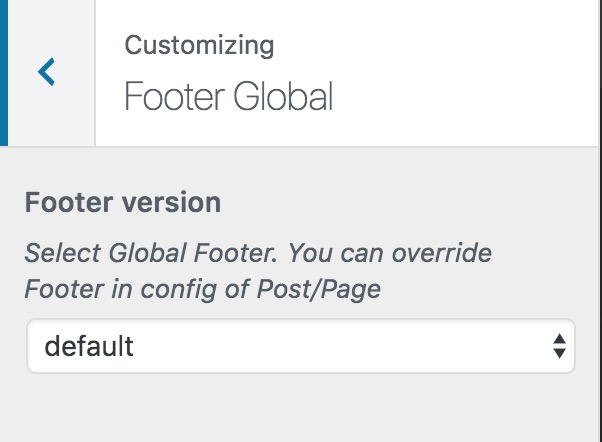
Footer
Appearance >> Customize >> Footer Global
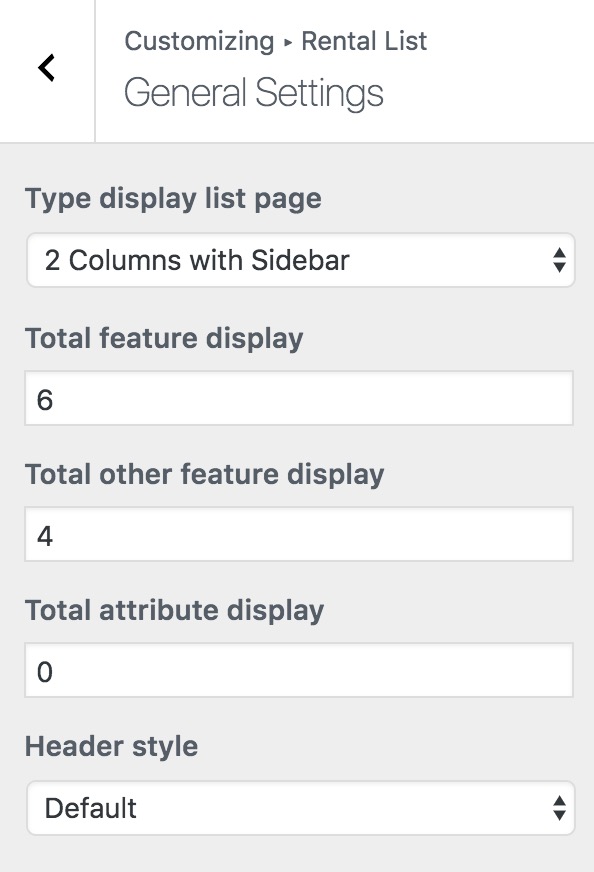
Rental Listing Settings
Appearance >> Customize >> Rental List
Config template for Category Rental
- Type display list papage:
+ 2 columns with sidebar
+ 3 columns no sidebar
+ Style 1 with sidebar
+ Style 2 with sidebar
+ Style 3 with sidebar
- Header style: Support 5 versions.
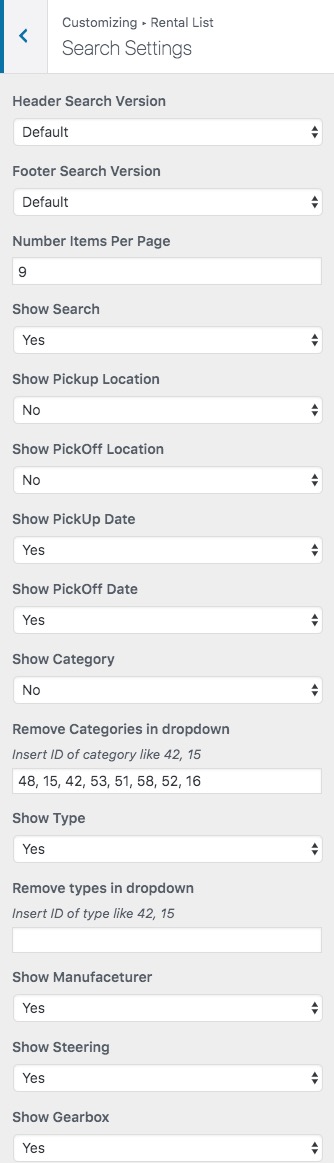
Config for Search section in Archive/Category Product
Detail Rental Settings
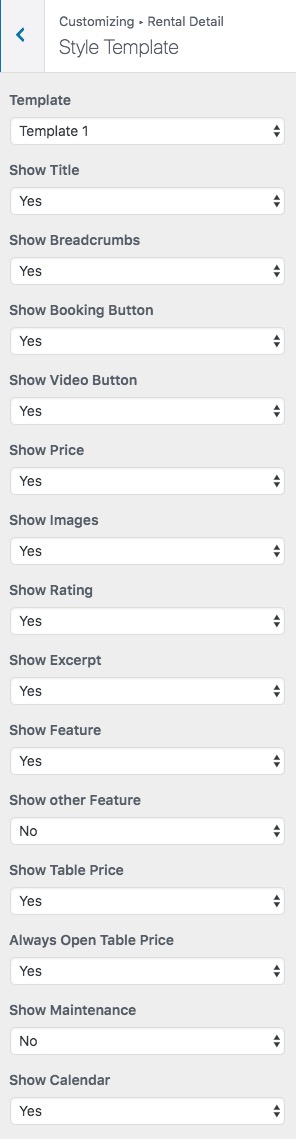
Appearance >> Customize >> Rental Detail >> Style Template
- You can choose Template 1 or 2
- Show/Hide fields:
+ Title
+ Breadcrumbs
+ Booking Button
+ Video Button
+ Price
+ Images
+ Excerpt
+ Feature
+ Table Price
+ Maintenance Vehicle
+ Calendar
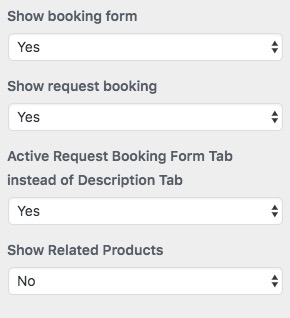
+ Booking Form
+ Request Booking Form
+ Related Products
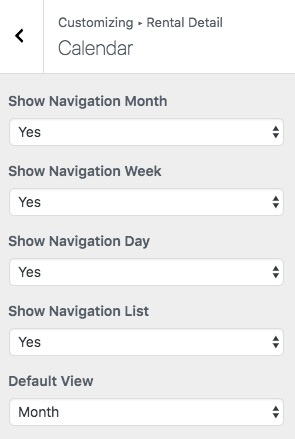
Appearance >> Customize >> Rental Detail >> Calendar
- Show/Hide fields:
+ Navigation Month
+ Navigation Week
+ Navigation Day
+ Navigation List
- Choose default view is Month / Week / Day / List
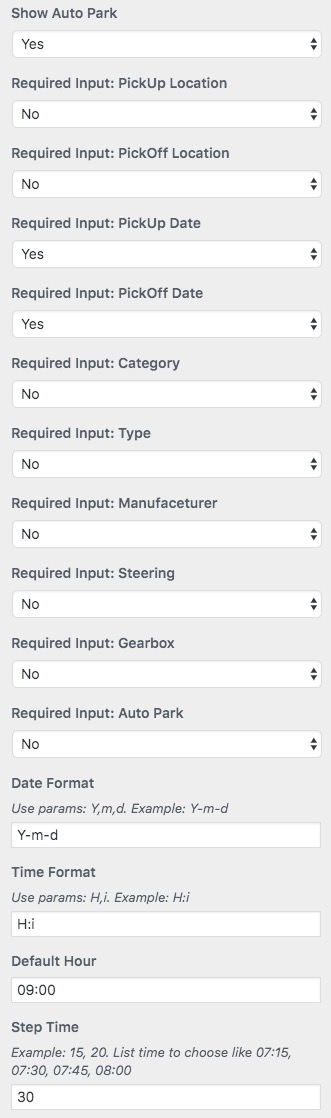
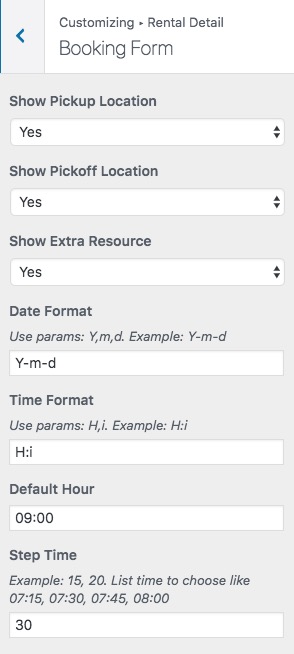
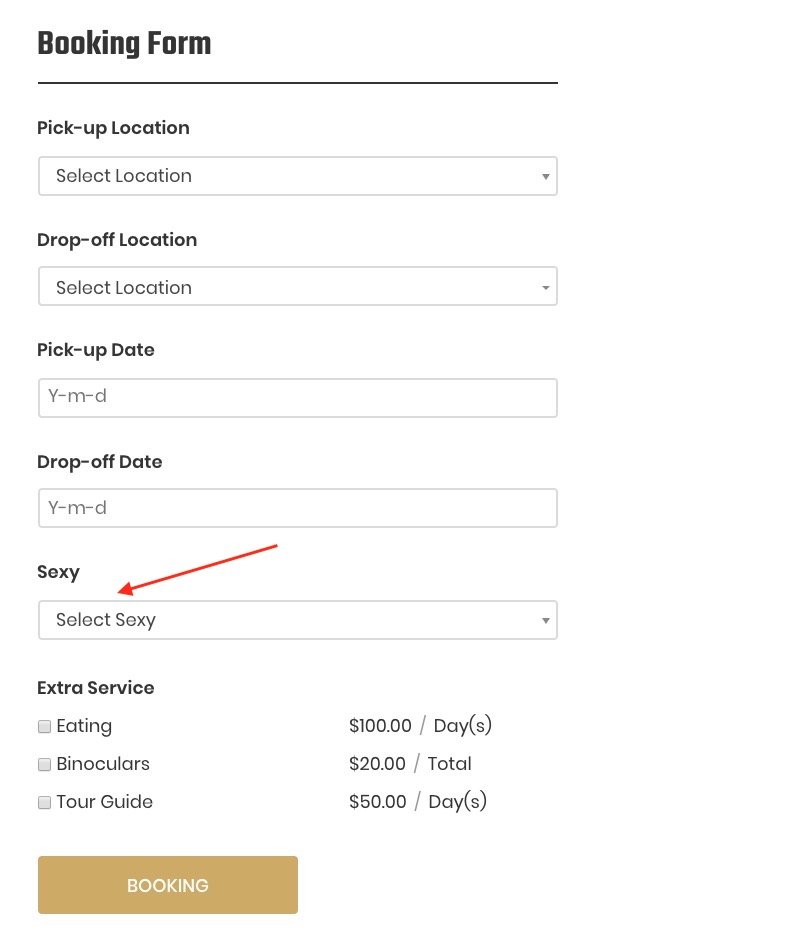
Appearance >> Customize >> Rental Detail >> Booking Form
- Show/Hide fields:
+ Pickup Location
+ Pickoff Location,
+ Extra Resource
- Choose Date Format
+ Choose Default Hour
+ Choose Step Time
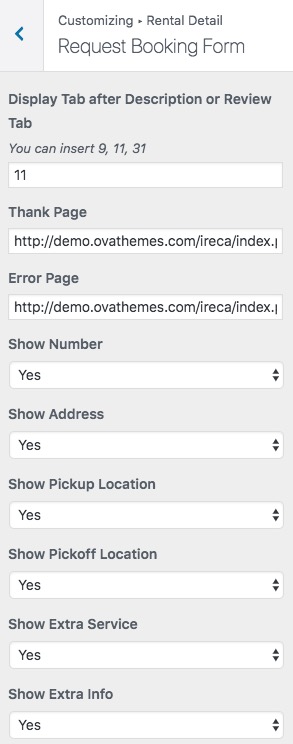
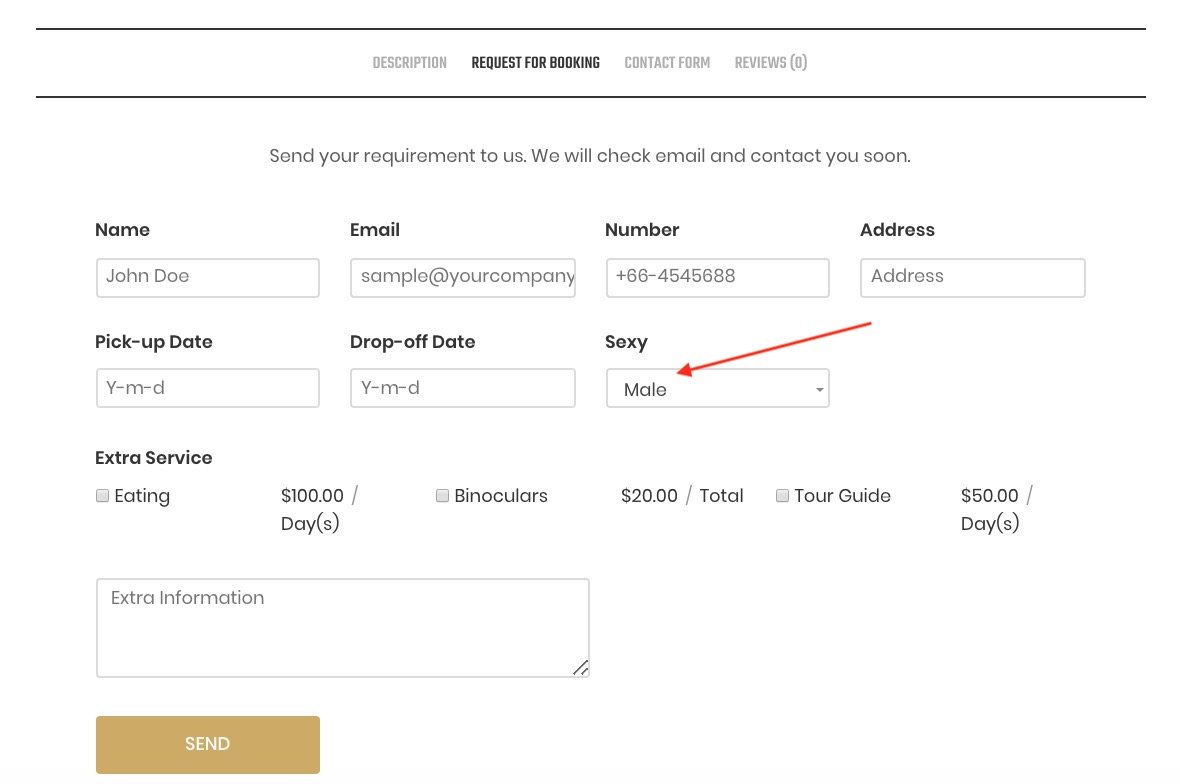
Appearance >> Customize >> Rental Detail >> Request Booking Form
- Show/Hide fields
+ Number
+ Addresss
+ Pickup Location
+ Pickoff Location
+ Extra Service
+ Extra Info
- Order tab in detail
- Thank page
- Error Page
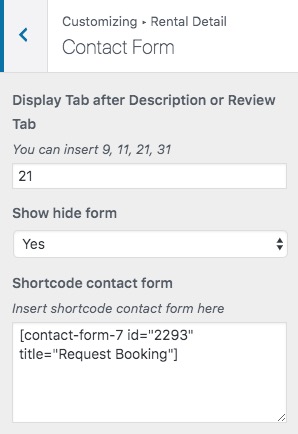
Appearance >> Customize >> Rental Detail >> Conact Form
- Display Tab position
- Show/hide Form
- Shortcode Contact Form 7: You can find in. Contact >> Contact Form
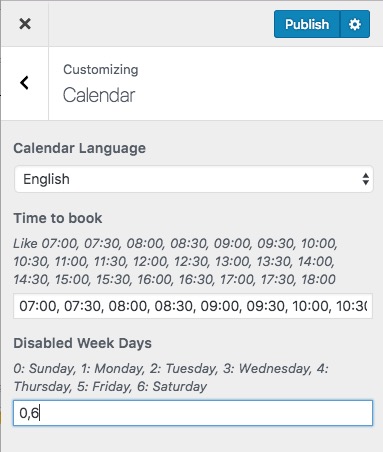
Calendar Search, Booking
You can choose Language, Special Time, Disable any day in week in Search, Booking Form.
Appearance >> Customize >> Calendar
- When the client booking a vehicle and choose Start date, End date will display this calendar. Remove 0,6 to display weekend.
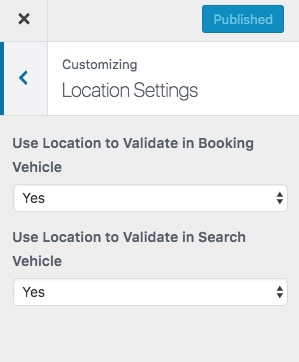
Locations
Appearance >> Customize >> Location Settings
Allow use Pickup Location, Drop off Location to validate Booking, Serach vehicle.
Google API Settings
You have to insert Google API Key to use Map
Appearance >> Customize >> Google API Settings

Layout Global
Appearance >> Customize >> Layout Global

Woocommerce Layout
Appearance >> Customize >> Woocommerce Setting

Make a Vehicle (Car, Boat, Motorbike...)
Follow 6 Sub-Menu bellow
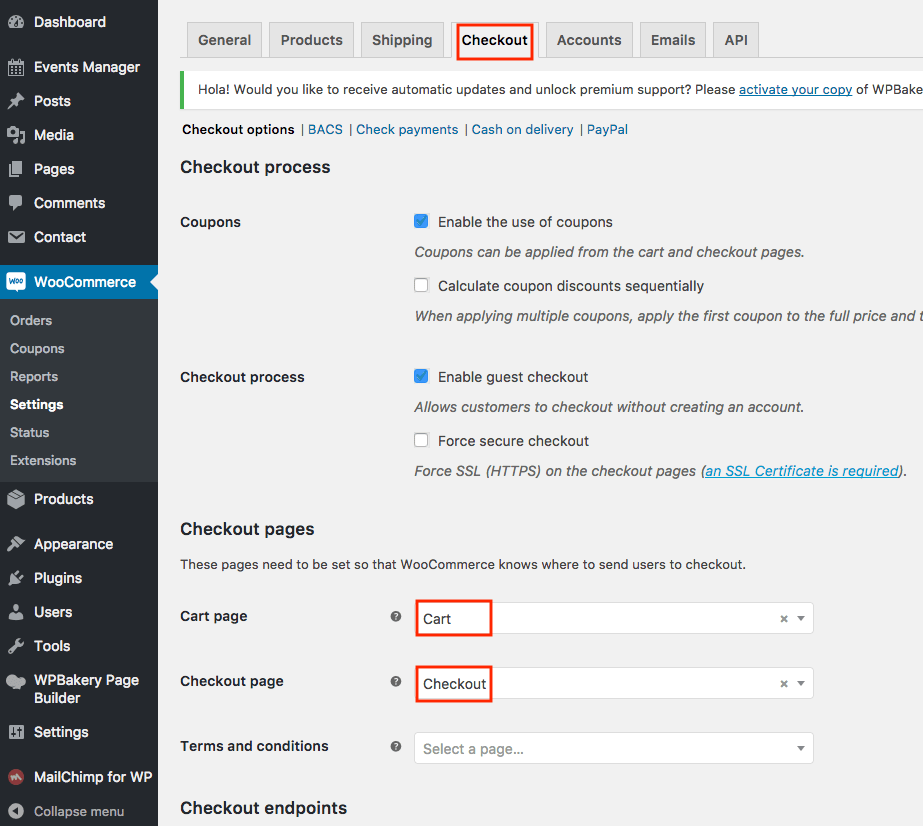
1: Config Woocommerce
Woocommerce >> Settings

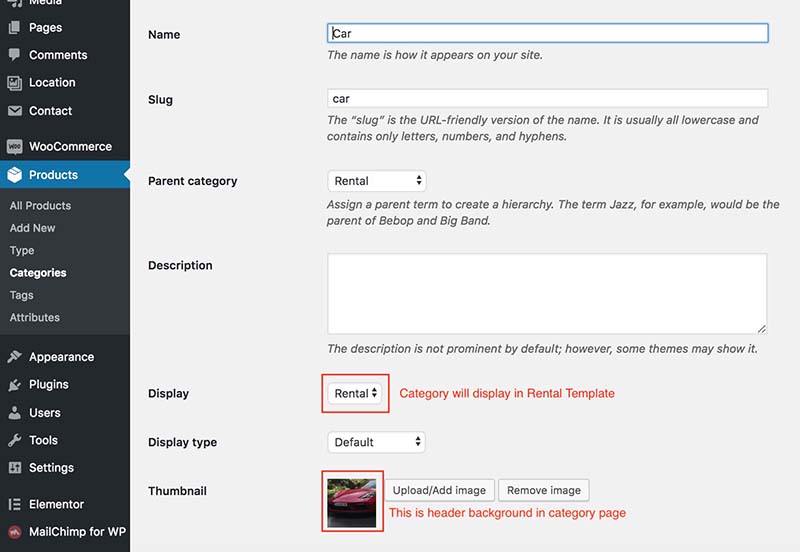
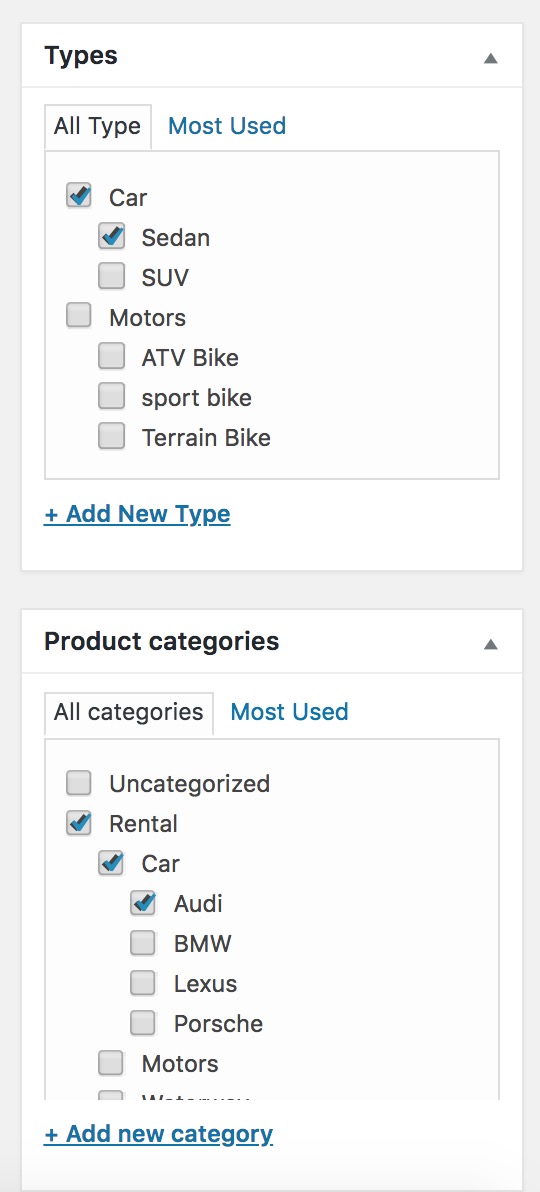
2: Make Category
Products >> Categories >> Add New
3: Make Type
Products >> Type >> Add New

4: Make Location
The location used when the clietn choose address for booking
Location >> Add New Locaiton >> Insert title
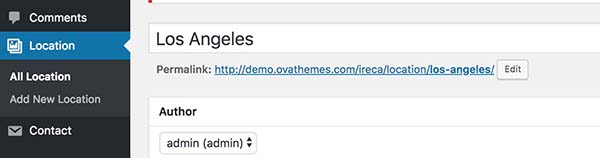
This location will used in ID Vehicle
5: Make ID Vehicle (Number Plate)
Allow Choose Location in a ID Vehicle . That will used when make a vehicle
Add Address to display Vehicle in Map
Setup Unavailable Time

6: Make a Vehicle
Products >> Add New
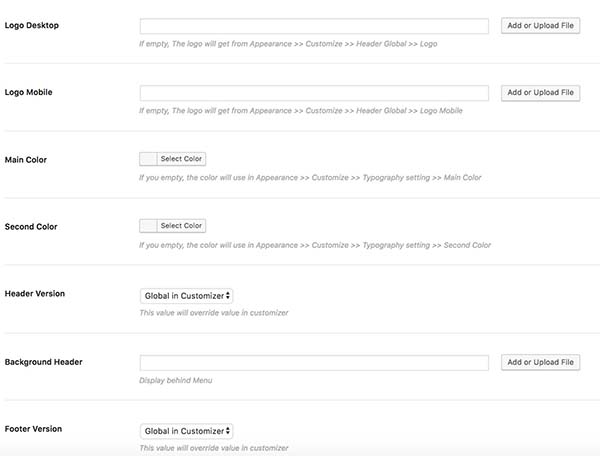
- Some Settings for Vehicle
+ Add new logo desktop for this product
+ Add new logo mobile for this product
+ Main color for this product
+ Second color for this product
+ Chooser Header Version for this product
+ Chooser Footer Version for this product
+ Chooser Background Header for this product
- Choose Type
- Choose Category
- Choose Tag
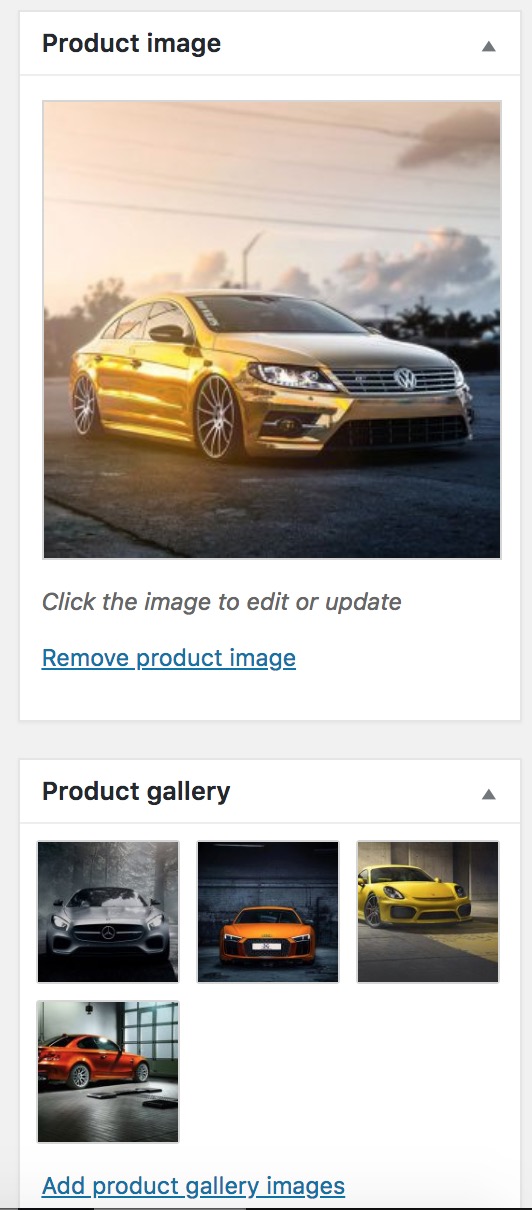
- Choose Product Image
- Chooser Gallery Images
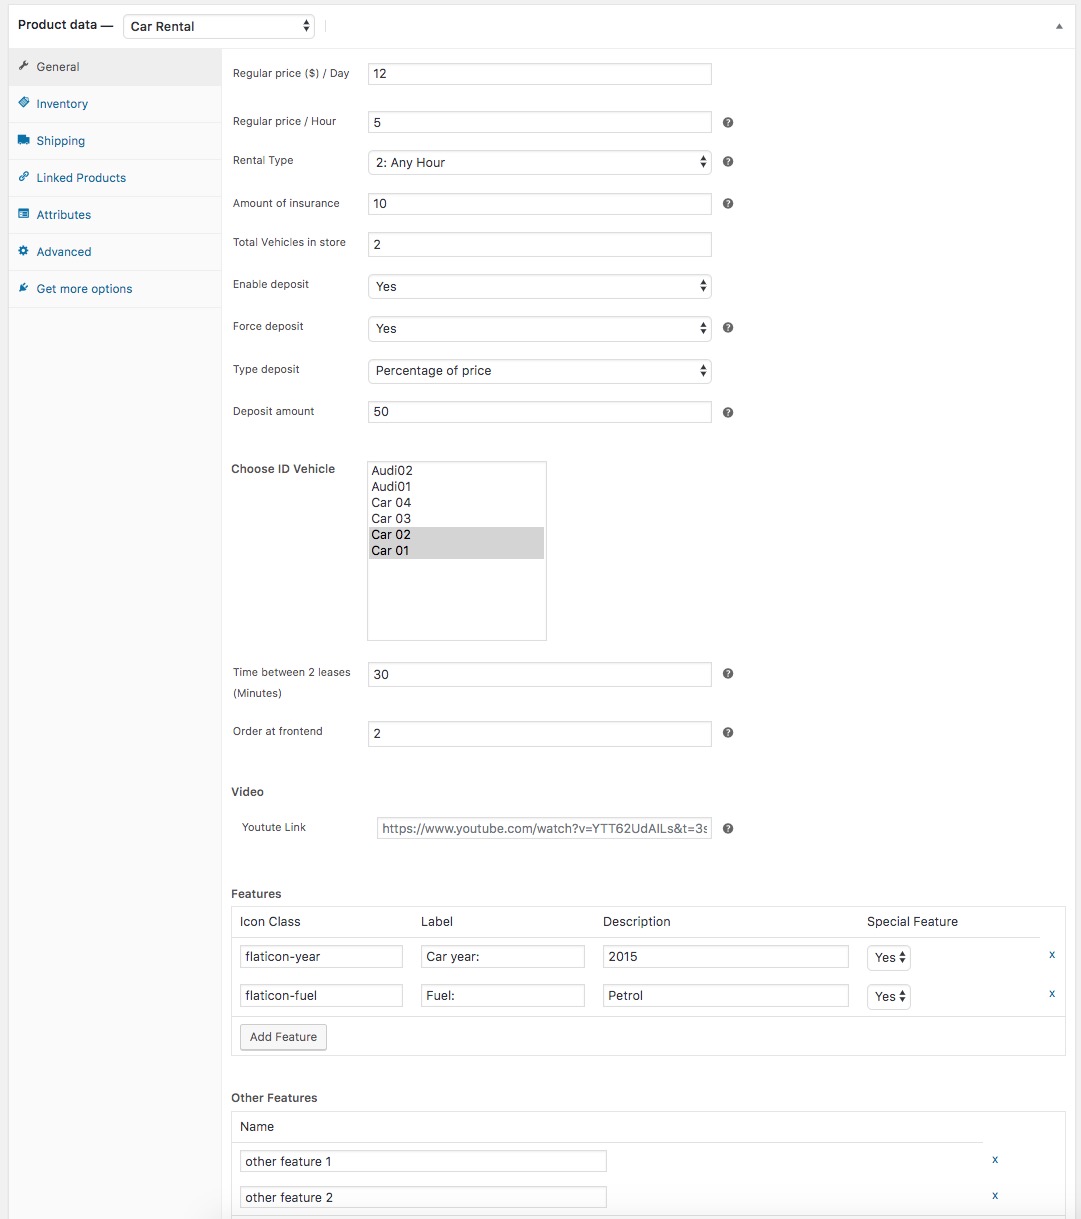
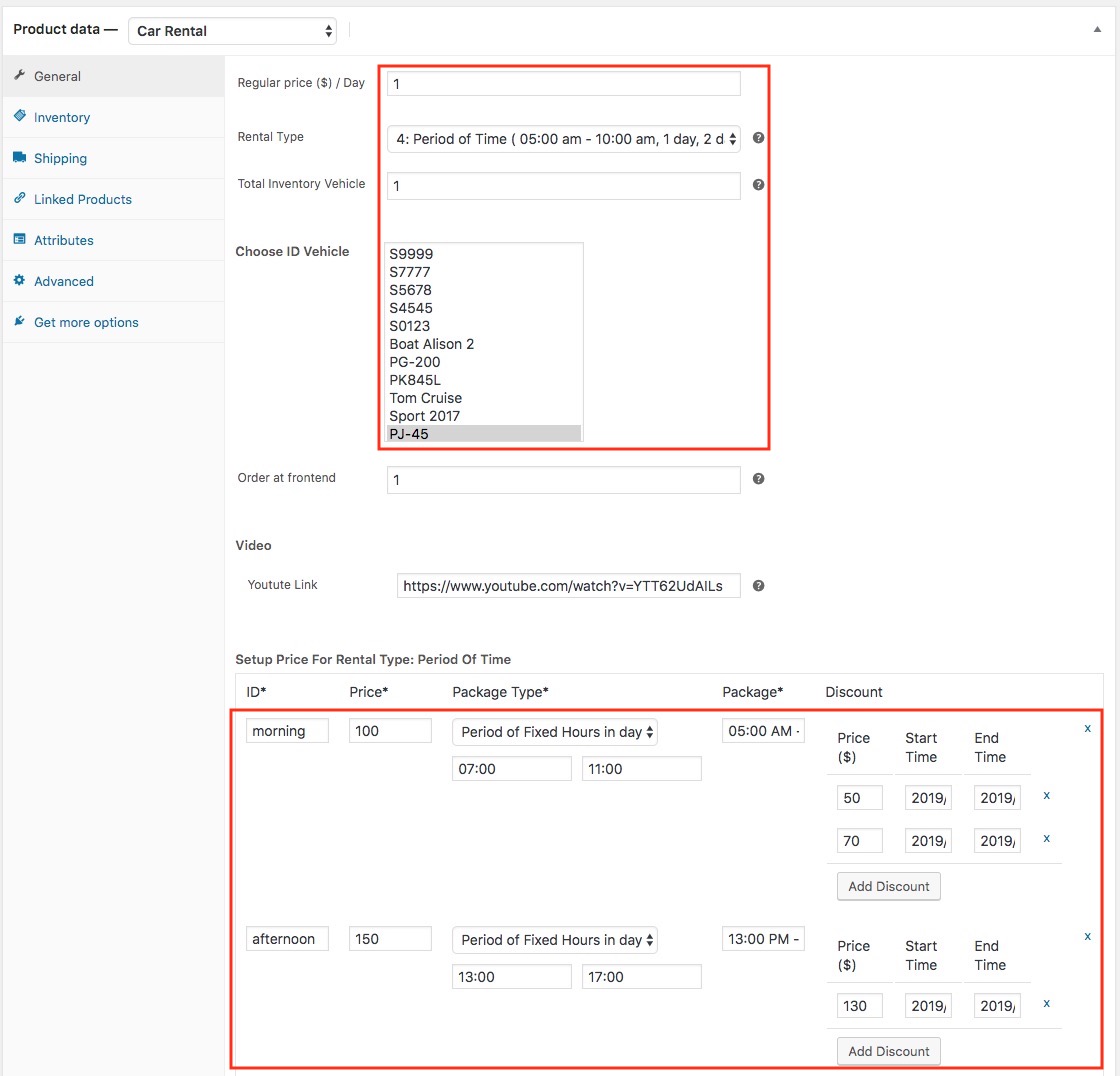
- Choose Product Data is Car Rental
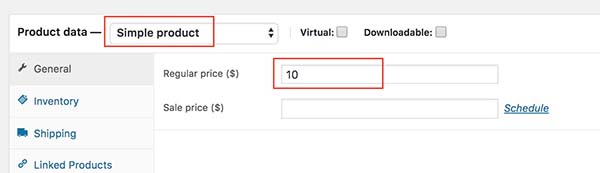
Global Price
+ If you choose Price Type is Day, you only need to insert price for Regular price / Day
+ If you choose Price Type is Hour, you have to insert price in 2 fields : Regular price / Day, Regular price / Hour because the search or filter will use Regular price / Day field to compare.
+ If you choose Price Type is Mixed, you have to insert price in 2 fields : Regular price / Day, Regular price / Hour
If the rental period is less than 24 hours, the system will get price by hour else price by day
Amount of insurance (option):
+ When booking the customer have to pay insurance for vehicle. When the customer completed trip and delivery vehicle the admin will return again insurance to customer.
Enable deposit:
+ Choose Yes/No
Force deposit: Yes/No
+ Yes: Allow choose Full Amount to payment
+ No: Only allow to pay amount deposit.
Type deposit:
+ Percentage of price
+ Fixed Value
Depost amount
+ Number percent or Number amount
Contact Form 7:
+ Insert shortcode to display contact form allow booking a vehicle
Inventory Vehicle (Total Number Vehicle)
+ If you have total 2 vehicle, you have to insert 2 code (number plate) in Number Plate field.
Like bellow example: Inventory Vehicle : 2 , Number Plate is L-101, L-102
Order at frontend: This field use in some Order item at frontend
Video: Insert link video
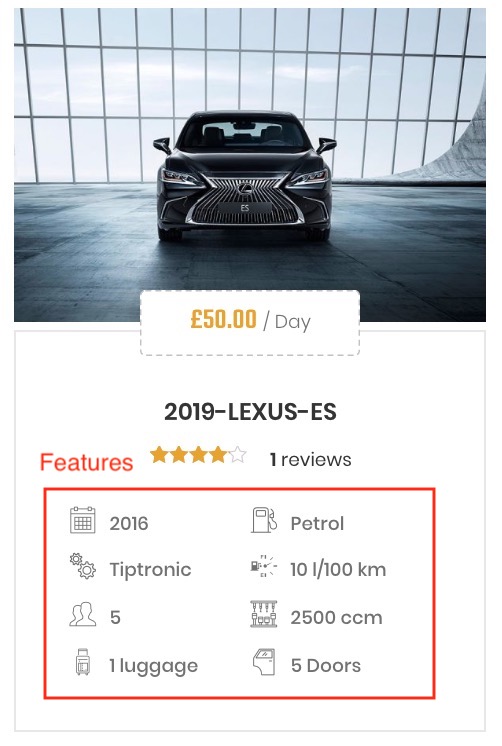
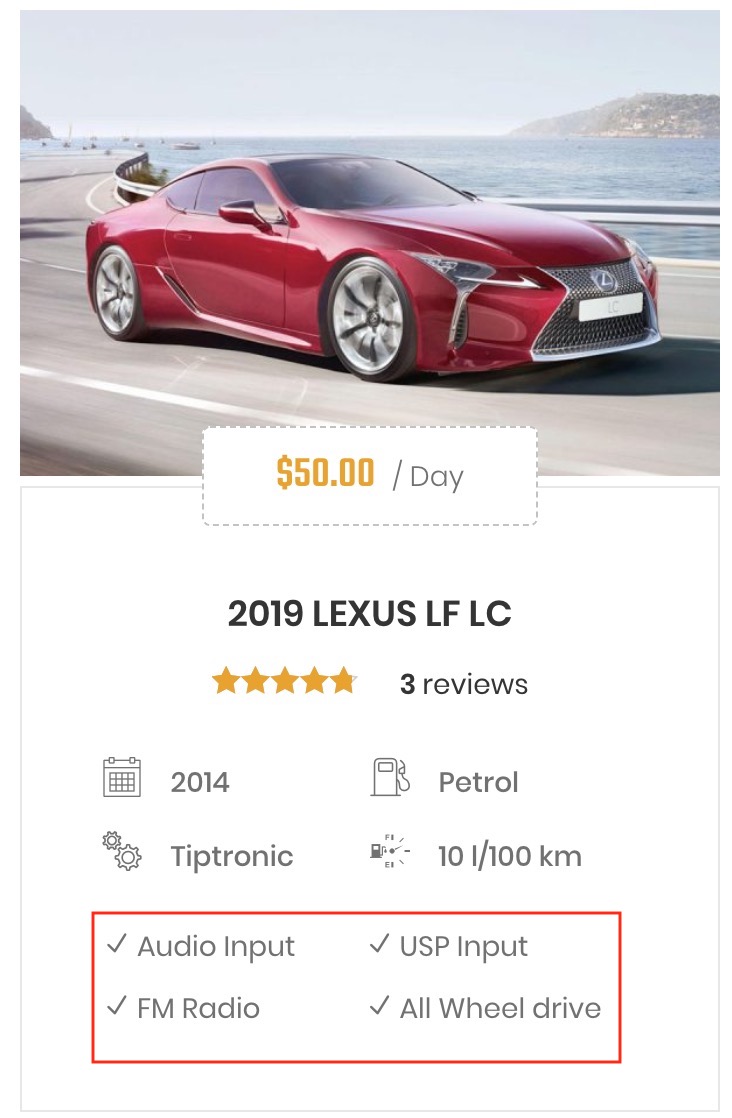
Features: Unlimited adding feature
+ If Special Feature you choose Yes, You will see it at frontend in List Category or some elementors: Product Filter, Product Slider
+ You will see all features in Detail Vehicle
+ Icon Class: You can insert Fontawesome, Flaticon, Elegant
Other Features: Unlimited adding other feature
You will see in list category and detail als some elementors
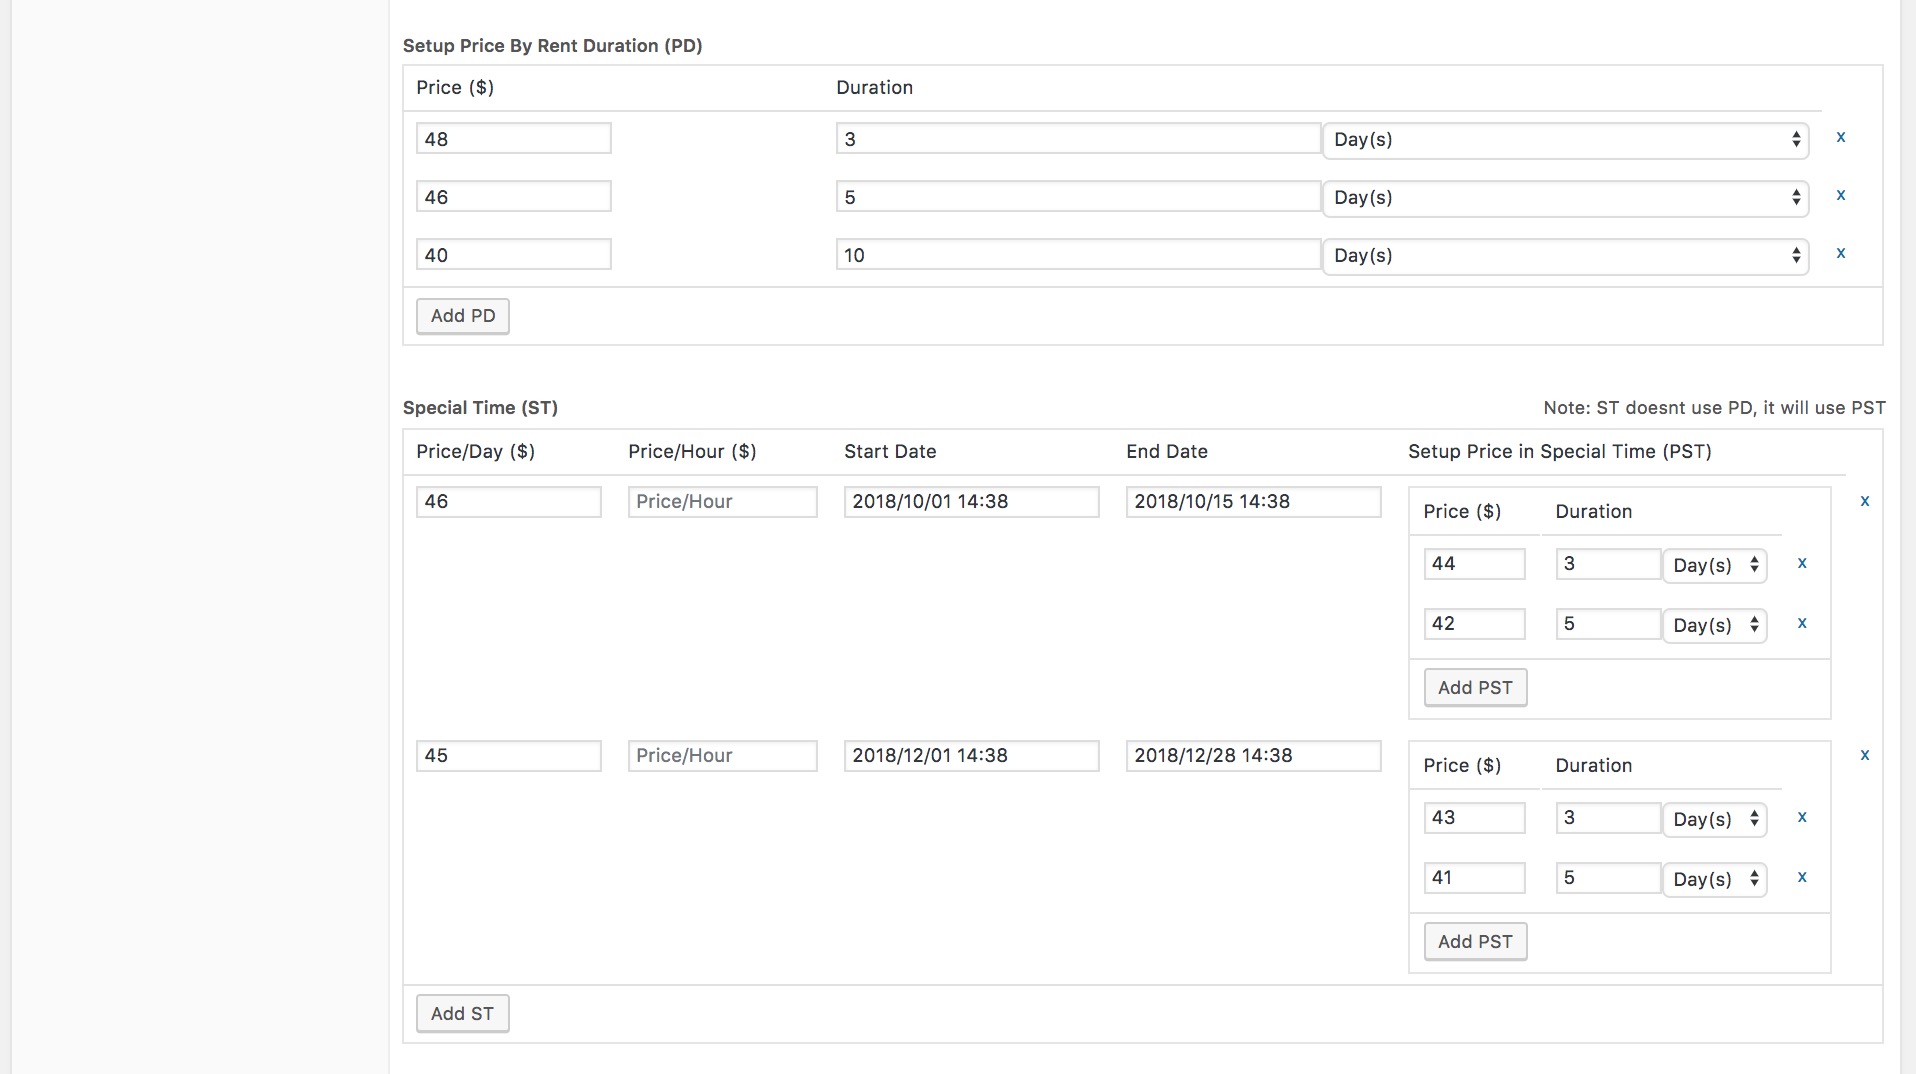
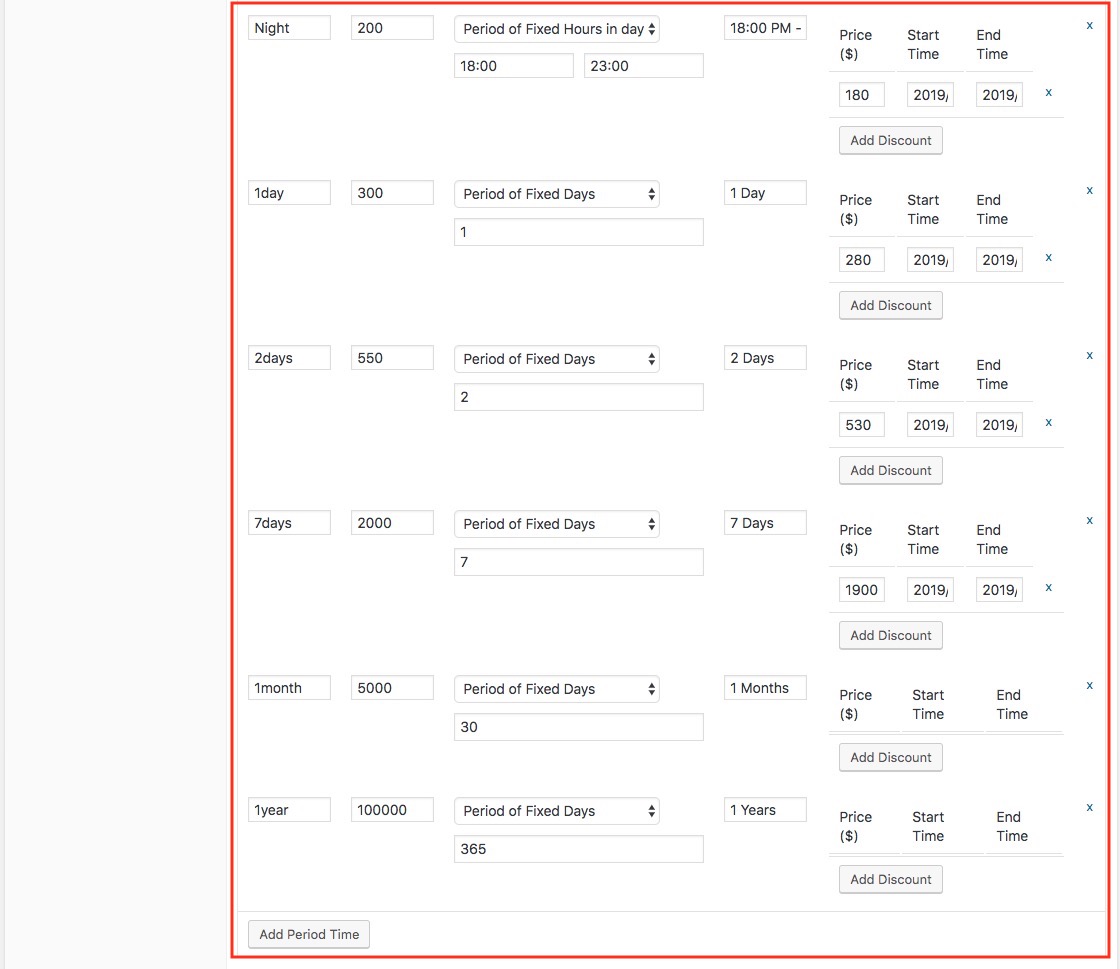
Setup Price by Rent Duration: You can set the discount on the Rental Duration.
Setup Price by Special Time: It is time in year like holiday season, festival
+ You can setup discount with Rental Duration for this time.
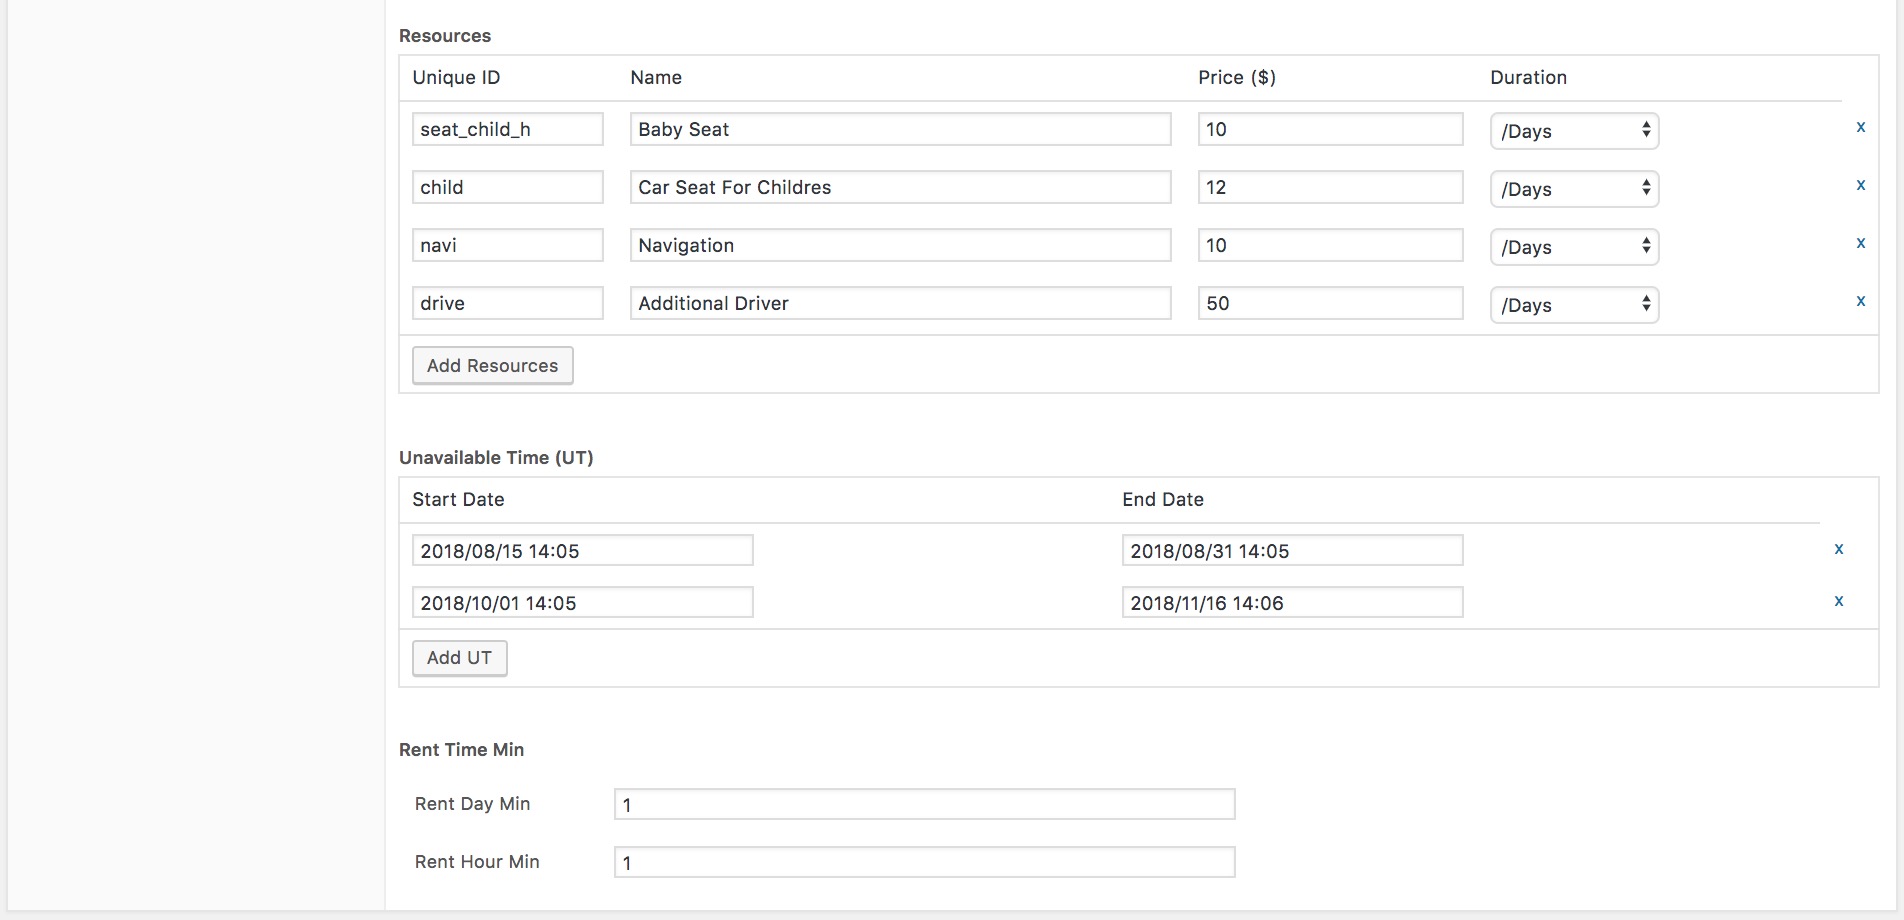
Resources: Unlimited adding Resources
+ Unique_ID: english, not space
+ Duration: Support Day, Hour, Total
Unavailable time: It only for case Inventory (total number) vehicle is 1.
+ The guest can't rent vehicle on this time like time maintenance
Rent time min: You can request a minimum rental period for day, hour
This is image in backend

- How to setup Package Like here:
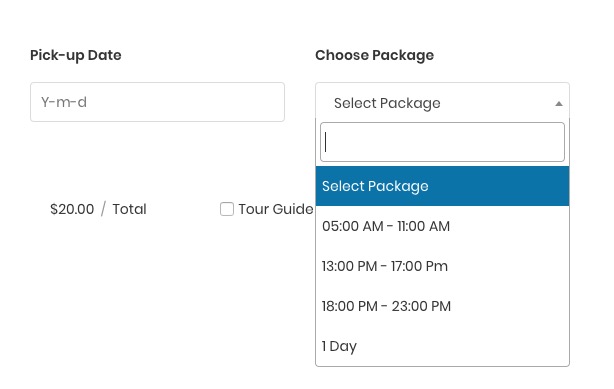
- You have to choose Rental Type: 4: Period Of Time (05:00am - 10:00 am, 1 day, 2 say)
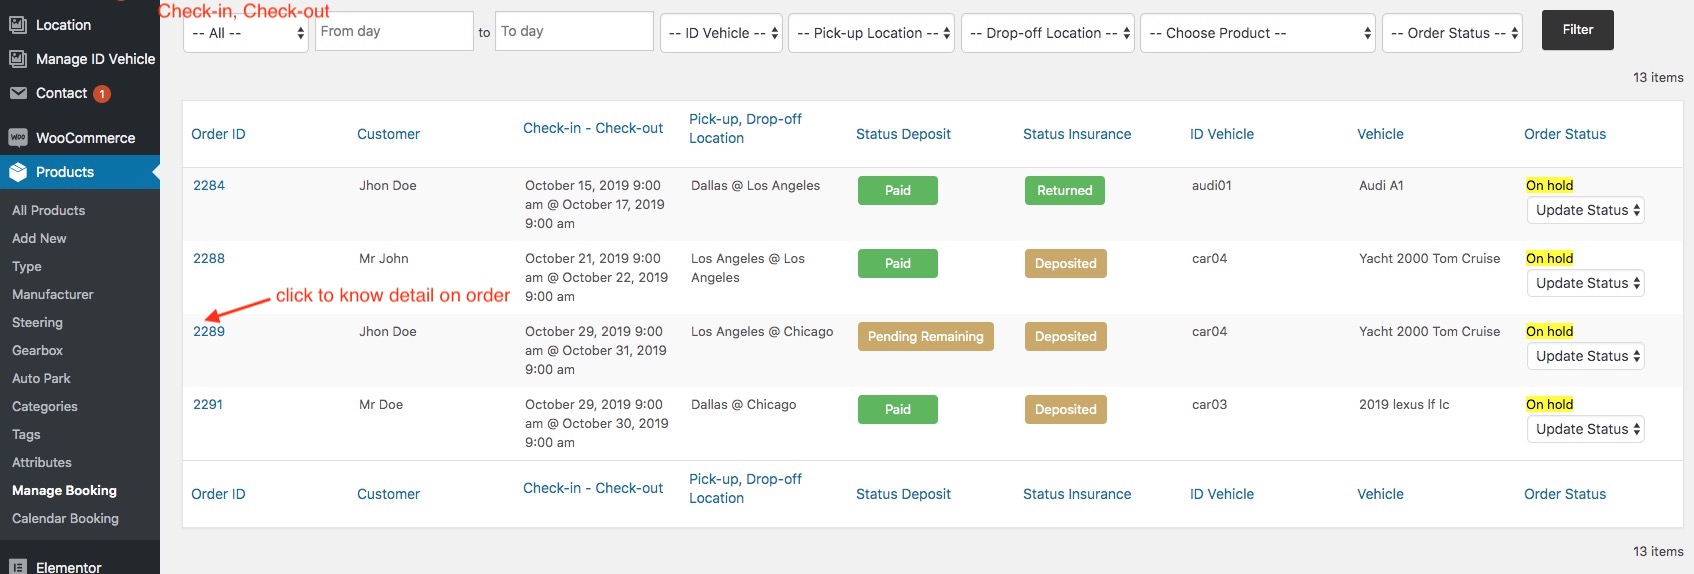
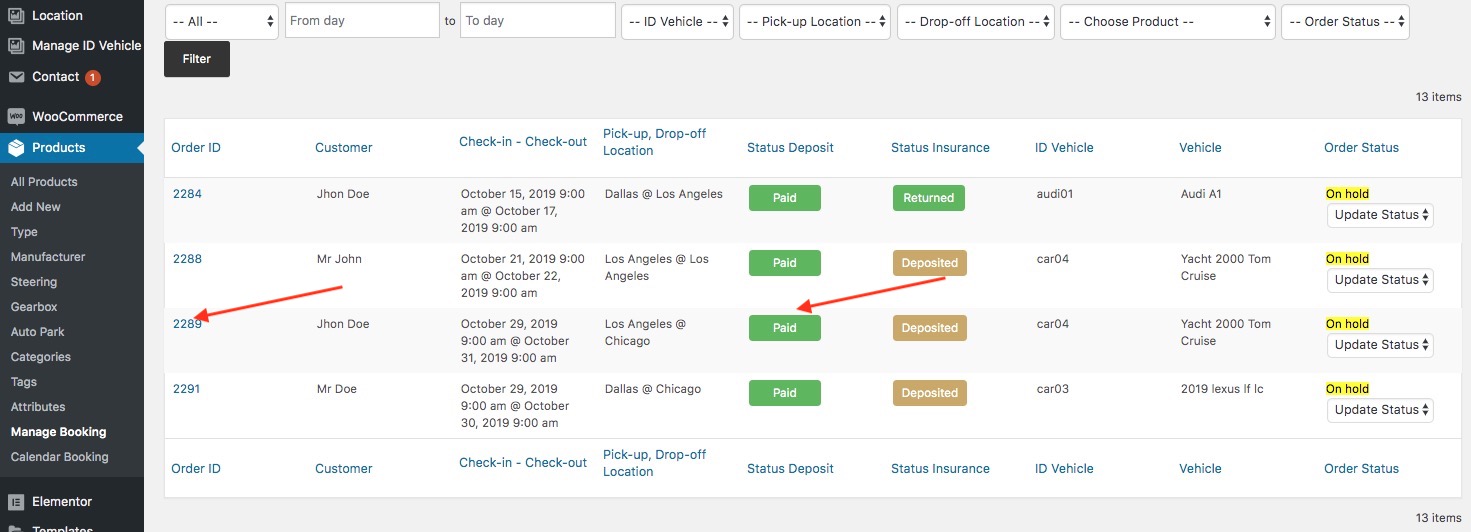
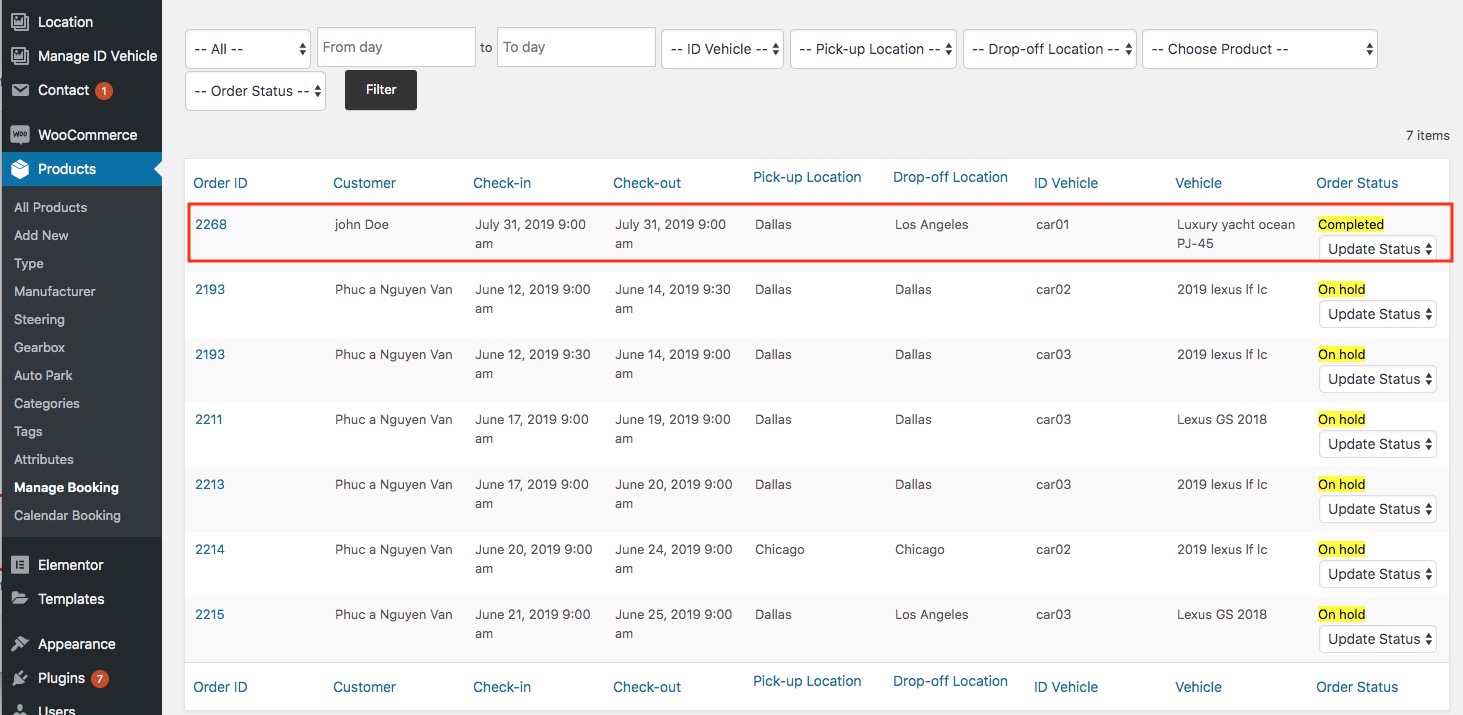
7: Manage Booking
Go to Products >> Manage Booking
- Filter date by:
+ Check in date
+ Check out date
+ From day .... To day
+ ID Vehicle
+ PickUp Location
+ PickOff Location
+ Vehicle Name
+ Order Status: Completed, Processing, On Hold, Cancel
- Allow you update Order Status to Completed, Processing, On Hold, Cancel
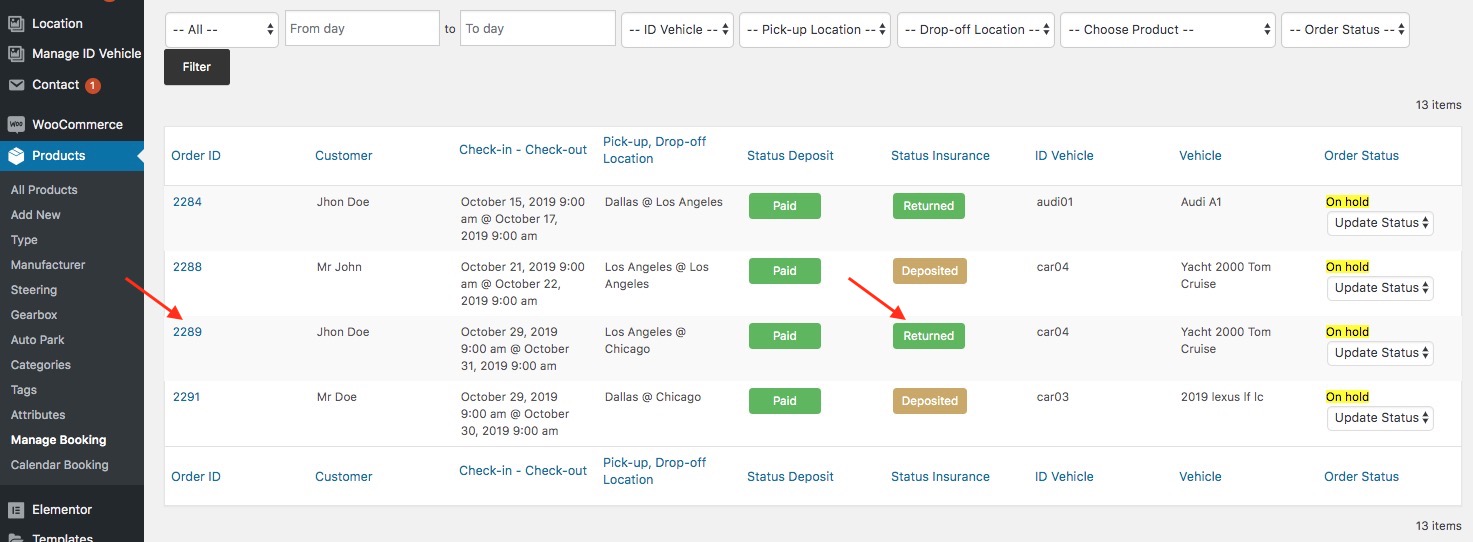
- Status Deposit:
+ Paid: Pay full amount o total order
+ Pending Remaining: pay 1 part (deposit) and pending to pay remaining
- Status Insurance
+ Deposited: The customer deposited insurance to rent vehicle.
+ Returned: The agency returned insurance to customer after the customer completed trip
- Order ID: Click to know detail of an order that store in Woocommerce Order
- How to update Deposit for payment 2nd time ?
The customer booking a vehicle and deposit (example 50% total amount), the customer to agency to receive vehicle and pay remaining amount. You will find info of customer in above Manage Booking and click Order ID, you will see detail in order like here:
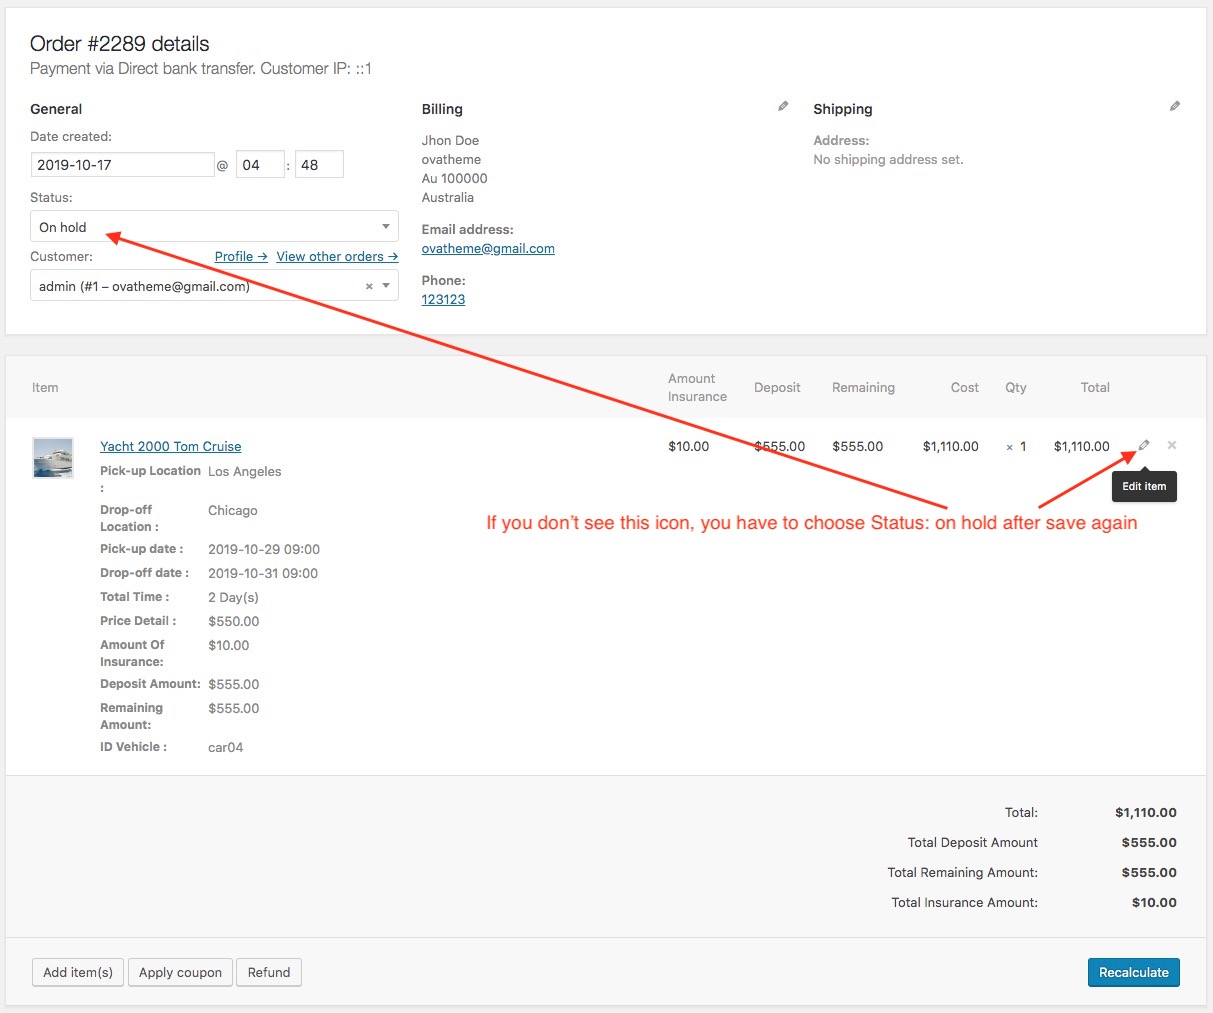
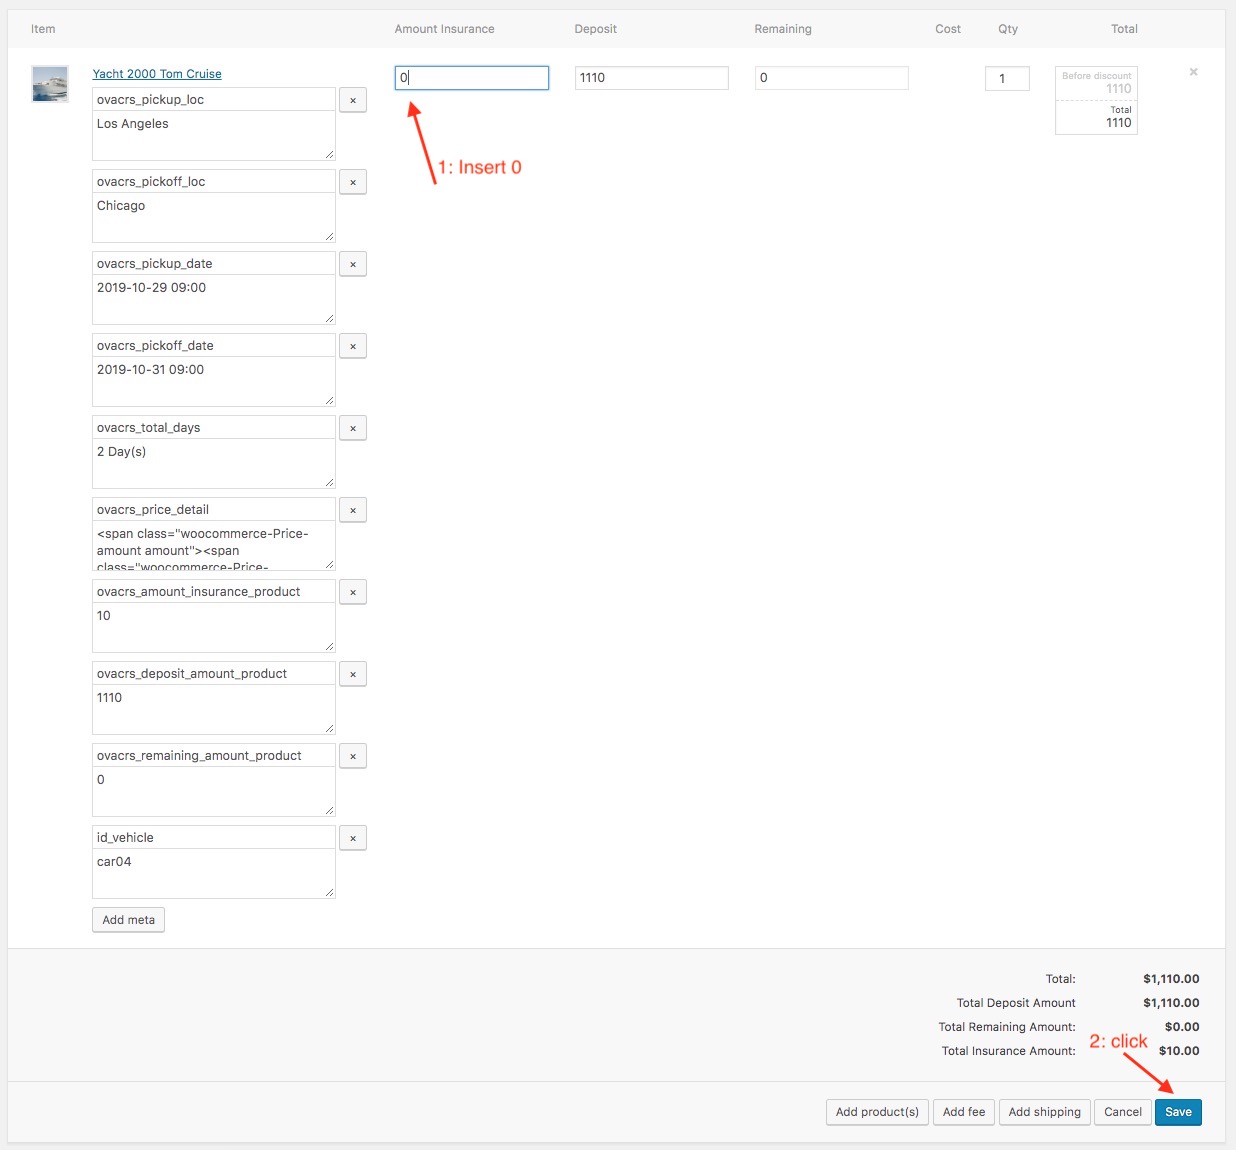
After you will edit Depost field:

After you will see Order updated
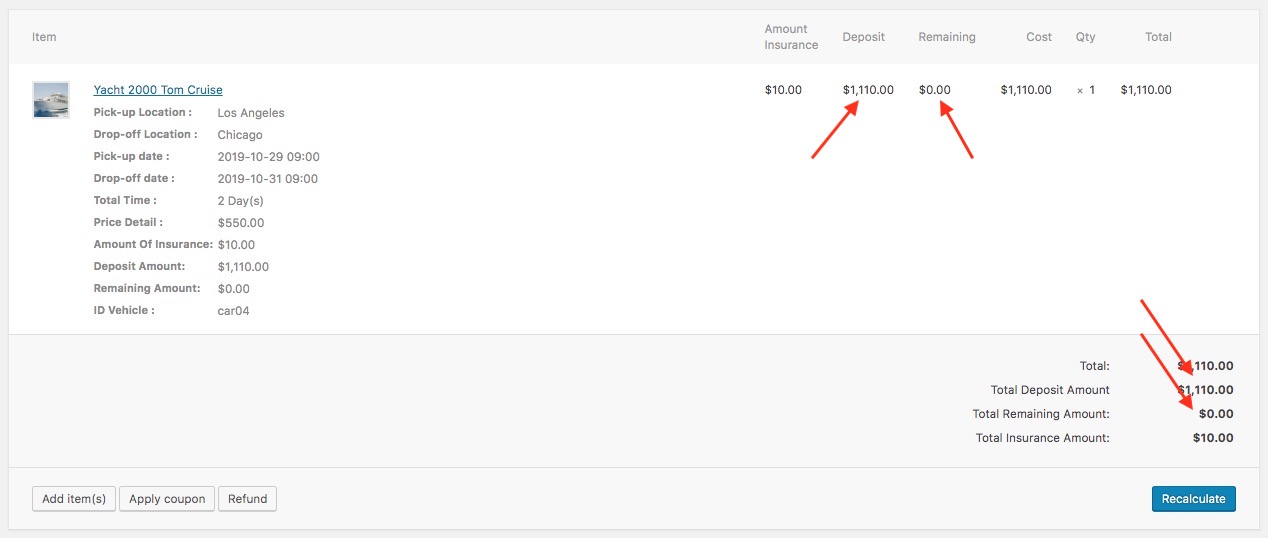
Go to to Manage Booking to check status Deposit
- How to update for returning insurance to customer ?
You click Order detail and edit insurance. Note: The insurance field only can edit when remaining is zero
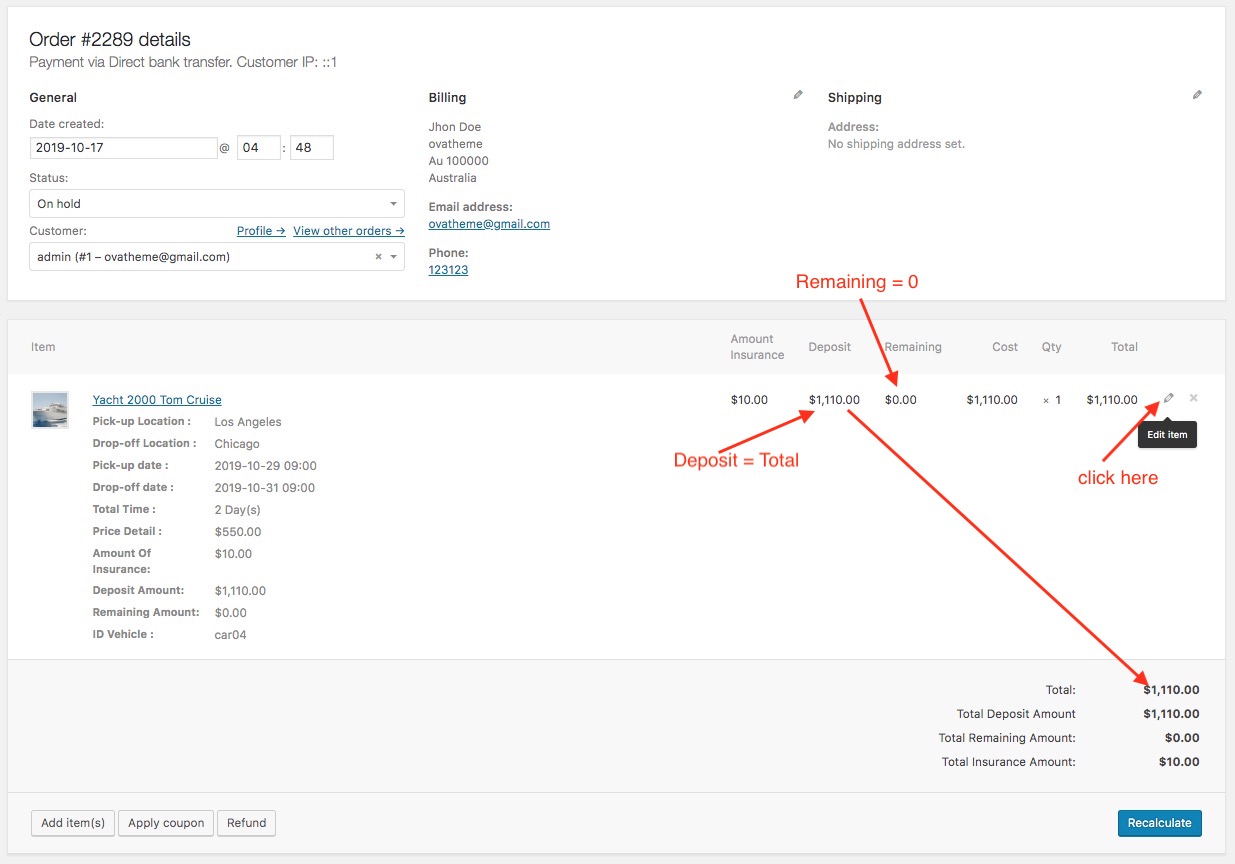

Go to Manage Booking to view
Create Manual a Booking
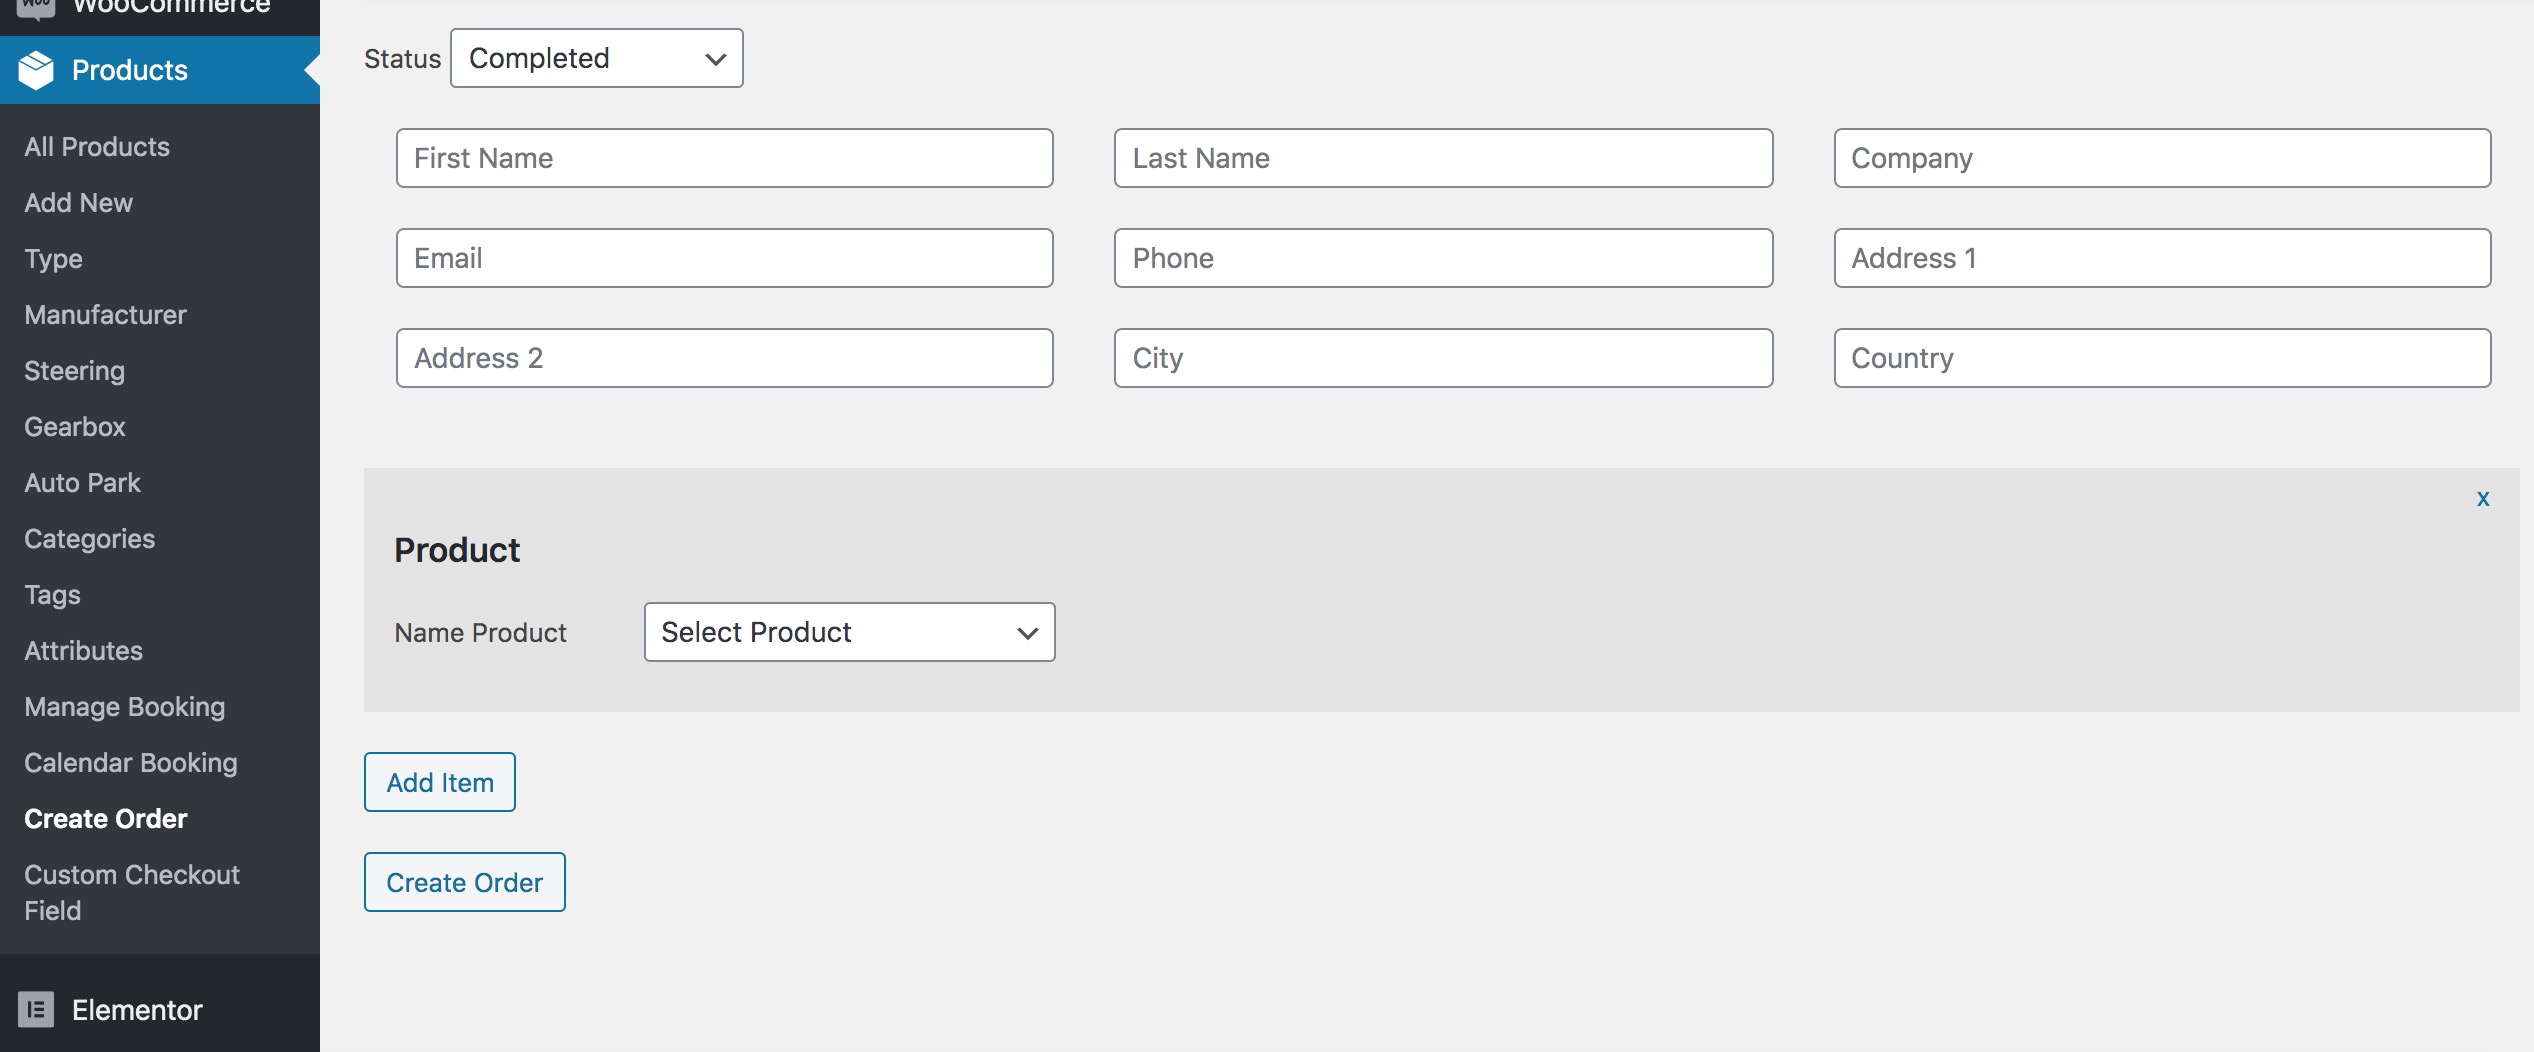
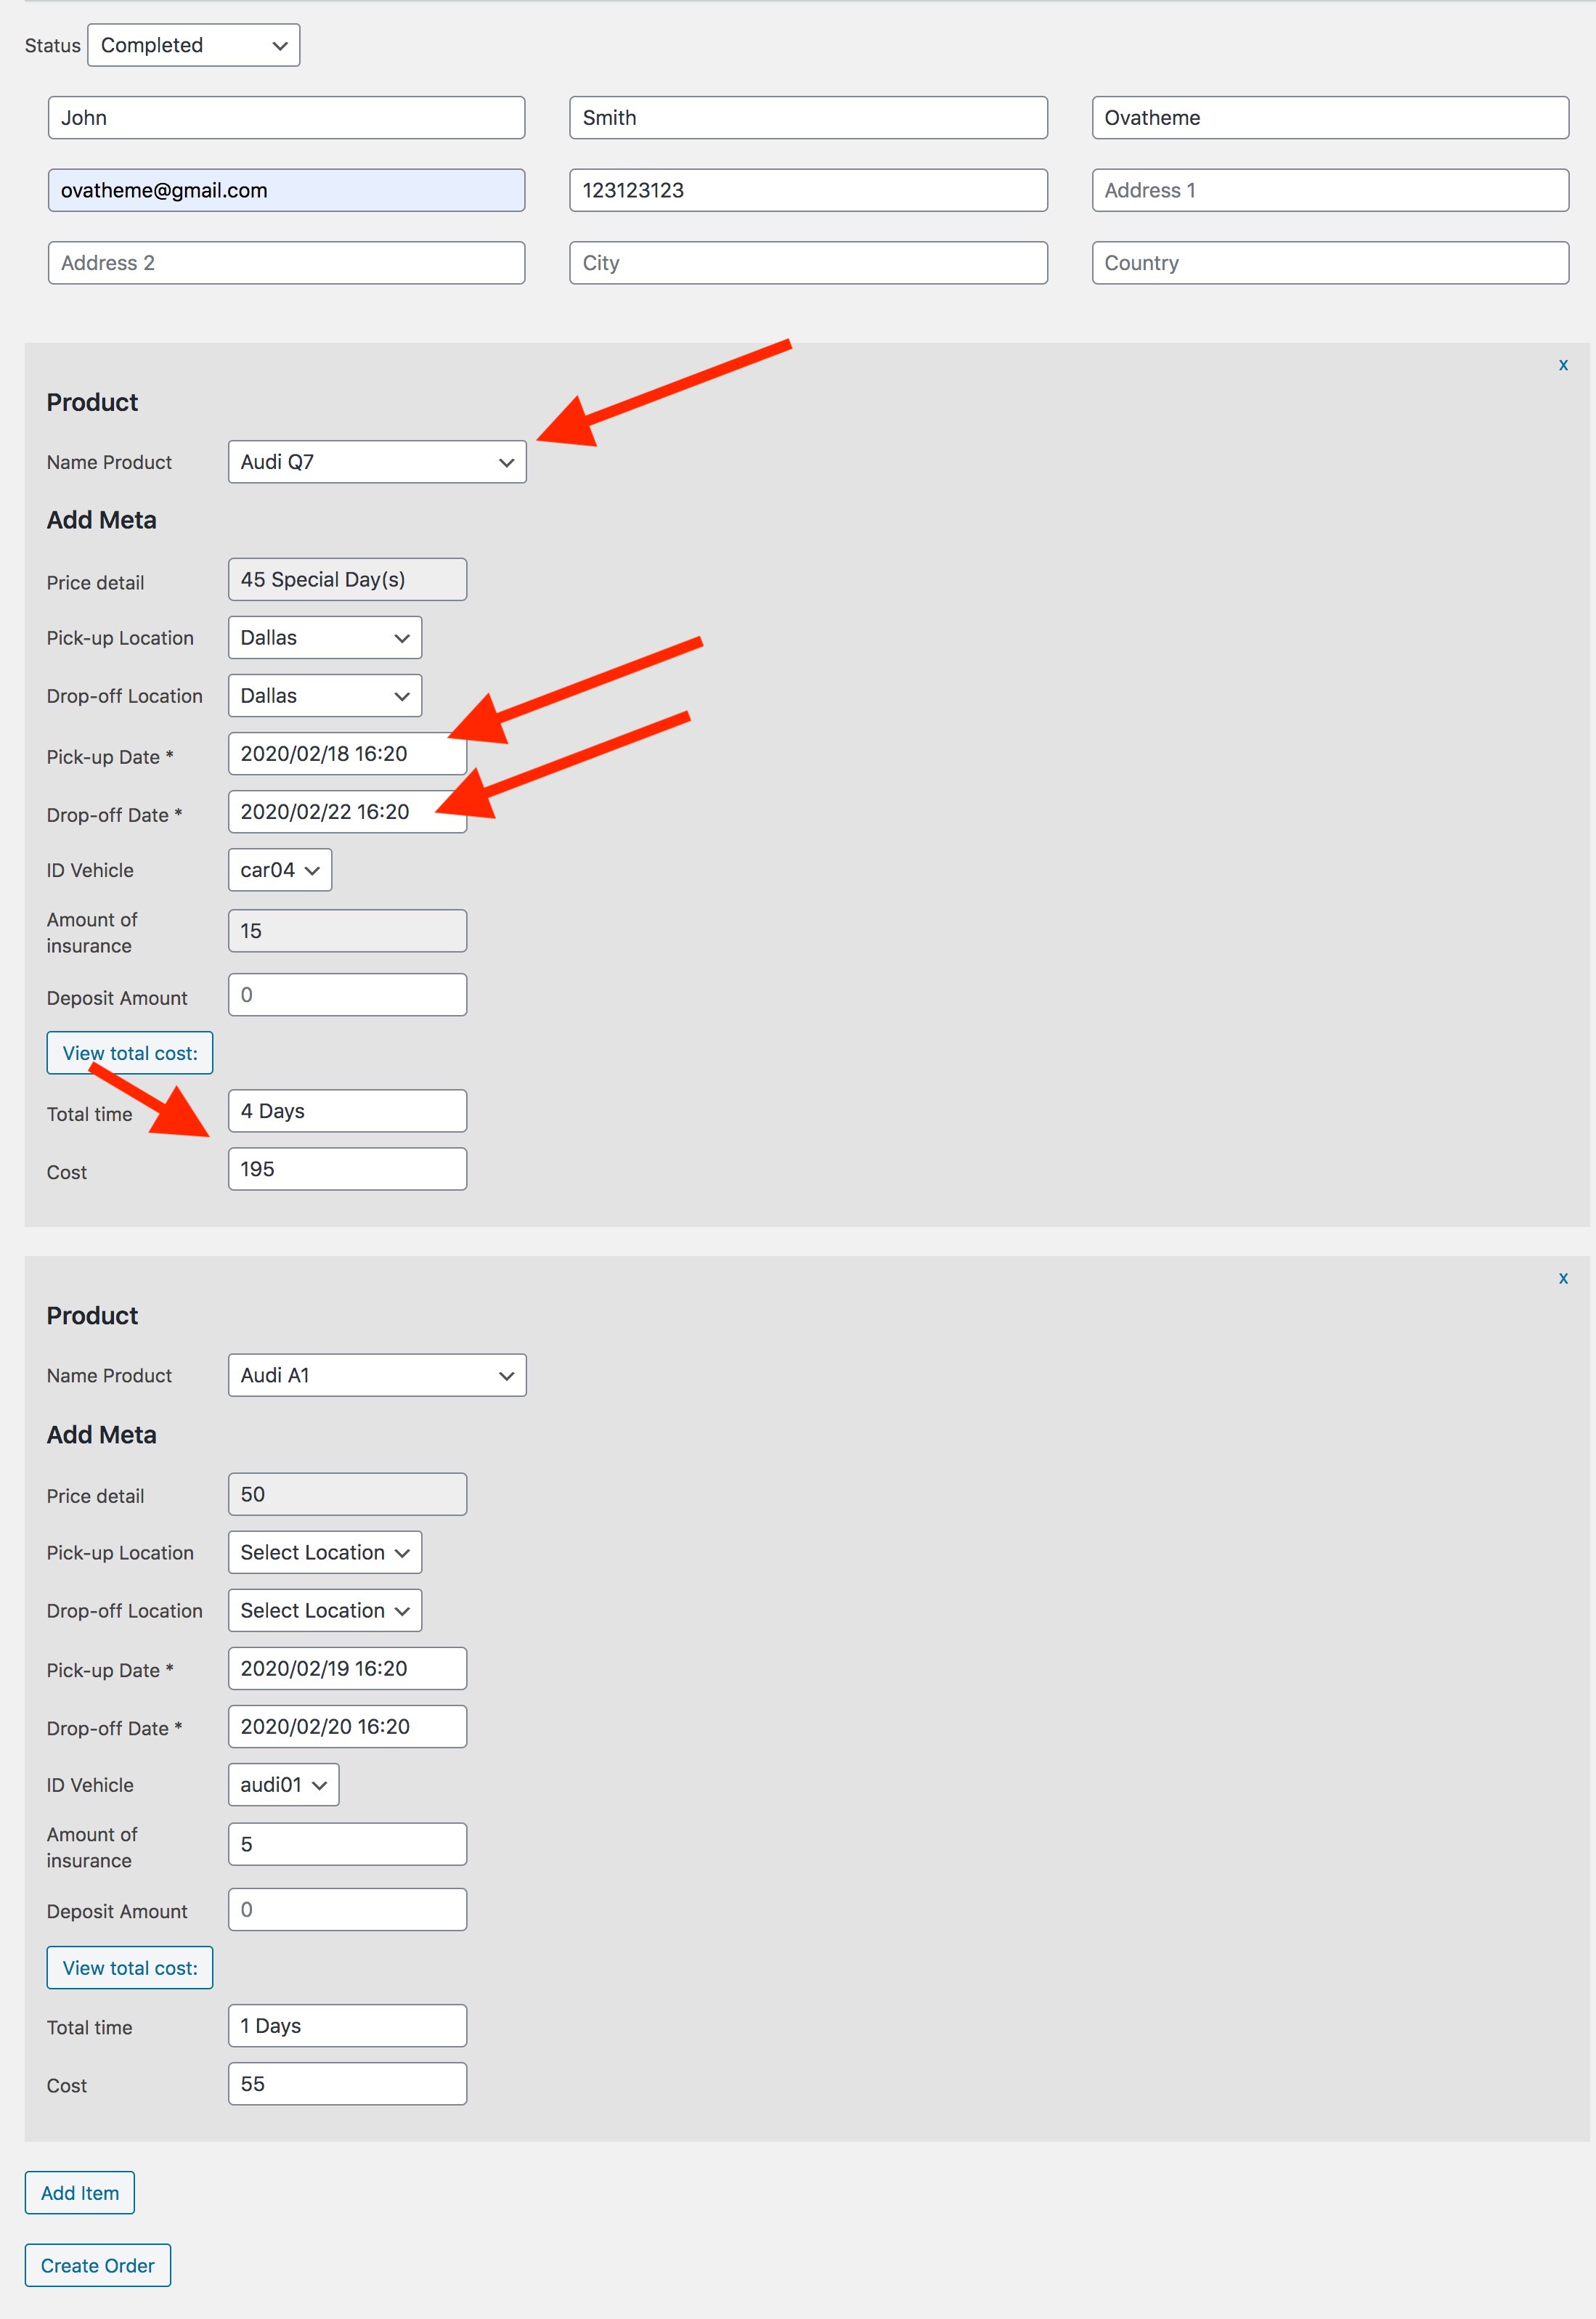
Step 1: Product >> Create order
Insert some info: Name, Email, Product...
Step 2: After choose Pick-up, Drop-off Date click View Total Cost After click Create Order Button
Step 3: After make order, you will see it in Product >> Manage Booking
Step 7: After make order, you will see it in Product >> Calendar Booking
Step 8: At frontend

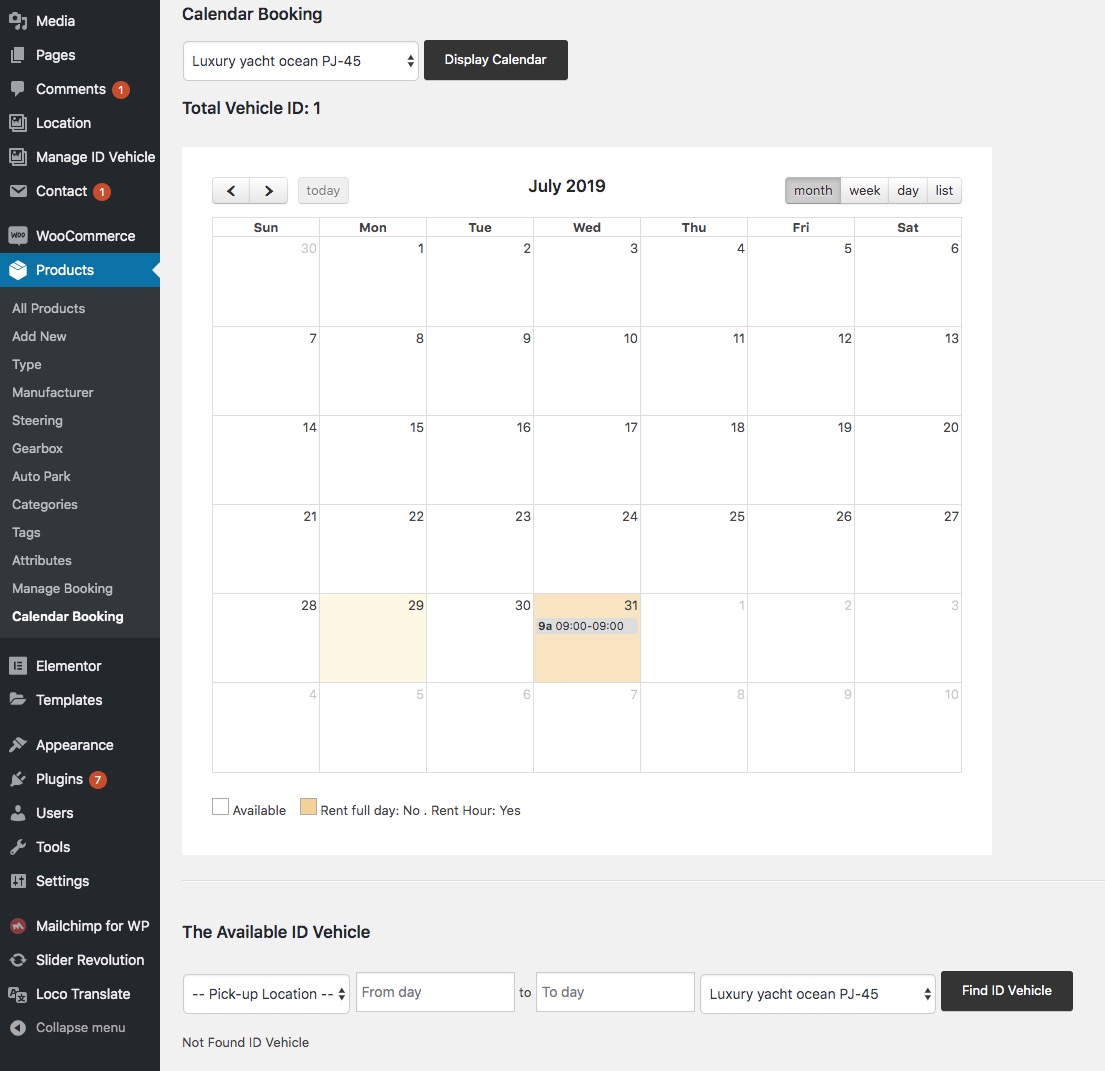
9: Calendar Booking
You can check Booked via Calendar. Find Exactly Avaiable Vehicle ID by Location, Pick-up date, Drop-off date

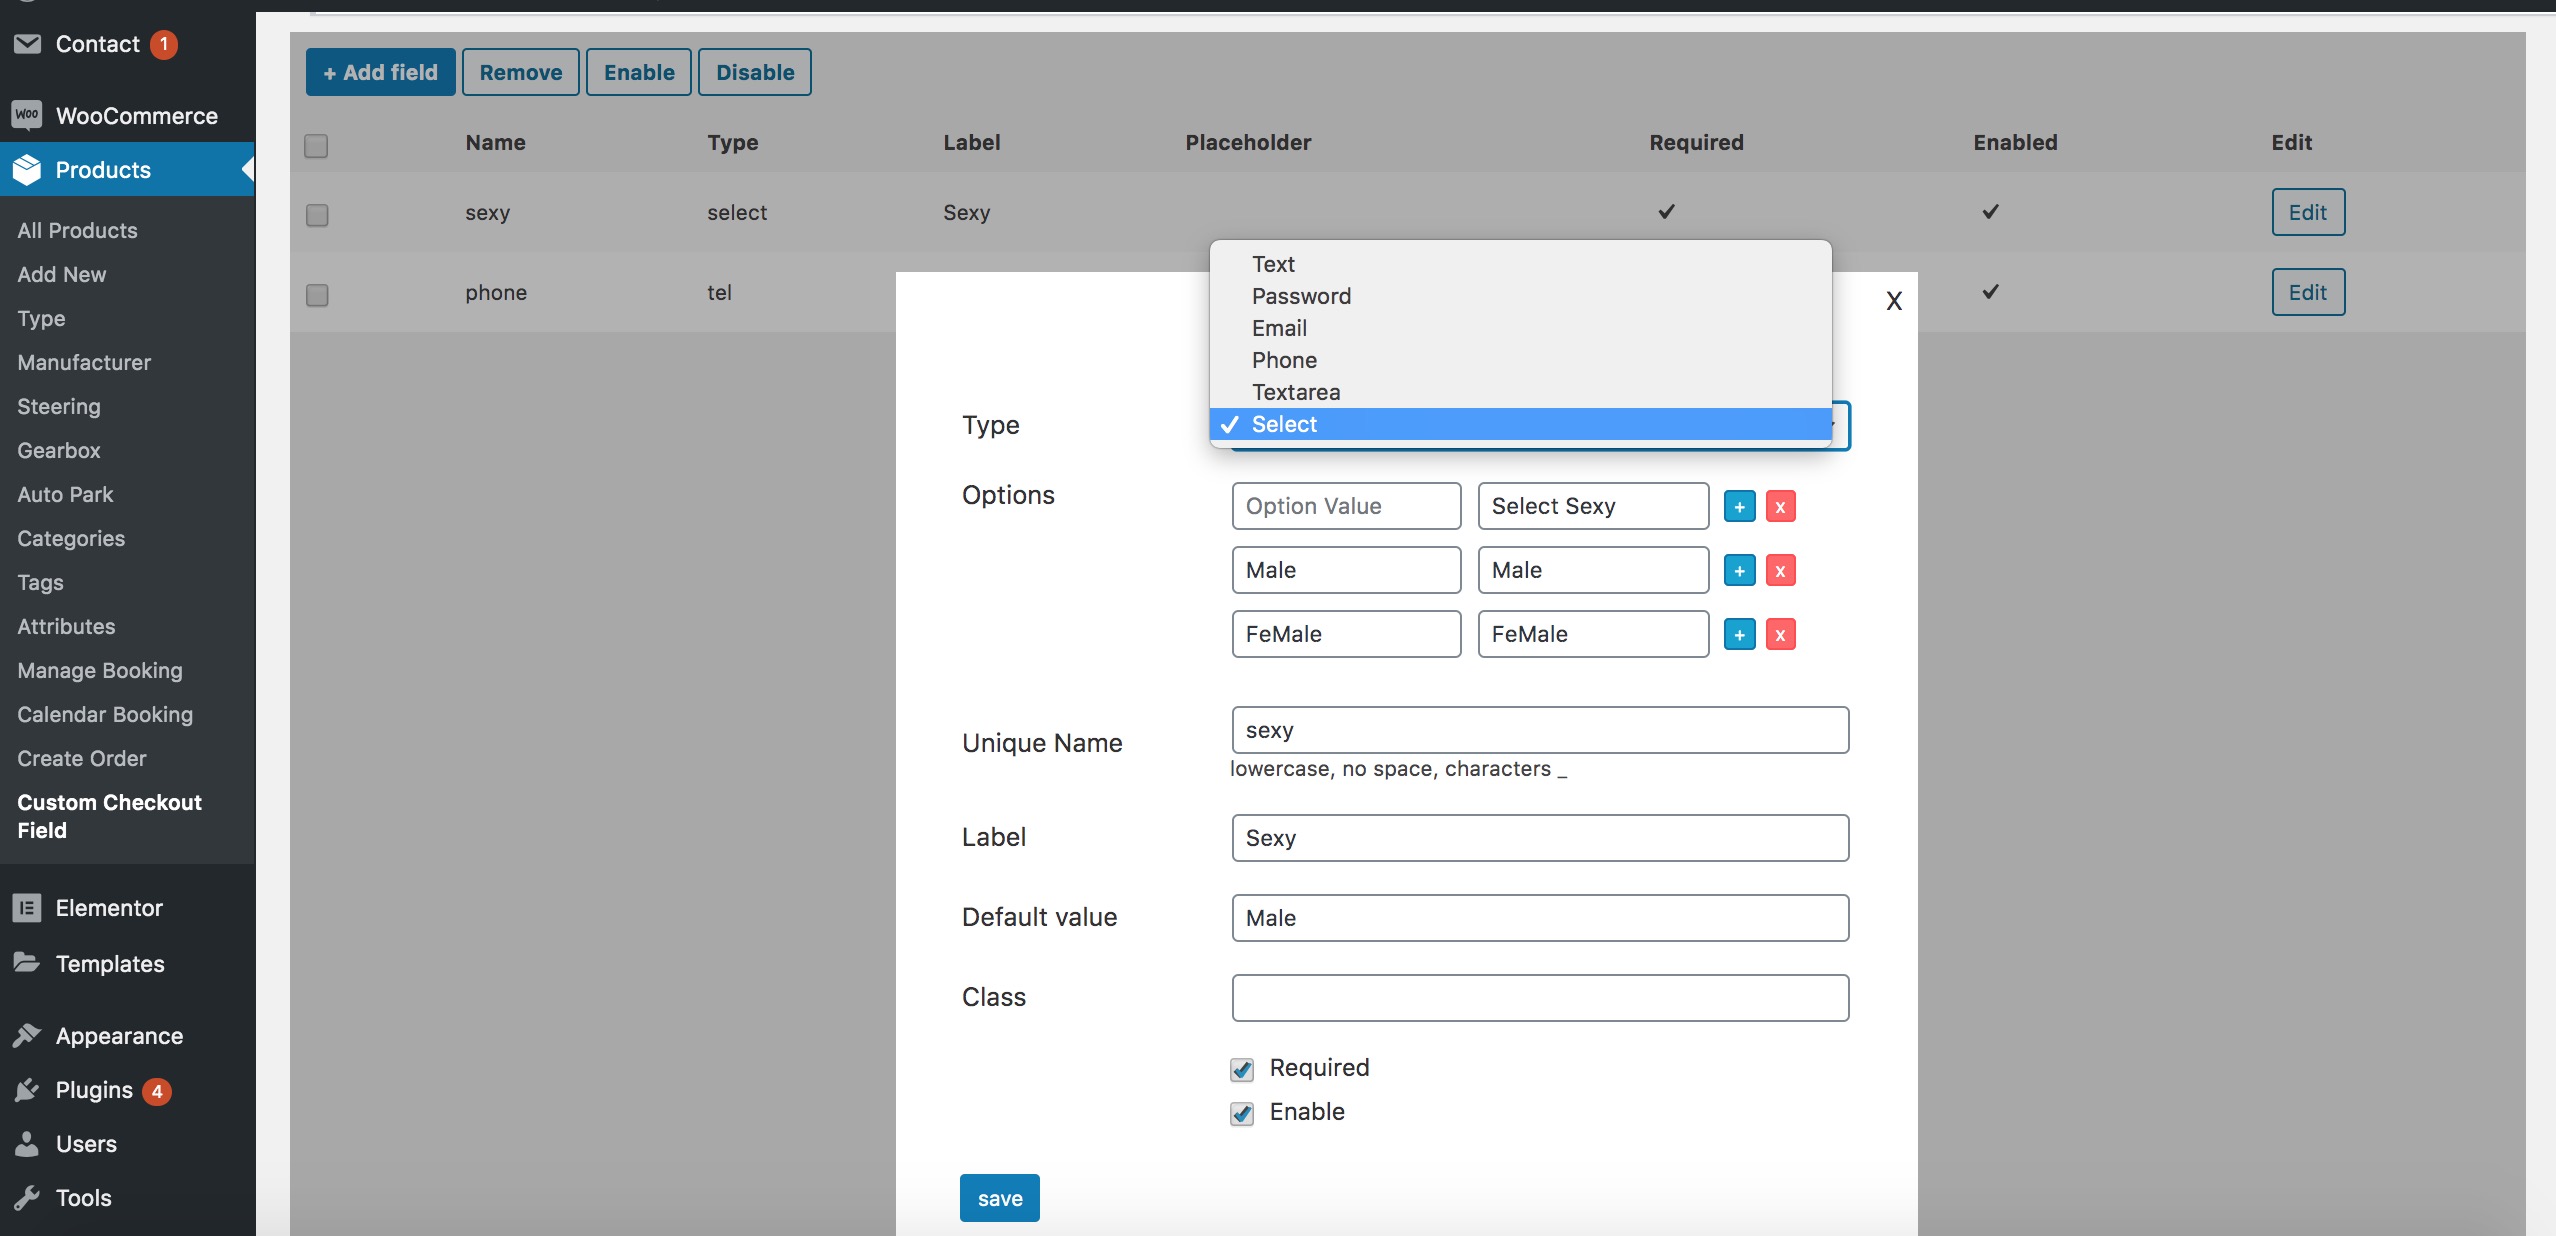
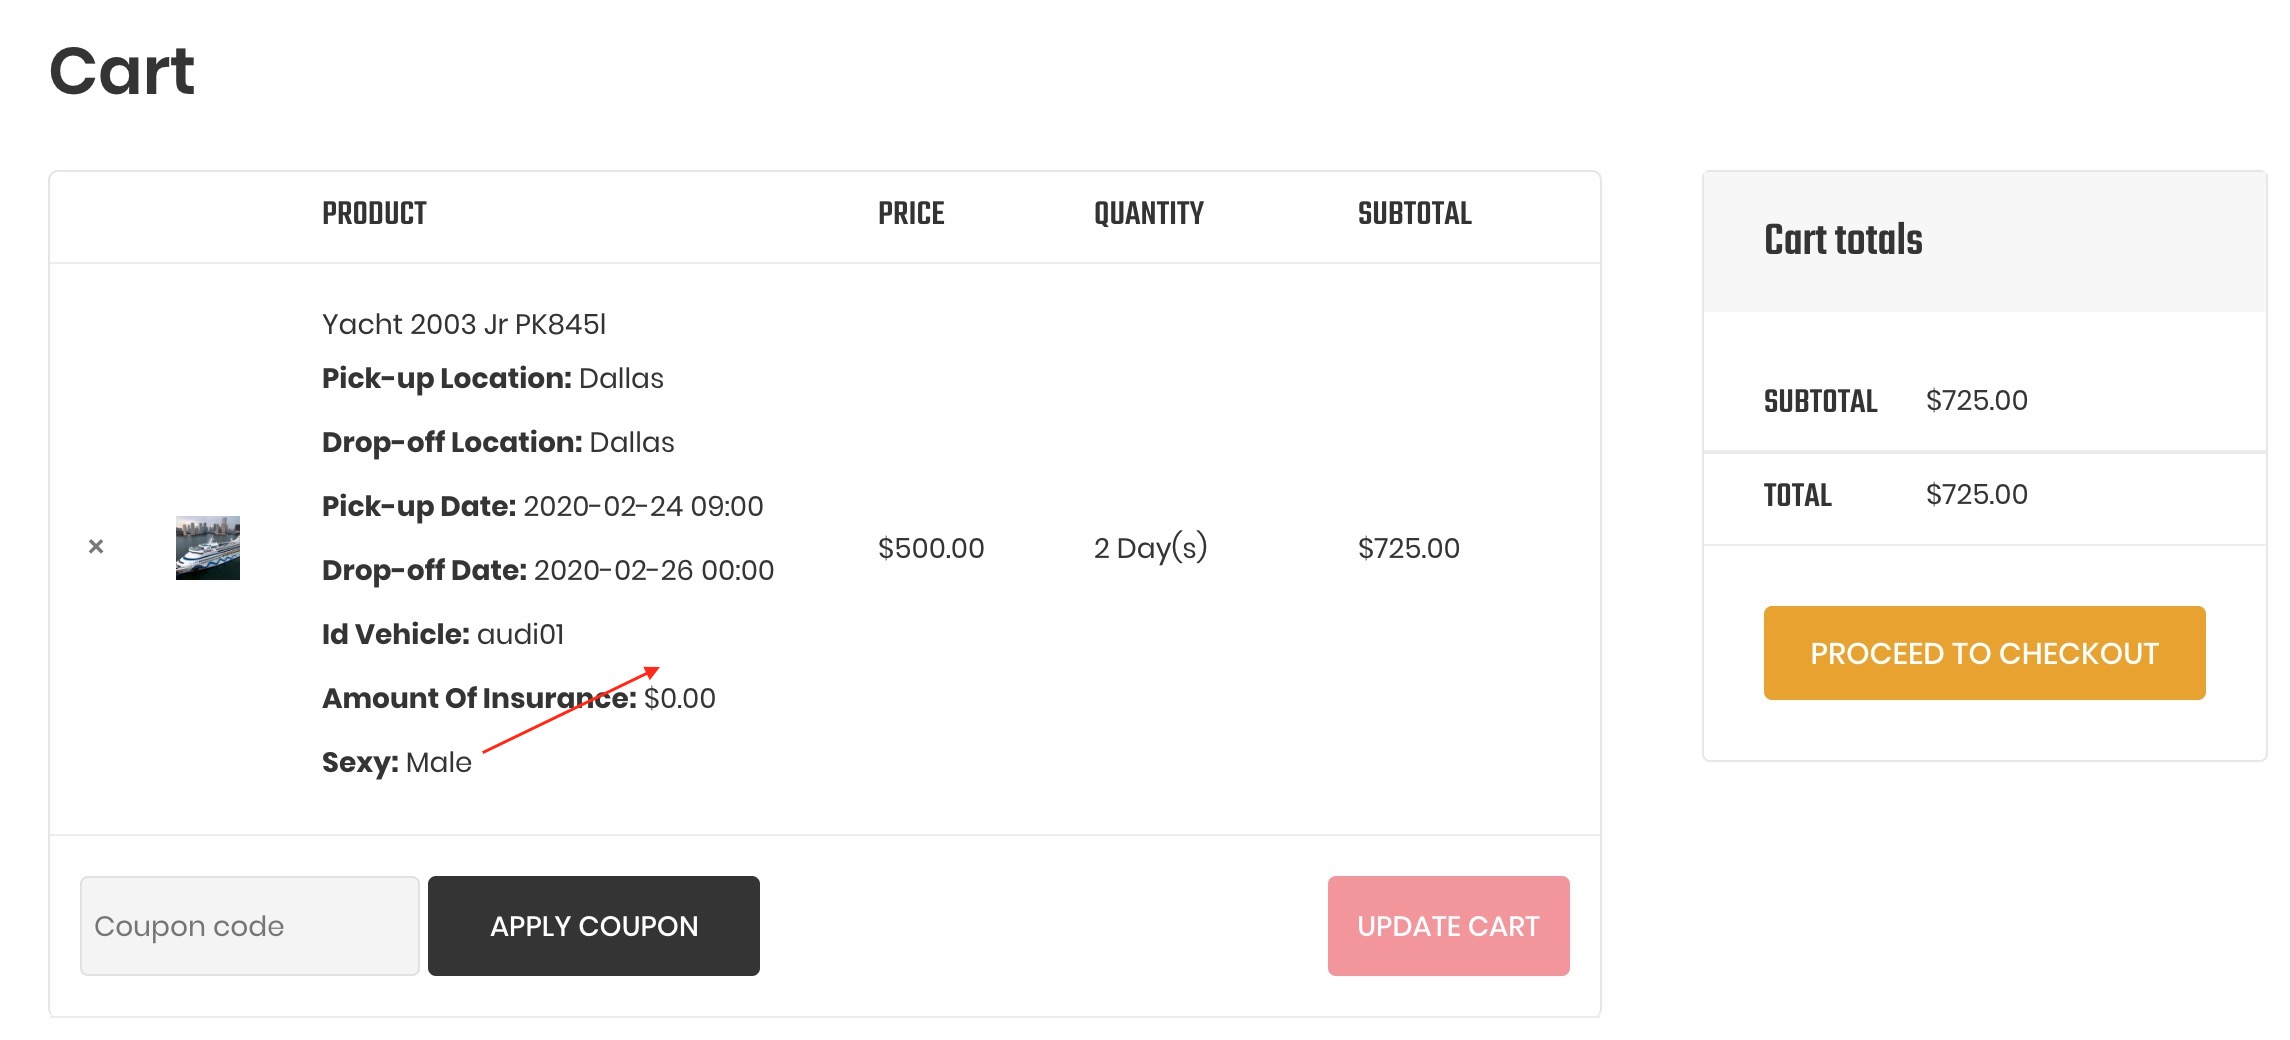
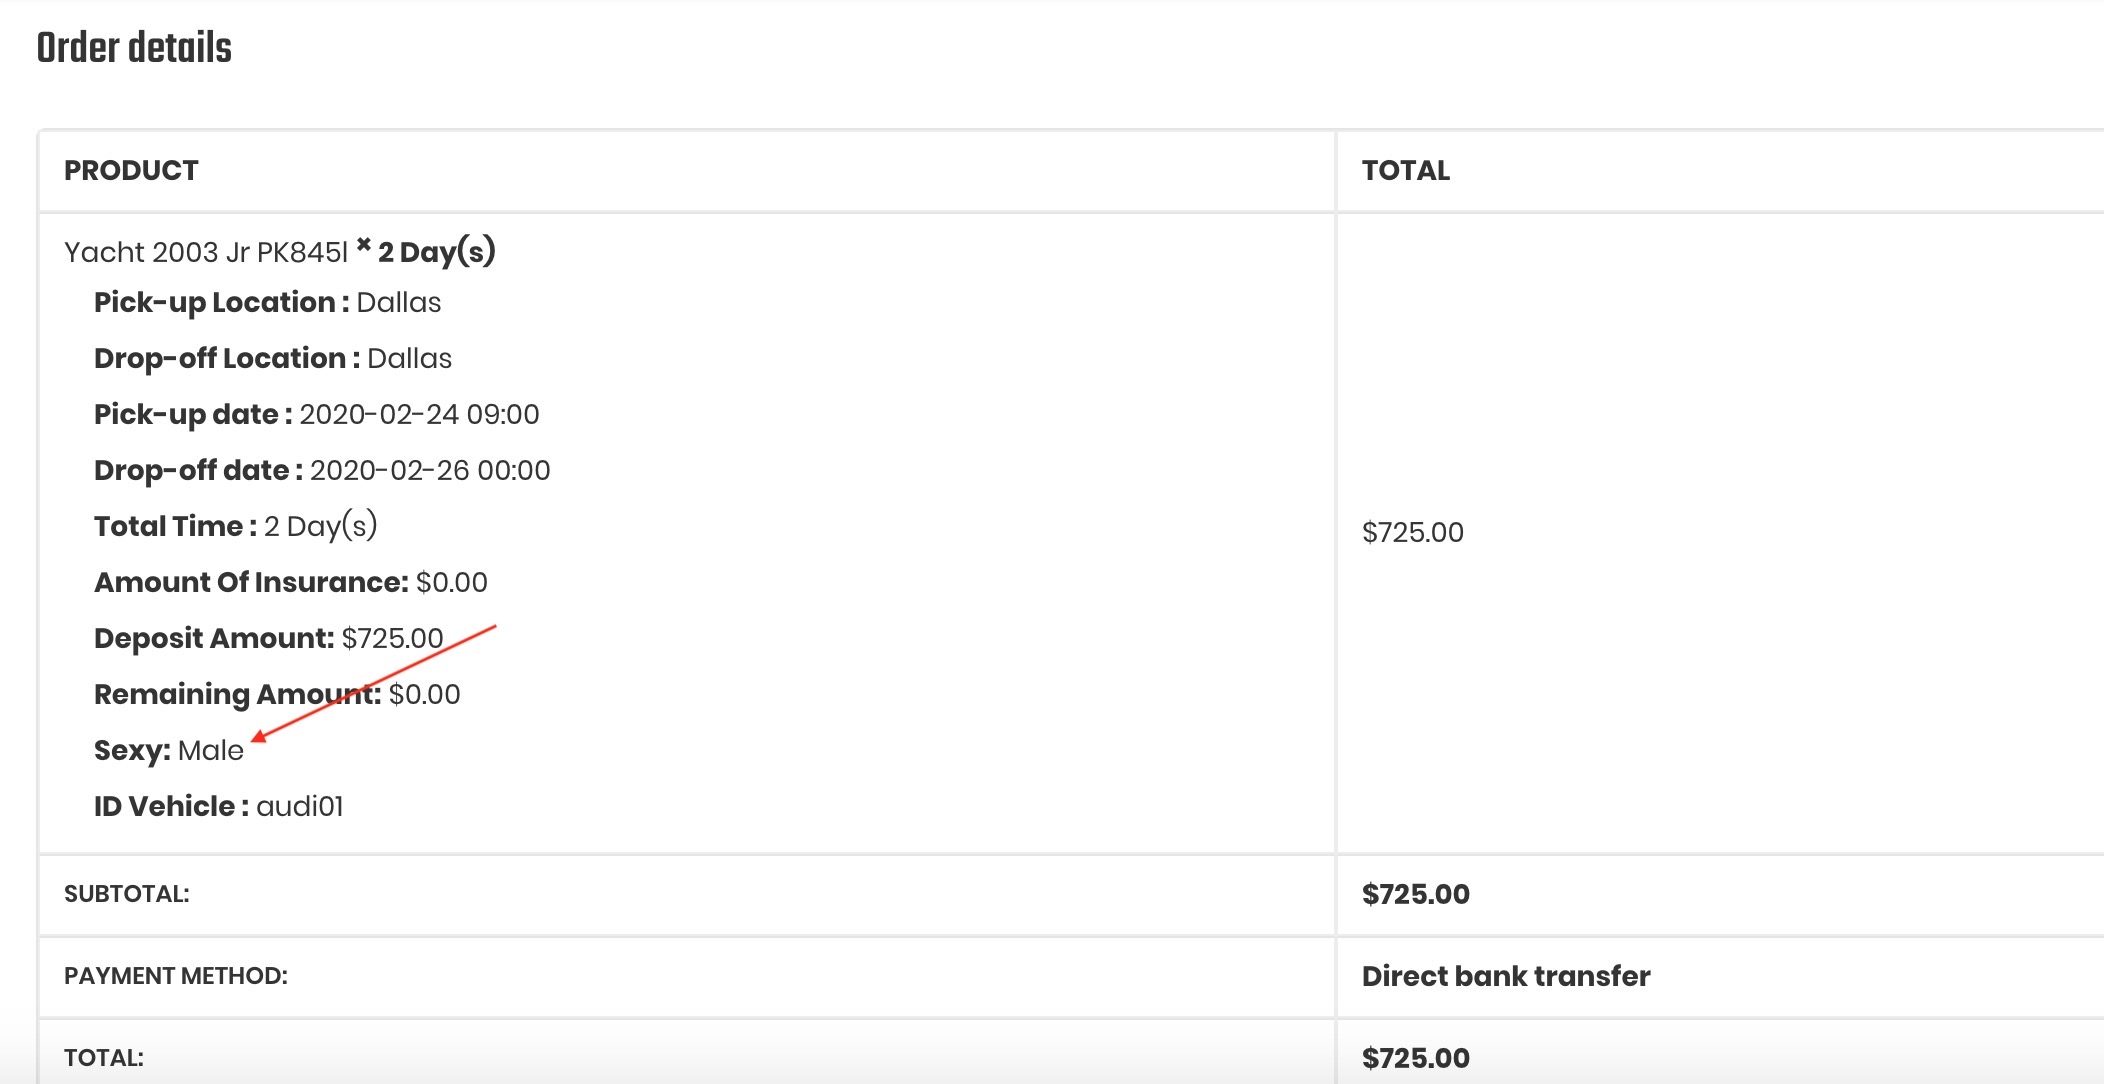
10: Add Custom Fields Checkout for Booking Form and Request Booking Form
Step 1: Go to Product >> Custom Checkout Fields >> Add Field
- You can choose some type: Text, Password, Email, Phone, Textarea, Select
- Required: Requied when booking form or request booking form
- Enable: Allow display in booking form or request booking form
Step 2: Config Custom Fields Booking per Product
All: Dipslay All custom fields
A Part: Only display custom fields in bellow input. You have to insert Name field to bellow input
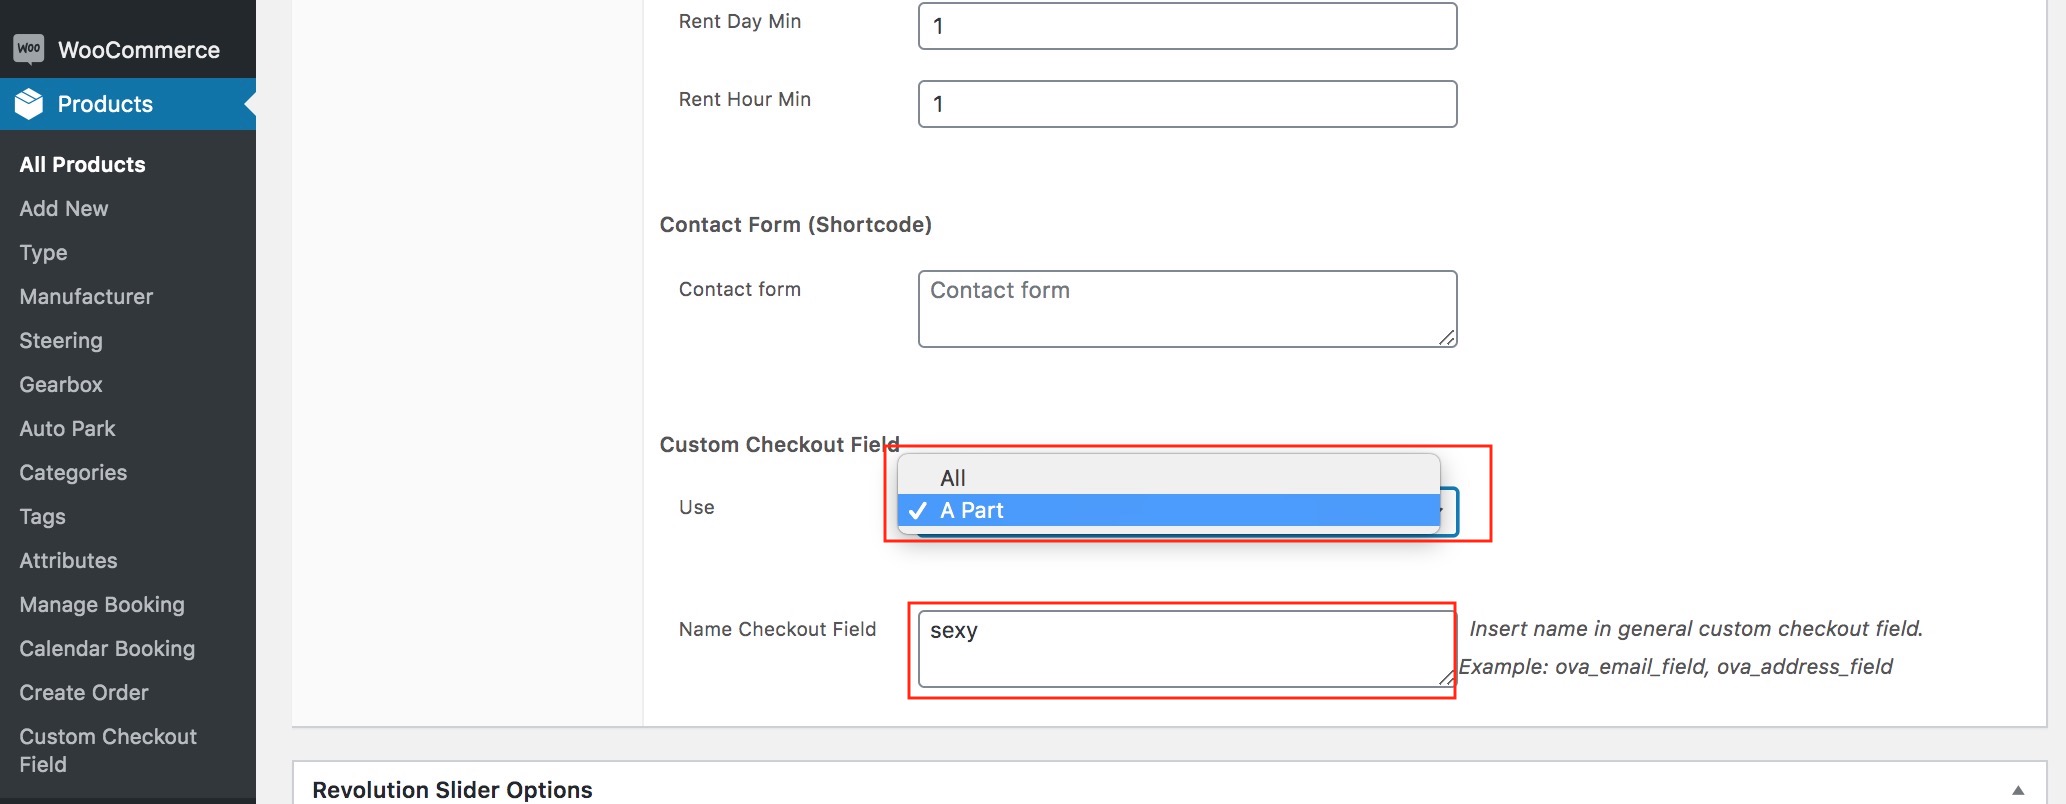
Step 3: Display at frontend
Customize Template
- You can edit Archive, Single rental template by copy file from
themes/ireca/woocommerce/rental
to
themes/ireca-child/woocommerce/rental
Change Header
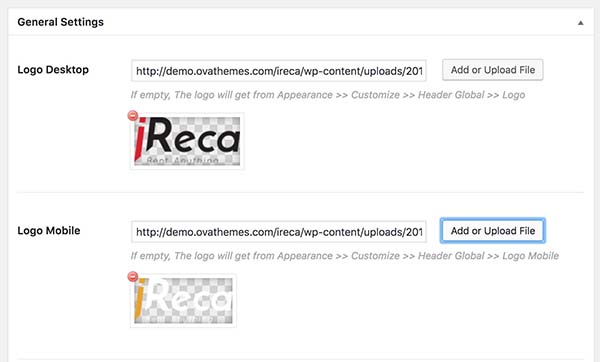
Logo:
- You can upload logo in Appearance >> Customize >> Header Global >> Logo, Logo mobile
- You can use other logo for each post/page/product in General Settings of post/page/product
1: Header Default

2: Header Version 1
3: Header Version 2

4: Header Version 3

5: Header Version 4
Header Default Top Left Widget: Use Custom Html widget with code:
[ovacrs_info icon="icon_mail_alt" text="ovatheme@gmail.com" class="" /][ovacrs_info icon="icon_mobile" text="002-045-6789" class="" /]
Header Default Top Left Wieget: Use Custom HTML widget with code
[ovacrs_social][ovacrs_social_item = icon="social_facebook" link="#" /][ovacrs_social_item = icon="social_twitter" link="#" /][ovacrs_social_item = icon="social_pinterest" link="#" /][ovacrs_social_item = icon="social_googleplus" link="#" /][ovacrs_social_item = icon="social_youtube_circle" link="#" /][ovacrs_social_item = icon="social_dribbble" link="#" /][/ovacrs_social]
Header Default Cart: Use Custom HTML widget with code
[ovacrs_mini_cart /]
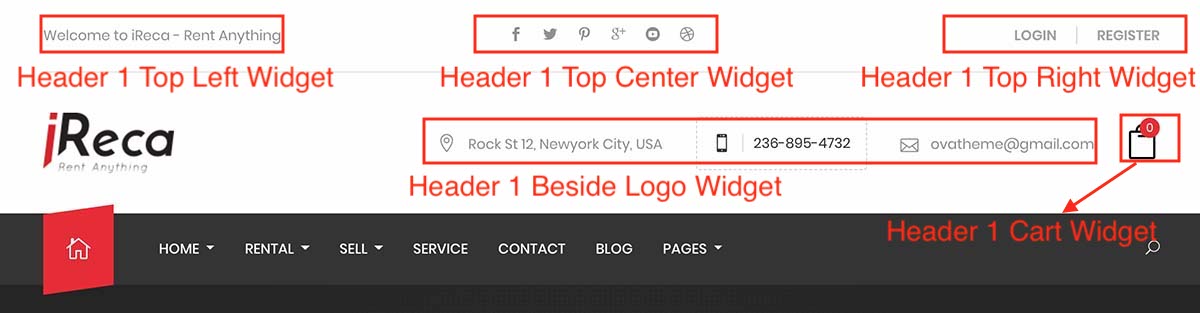
Header 1 Top Left Widget: Use Custom HTML widget with code
<span class="header_info">Welcome to iReca - Rent Anything</span>
Header 1 Top Center Widget: Use Custom HTML widget with code
[ovacrs_social][ovacrs_social_item = icon="social_facebook" link="#" /][ovacrs_social_item = icon="social_twitter" link="#" /][ovacrs_social_item = icon="social_pinterest" link="#" /][ovacrs_social_item = icon="social_googleplus" link="#" /][ovacrs_social_item = icon="social_youtube_circle" link="#" /][ovacrs_social_item = icon="social_dribbble" link="#" /][/ovacrs_social]
Header 1 Top Right Widget: Use Custom HTML widget with code
[ovacrs_account login_link="http://demo.ovathemes.com/ireca/wp-login.php?action=login" login_text="Login" register_link="http://demo.ovathemes.com/ireca/wp-login.php?action=register" register_text="Register" show_slash="true" /]
Header 1 Beside Logo Widget: Use Custom HTML widget with code
[ovacrs_info icon="icon_pin_alt" text="Rock St 12, Newyork City, USA" class="" /]
[ovacrs_info icon="icon_mobile" text="236-895-4732" class="box_dotted" /]
[ovacrs_info icon="icon_mail_alt" text="ovatheme@gmail.com" class="" /]
Header 1 Cart Widget: Use Custom HTML widget with code
[ovacrs_mini_cart /]
Header 2 left Logo widget: Use Custom HTML widget with code
[ovacrs_info2 icon="icon_mobile" heading="Mobile Phone" text="+500 236-895-4732" class="" /]
Header 2 right Logo widget: Use Custom HTML widget with code
[ovacrs_mini_cart style="style2" /]
Header 3 Info widget: Use Custom HTML widget with code
[ovacrs_info icon="icon_pin_alt" text="Rock St 12, Newyork City, USA" class="" /]
[ovacrs_info icon="icon_mobile" text="236-895-4732" class="mob_yellow" /]
[ovacrs_info icon="icon_mail_alt" text="ovatheme@gmail.com" class="" /]
Header 3 Cart widget: Use Custom HTML widget with code
[ovacrs_mini_cart /]
Header 3 Search widget: Use Custom HTML widget with code
[ovacrs_search_woo /]
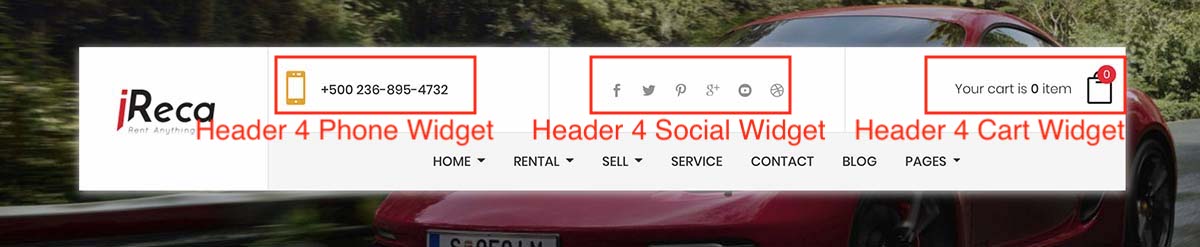
Header 4 Phone widget: Use Custom HTML widget with code
[ovacrs_info2 icon="icon_mobile" heading="" text="+500 236-895-4732" class="" /]
Header 4 Social widget: Use Custom HTML widget with code
[ovacrs_social][ovacrs_social_item = icon="social_facebook" link="#" /][ovacrs_social_item = icon="social_twitter" link="#" /][ovacrs_social_item = icon="social_pinterest" link="#" /][ovacrs_social_item = icon="social_googleplus" link="#" /][ovacrs_social_item = icon="social_youtube_circle" link="#" /][ovacrs_social_item = icon="social_dribbble" link="#" /][/ovacrs_social]
Header 4 Cart widget: Use Custom HTML widget with code
[ovacrs_mini_cart style="style3" /]
Change Footer
You can change Footer content in Appearance >> Widgets
- Footer Default

- Footer Version 1
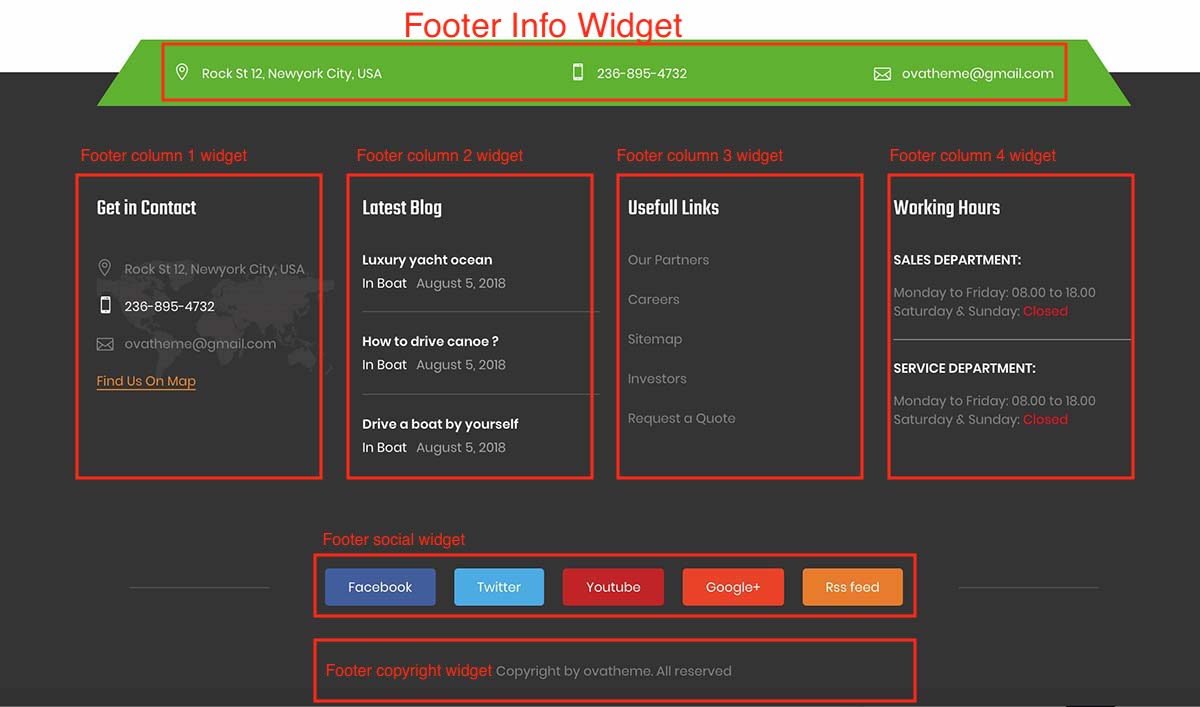
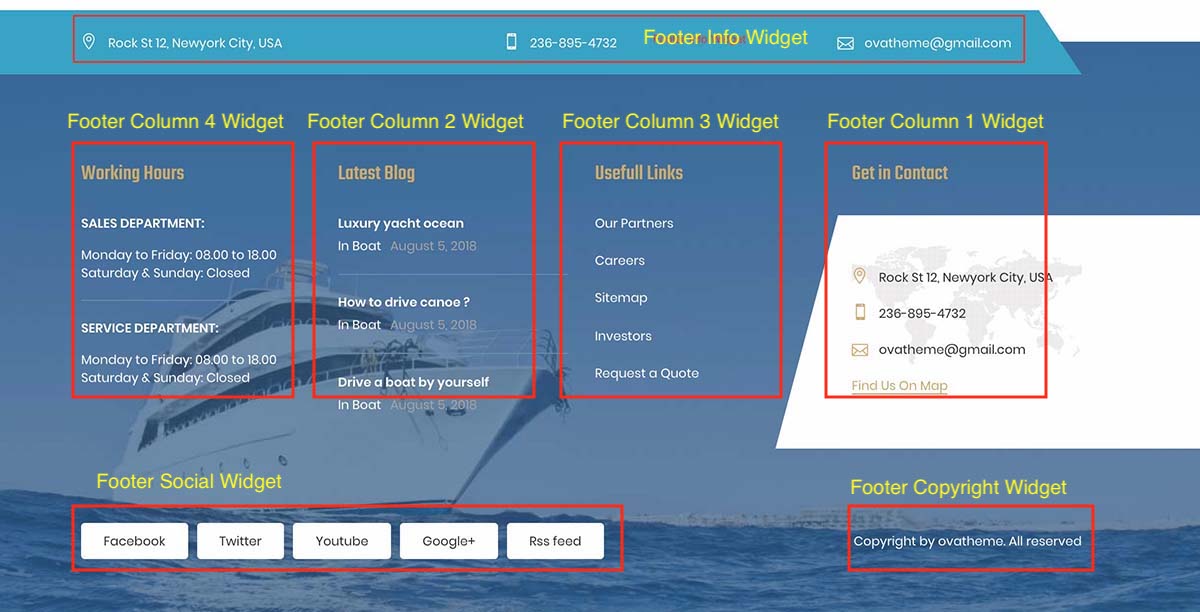
- Footer column 1 Widget: Use Custom Html Widget with code:
- Footer Social Widget: Use Custom Html Widget with code
[ovacrs_social]
[ovacrs_social_item = name="Facebook" link="#" class="facebook" /]
[ovacrs_social_item = name="Twitter" link="#" class="twitter" /]
[ovacrs_social_item = name="Youtube" link="#" class="youtube" /]
[ovacrs_social_item = name="Google+" link="#" class="google" /]
[ovacrs_social_item = name="Rss feed" link="#" class="rss" /]
[/ovacrs_social]
- Footer Copyright Widget: Use Custom Html Widget with text
Copyright by ovatheme. All reserved
- Footer Info Widget: Use Custom Html widget with code
[ovacrs_info icon="icon_pin_alt" text="Rock St 12, Newyork City, USA" class="" /]
[ovacrs_info icon="icon_mobile" text="236-895-4732" class="mob_yellow" /]
[ovacrs_info icon="icon_mail_alt" text="ovatheme@gmail.com" class="" /]
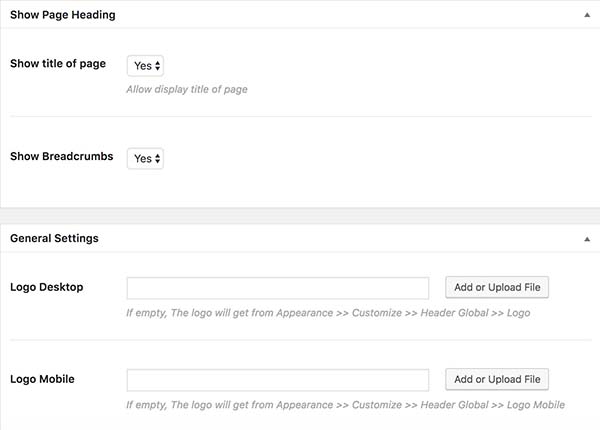
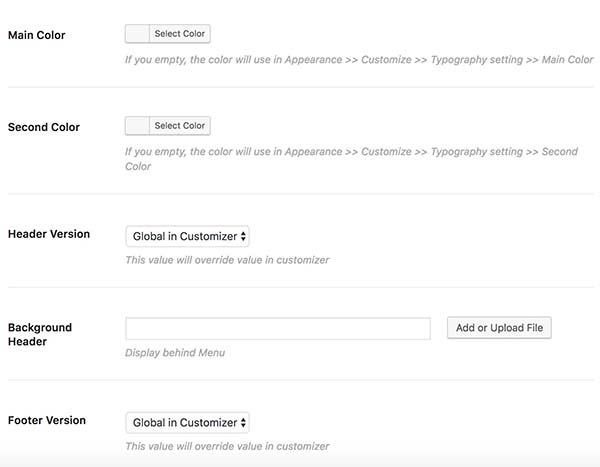
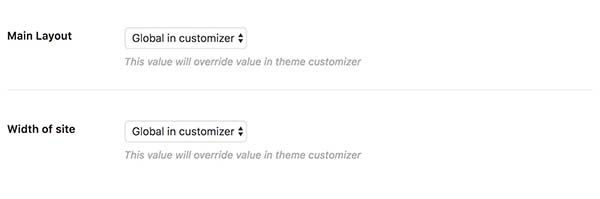
Post/Page Settings
You can show title, breadcrumbs, logo desktop, logo mobile, main color, second color, header version, Background Header, Footer version
Shortcode
Search Shortcode
[ovacrs_search show_pickup_loc="true" show_dropoff_loc="true" show_pickup_date="true" show_dropoff_date="true" show_cat="true" show_type="true" show_manufacturer = "true" show_steering="true" show_gearbox="false" show_auto_park="false" pickup_loc_required="" dropoff_loc_required="" pickup_date_required="required" dropoff_date_required="required" category_required="false" manufacturer_required ="false" steering_required="false" gearbox_required="false" auto_park_required="false" type_required="false" dateformat="Y-m-d" timeformat="H:i" hour_default="09:00" time_step="30" class="search_slide home_search" ]
Icon Font
You can use some library Font icon:
- Fontawesome: https://fontawesome.com/icons?d=gallery&m=free
- Elegant: http://demo.ovathemes.com/documentation/ireca/elegant_font/
- Flaticon:
+ http://demo.ovathemes.com/documentation/ireca/flaticon/essential_set/flaticon.html
+ http://demo.ovathemes.com/documentation/ireca/flaticon/car_service/flaticon.html
+ http://demo.ovathemes.com/documentation/ireca/flaticon/car2/flaticon.html
Make a Shop ( Sell )
1: Make Category

2: Make Product
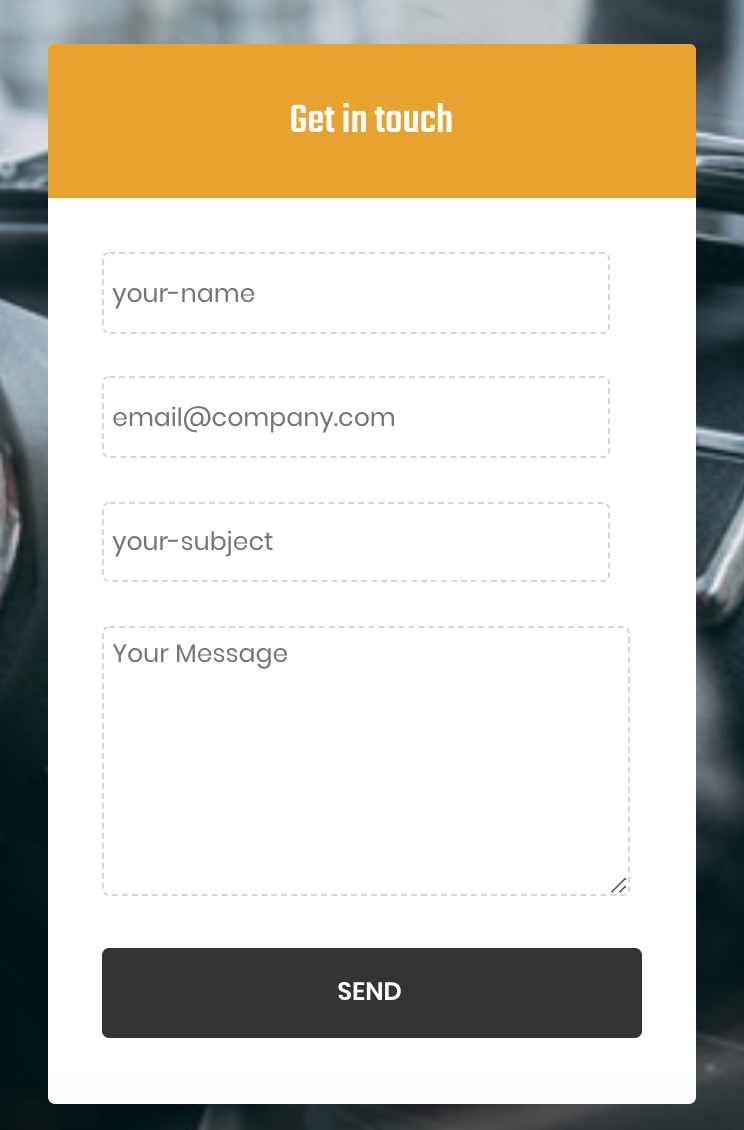
Contact Form
1: Contact Form
Front Admin Menu click Contact >> Add New and insert code

Newsletter - Mail Chimp
From Admin Menu click Mail Chimp for WP >> MailChimp >> API key
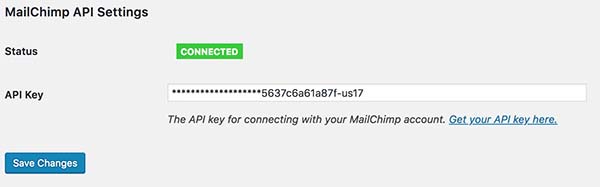
From Admin Menu click Mail Chimp for WP >> Form >> Insert code
Translate Theme, Plugin to your language
- Use "Loco Translate" plugin to translate theme and plugin to your language
- Use "WPML" for making Multipe Languages.