Install and Config WordPress Theme
Overview
We would like to thank you for purchasing our theme! We are very pleased you have chosen our theme for your website, you will not be disappointed! Before you get started, please be sure to always check out these documentation files. We outline all kinds of good information, and provide you with all the details you need to use our theme.
Support
The our team are always happy to help you with any questions or recommendations you have about the our theme.
If you need any help or support please contact us through the Themeforest Messaging system or directed at jakjim@gmail.com
Note: If you contact us directed at jakjim@gmail.com, please attach info about purchase code:
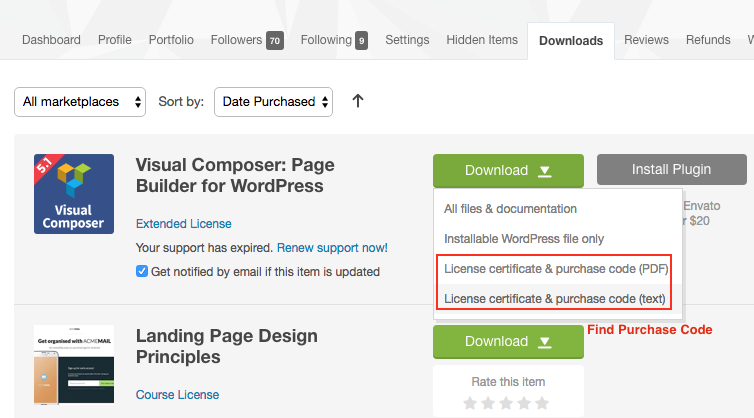
Then open file and find "Item Purchase Code" like
Item Purchase Code: cdf581e0-ed42-41a2-ab3f-26bb5fb9c874
Wordpress Information
WordPress Information
To install this theme you must have a working version of WordPress already installed.
To install this theme you must have a working version of WordPress already installed. If you need help installing WordPress, follow the instructions in WordPress Codex or you can watch the Instructional Video. Below are all the useful links for WordPress information.
• WordPress Codex – general info about WordPress and how to install on your server
• Instructional Video – How To install wordpress
• First Steps With WordPress – general information that covers a wide variety of topics
• FAQ New To WordPress – the most popular FAQ’s regarding WordPress
• WP101 Basix Training videos – some great videos from WPTuts on WordPress
Download Theme Package
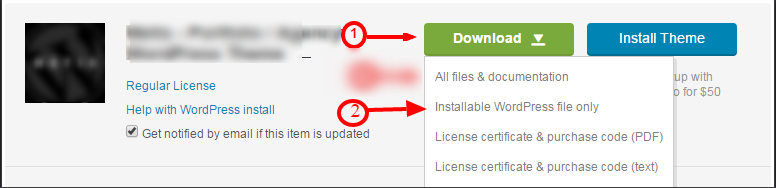
After purchasing our theme from Themeforest, you will need to download theme package for your use. To download the package, please login to your Themeforest account, navigate to “Downloads”, click the “Download” button in the left of the theme, choose “All files & documentation” to download our theme package to your computer. The theme package includes:
Theme File: Includes imevent.zip file that consists of everything you need to install the theme.
Child Theme File: Includes imevent-child.zip file
Document Folder: Includes Documentation file that helps you get to know about theme and guides you to build your site with our theme.
Licensing Folder: Includes the licensing files of Themeforest purchase.
Requirements For Our Theme
- To use theme, you must be running WordPress 4.4 or higher, PHP 5.6 or higher, and mysql 5 or higher. Follow below checklist to ensure your host can work well with theme:
+ Your web host has the minimum requirements to run WordPress.
+ They are running the latest version of WordPress.
+ You can download the latest release of WordPress from official WordPress website.
+ You did create best secure passwords FTP and Database.
Update Theme
1: Automatically updated the theme when a new version is released:
Read more : http://www.wpexplorer.com/envato-market-plugin-guide/
Then update theme, you have to install again imevent-common plugin
- Deactive imevent-common plugin
- Delete imevent-common plugin
- Install again imevent-common plugin: You will find plugin file in imevent/framework/plugins/ folder
2: Update theme by manually via FTP or via WordPress Admin Panel :
g, Then update theme, you have to install again imevent-common plugin
- Deactive imevent-common plugin
- Delete imevent-common plugin
- Install again imevent-common plugin: You will find plugin file in imevent/framework/plugins/ folder
Install & Import demo data
Then Download Theme Package, you can follow video to install & import demo data:
https://www.youtube.com/watch?v=9ZAgGepy2h8
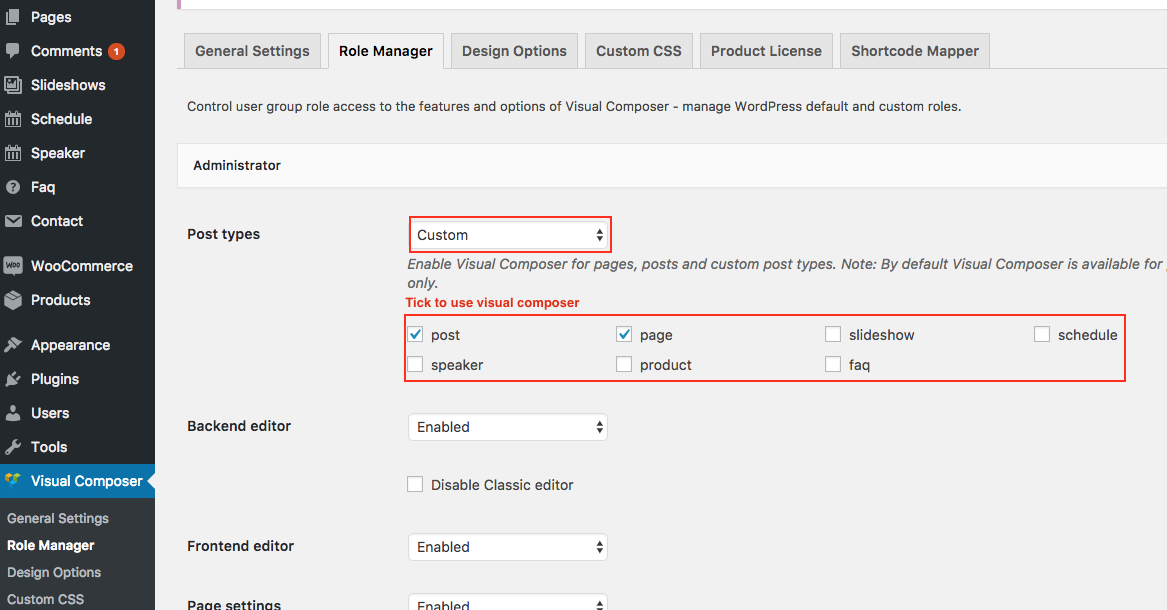
Visual Composer
- You don't have to active license visual compsoer to use because we purchased extend license for this theme.
- Config visual compsoer: Go to Visual Composer >> Role manager
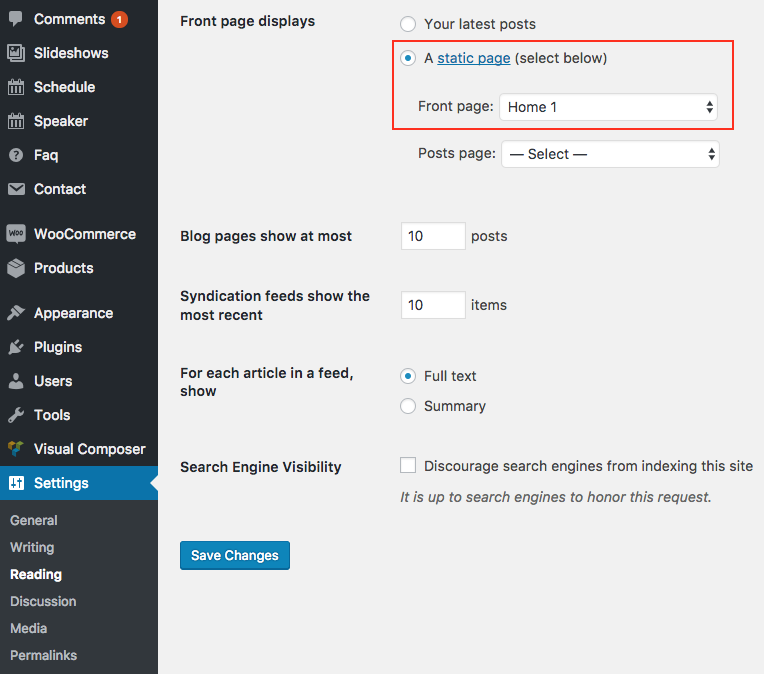
Choose home page
Go to Settings >> Reading
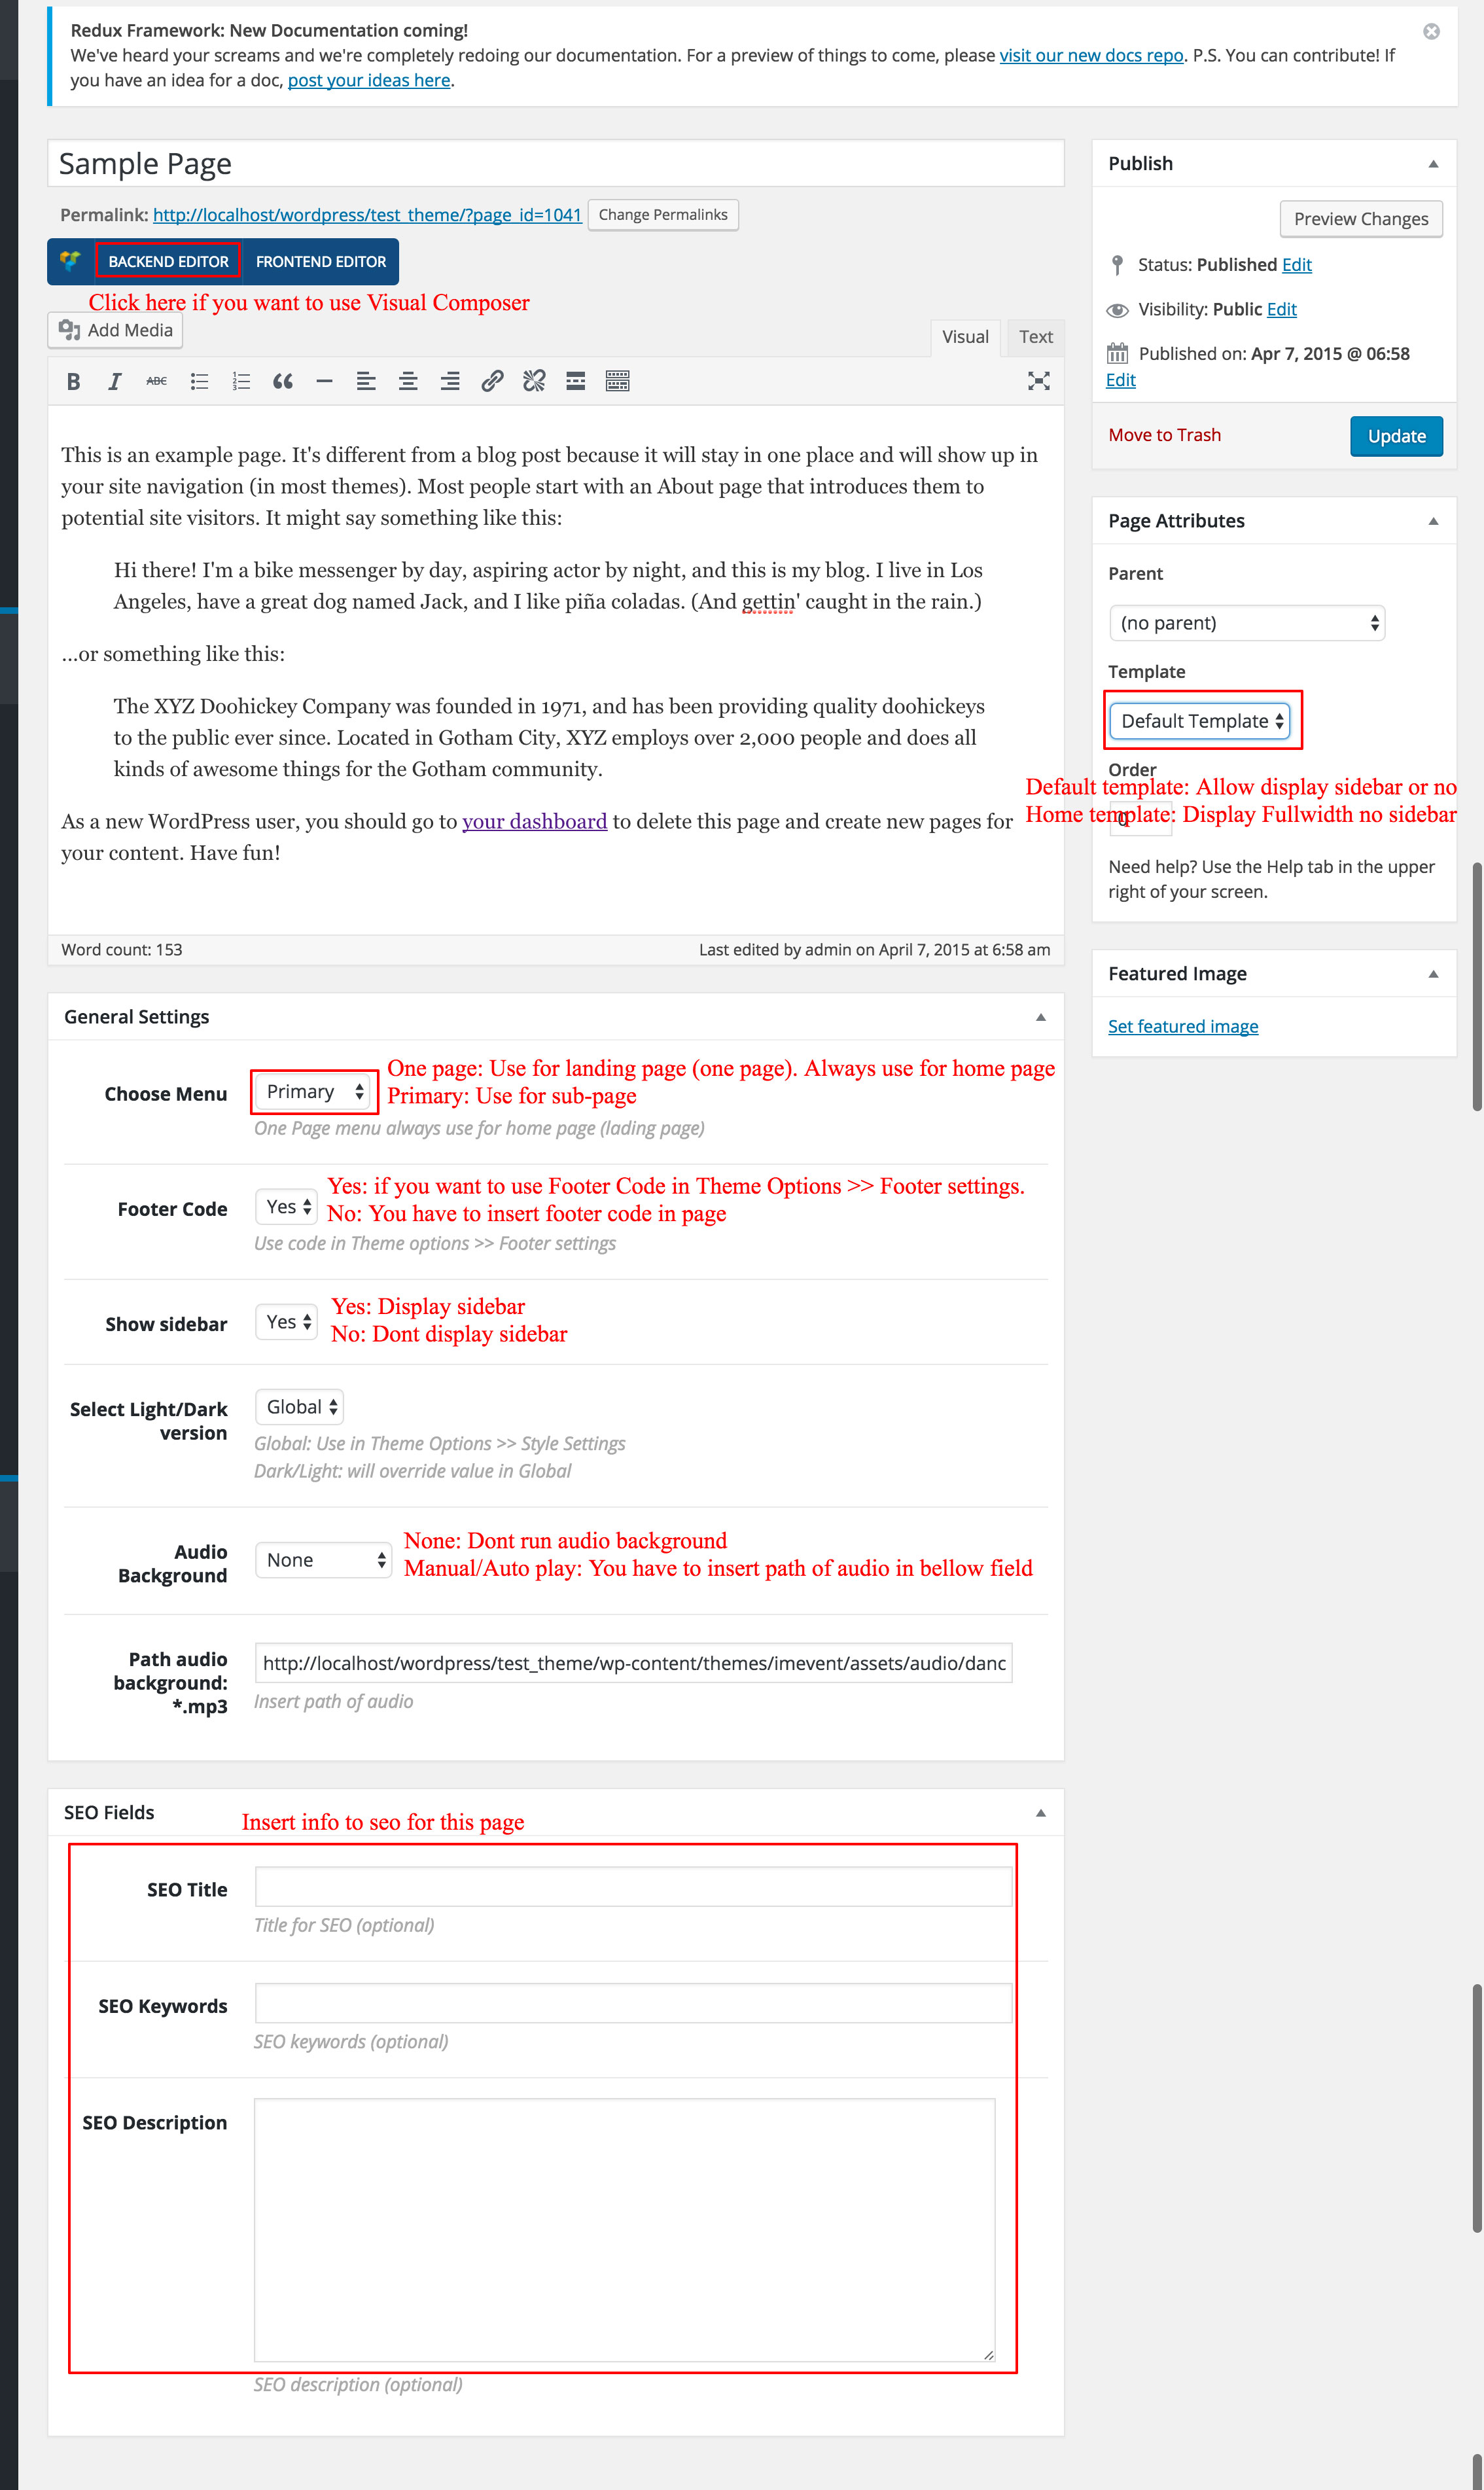
Attribute in page
Edit Menu & Make scroll page
- Go to Appearance >> Menus:
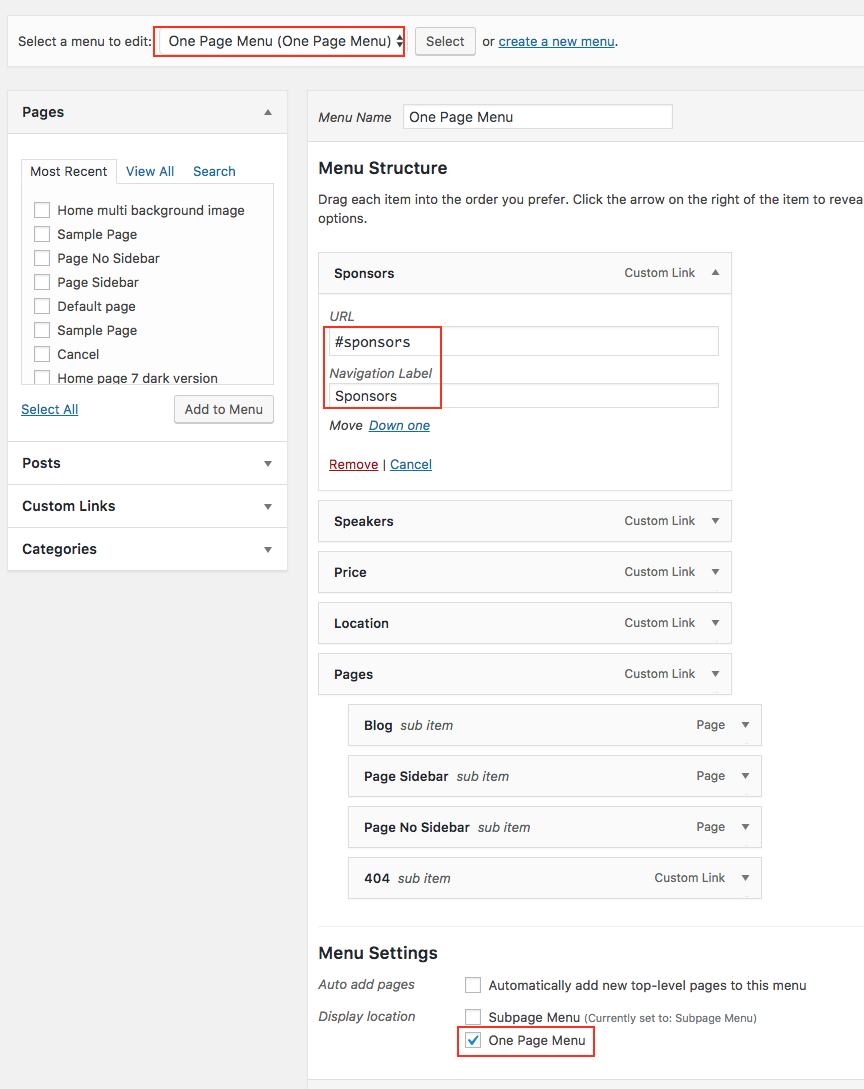
1: One Page (Scroll) Menu
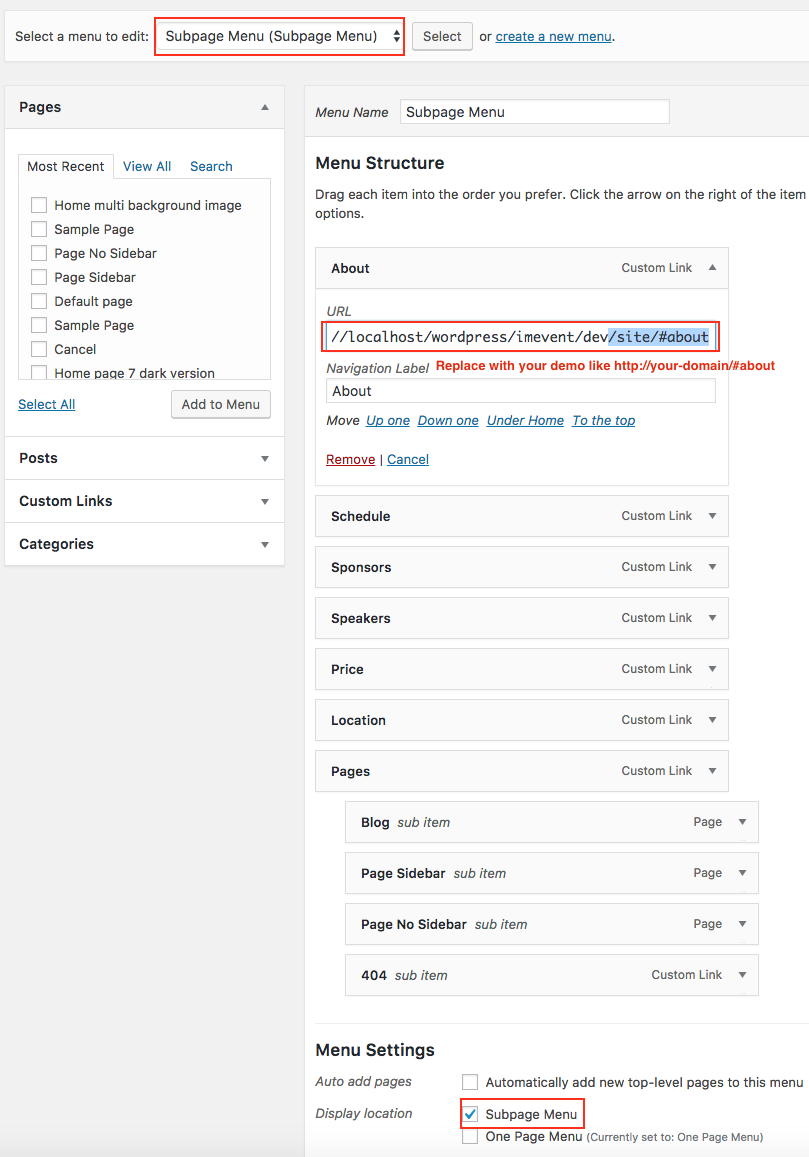
2: Subpage Menu
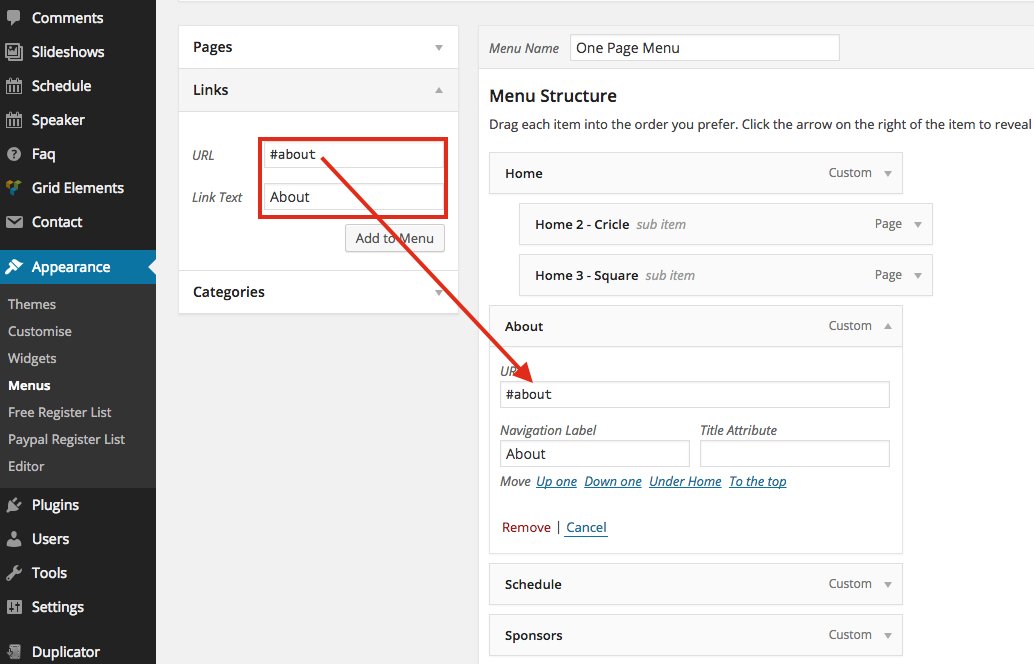
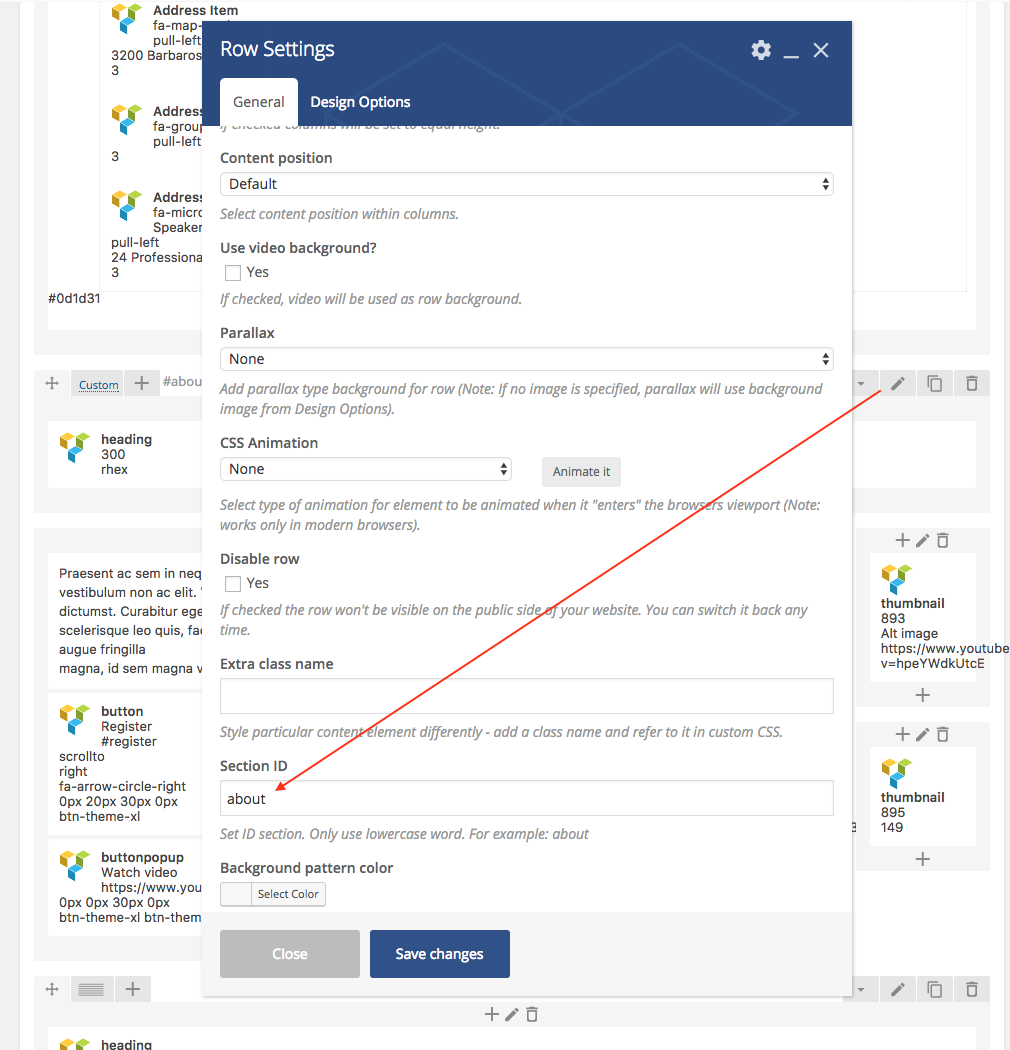
3: Create scroll when click an menu item
For example: Create menu about
Step 1: Create menu about
Step 2: Create section about in page
Theme Options
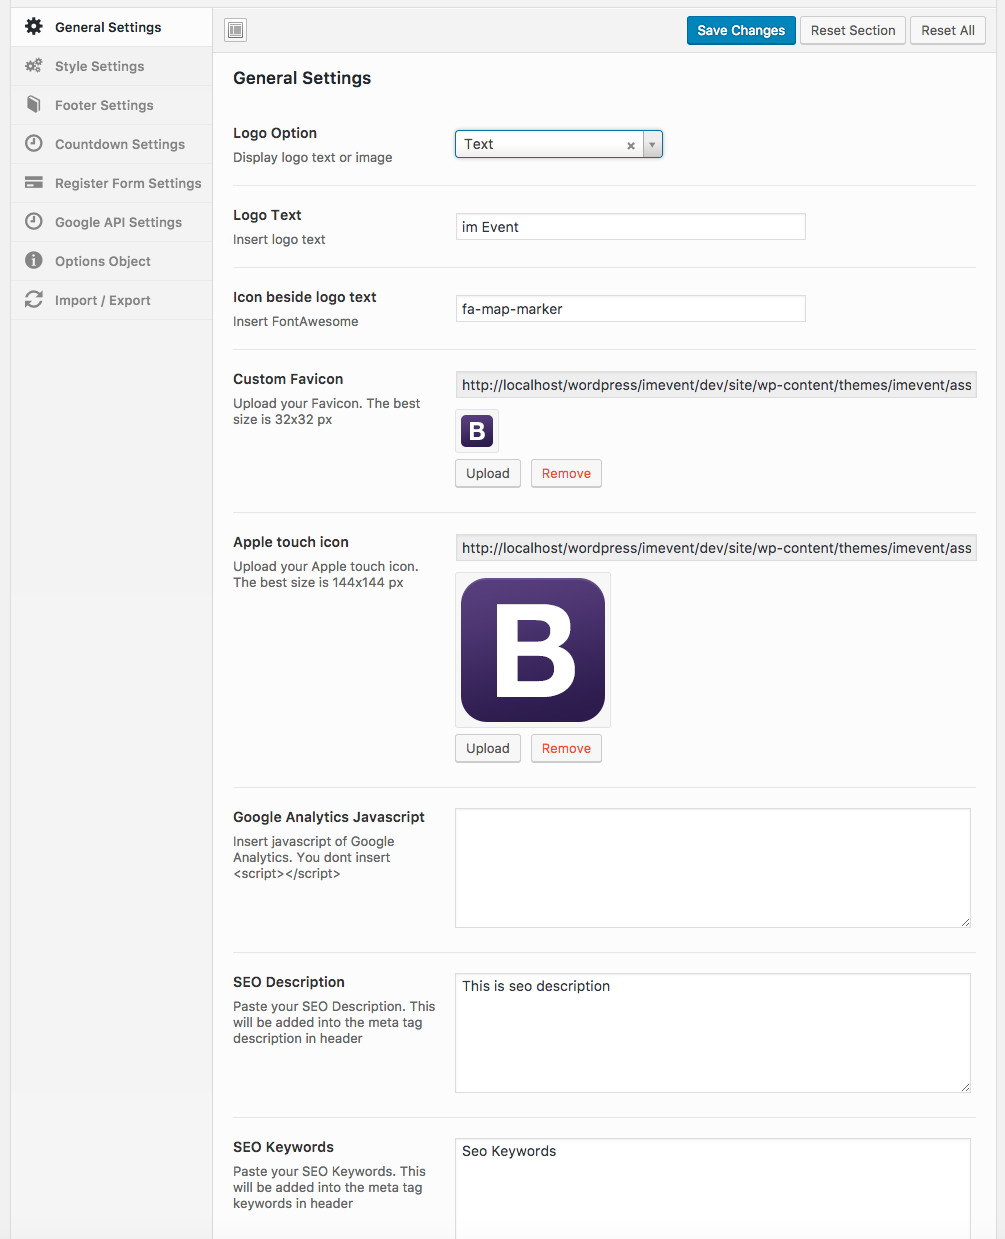
Go to Theme Options >> General Settings
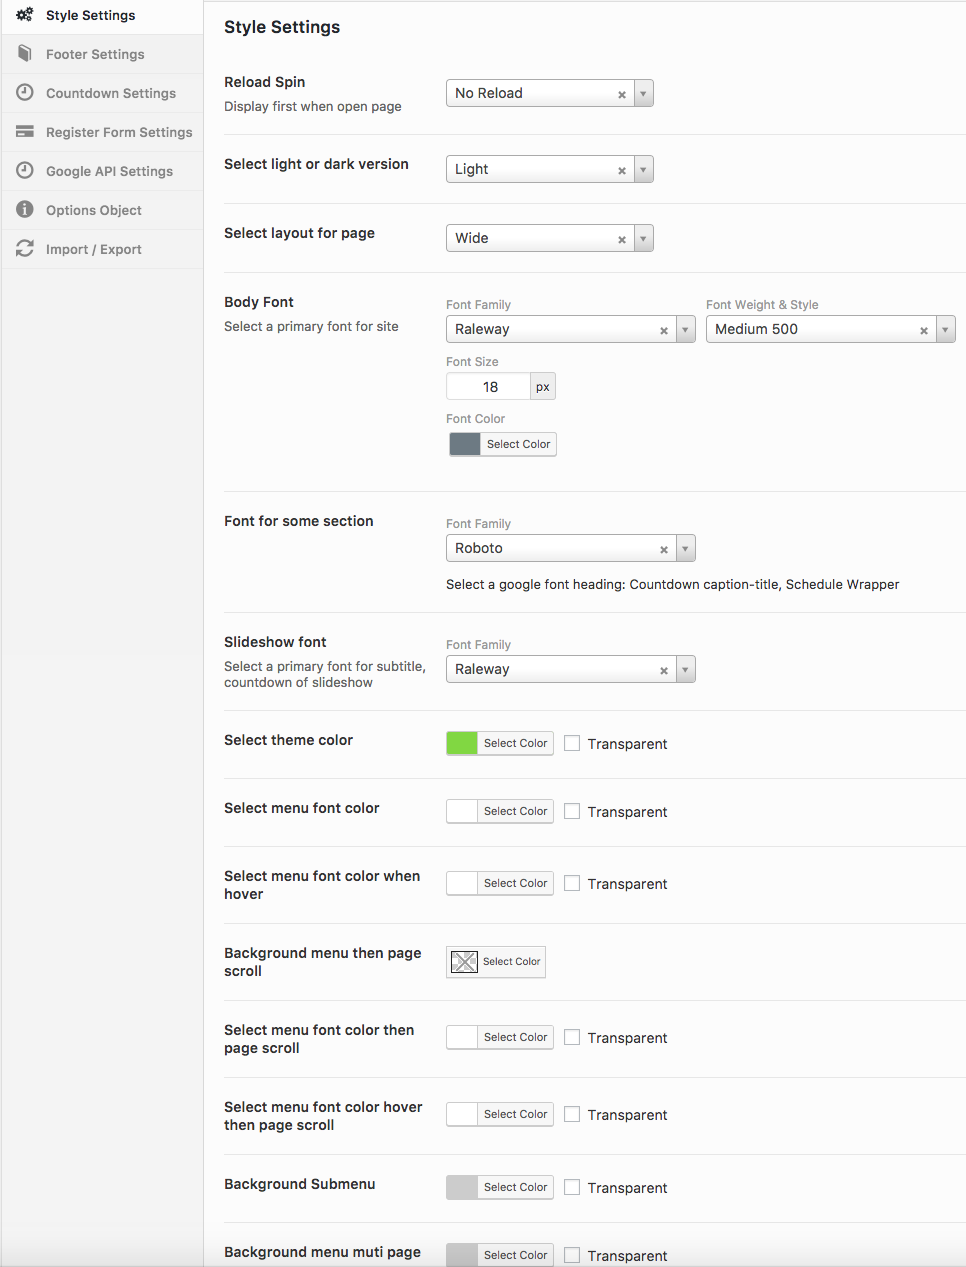
Go to Theme Options >> Style Settings
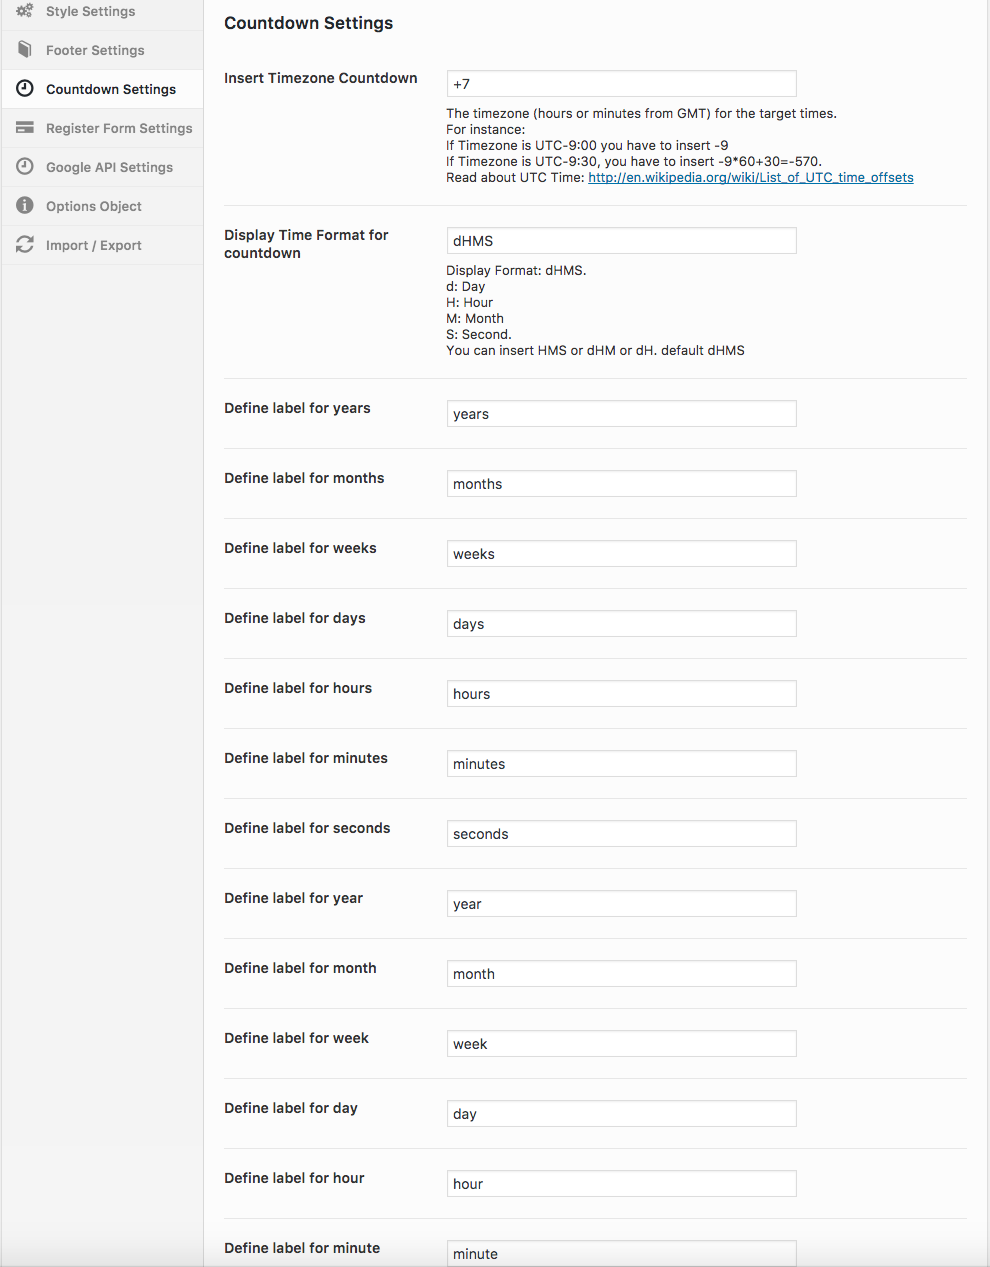
Go to Theme Options >> Countdown Settings
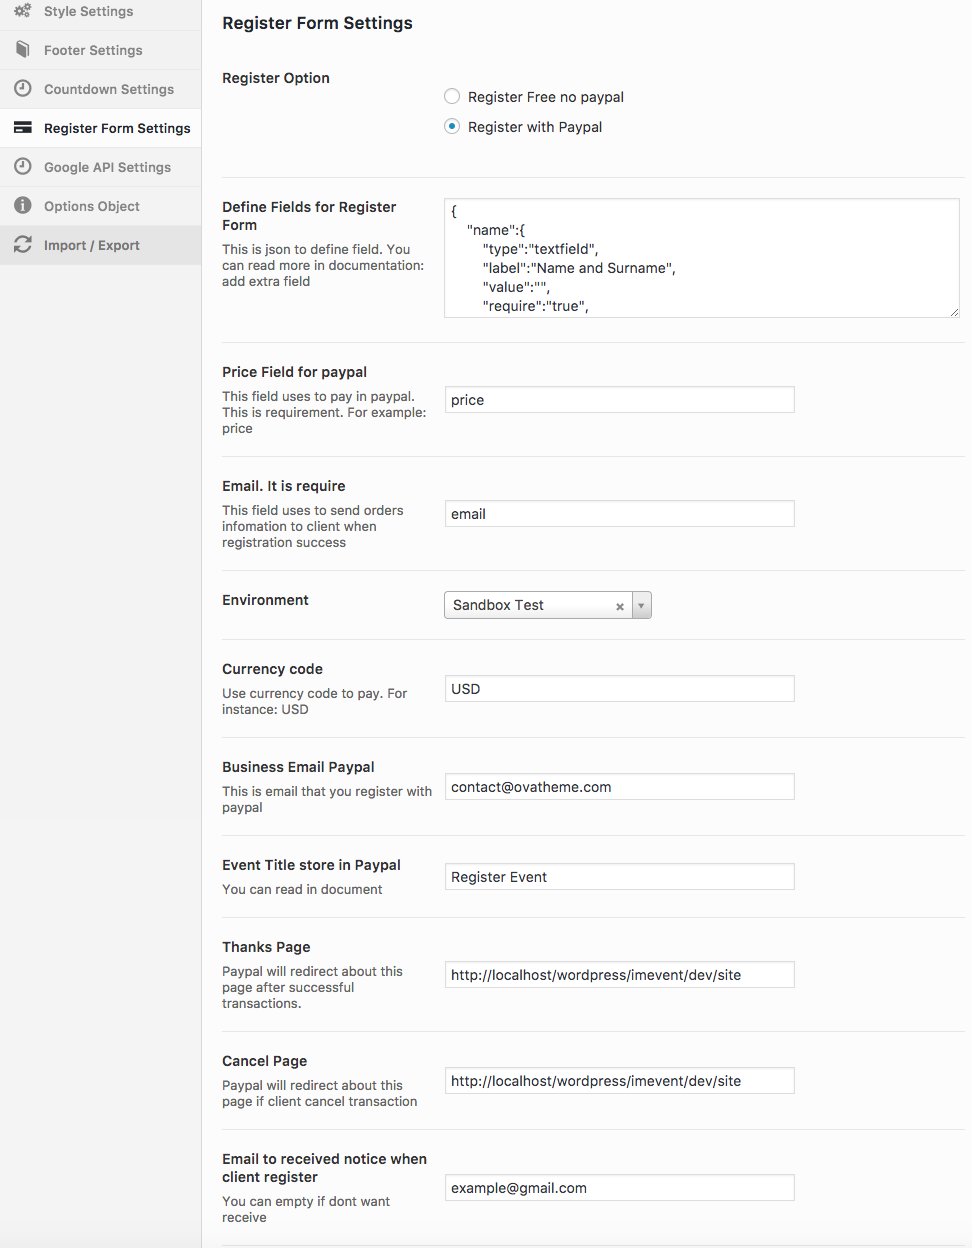
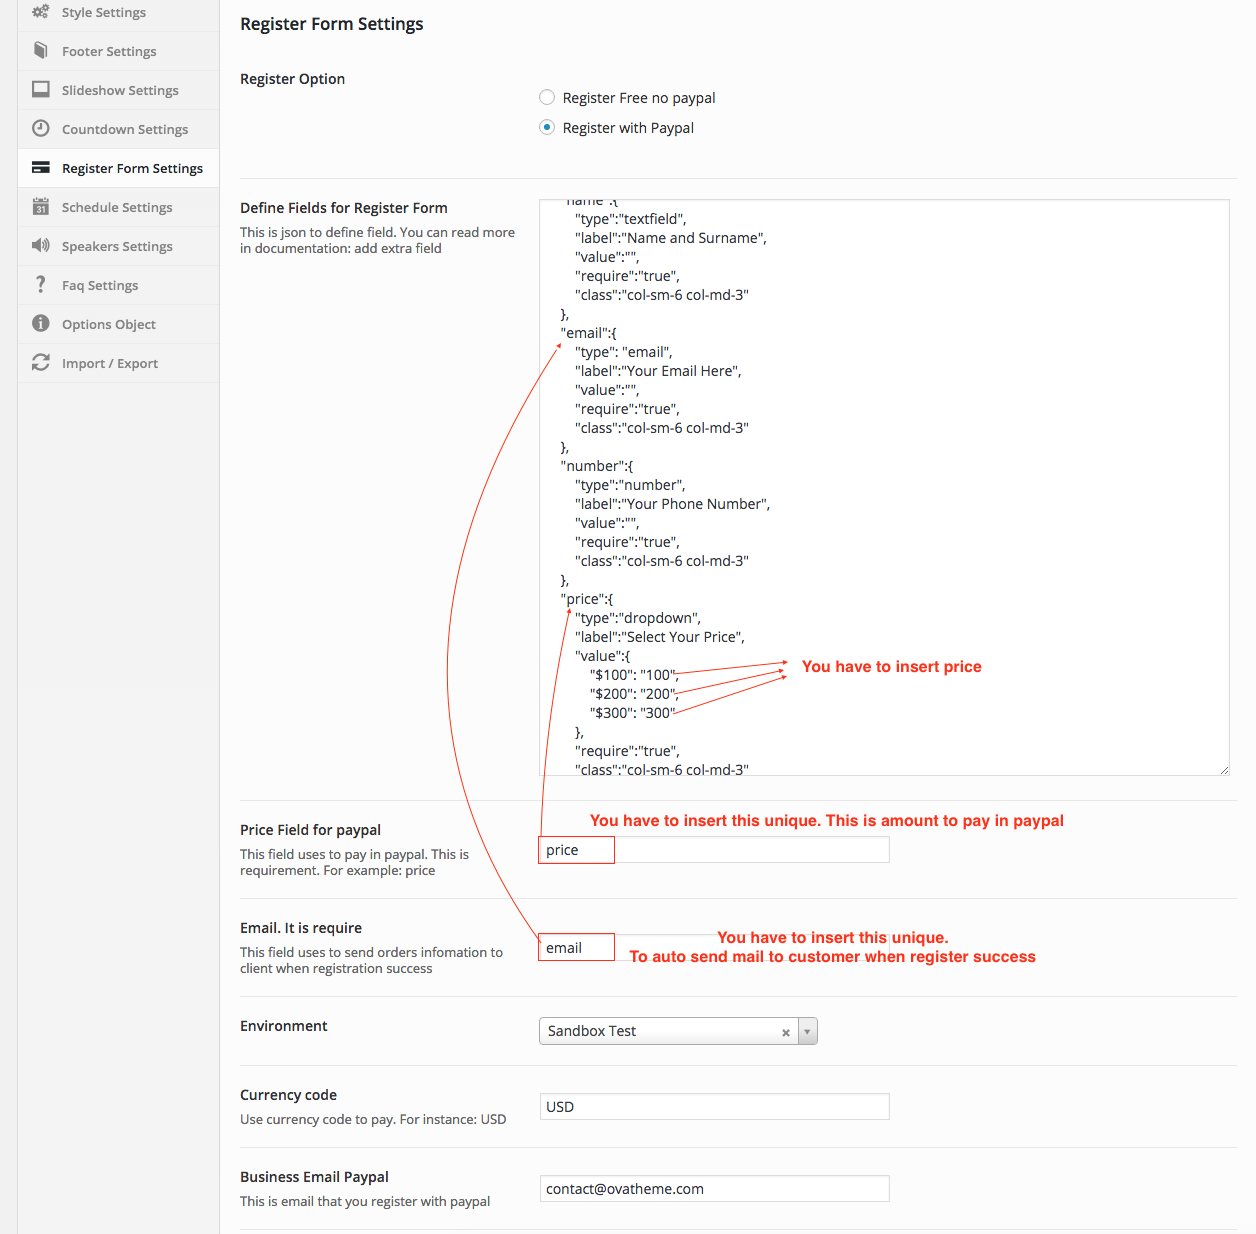
Go to Theme Options >> Register Form Settings
You can find more detail bellow
Go to Theme Options >> Footer Settings

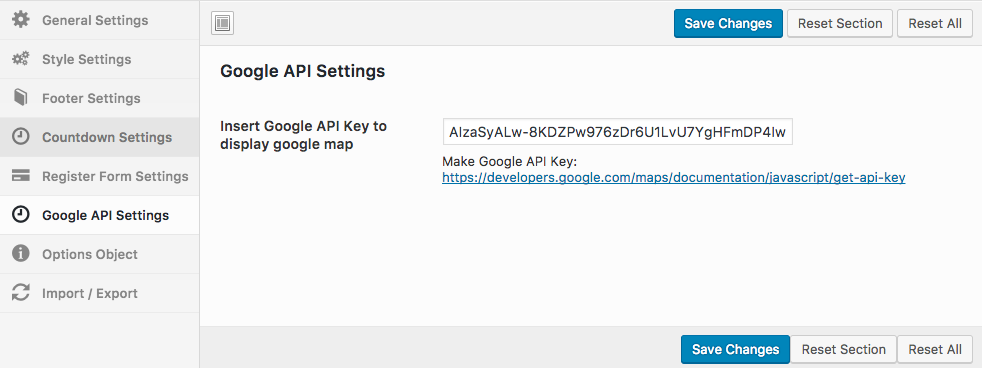
Go to Theme Options >> Google API Settings
Register Form Settings
"uniqueid":{

"type":"textfield",

"label":"label of text",

"value":"",

"require":"true",

"class":"col-sm-6 col-md-3"

}
"uniqueid":{

 "type":"textarea",

 "label":"label of text",

 "value":"",

 "cols":"10",

 "rows":"4",

 "require":"false",

 "class":"col-sm-6 col-md-3"

 }
"uniqueid":{

 "type": "email",

 "label":"Your Email Here",

 "value":"",

 "require":"false",

 "class":"col-sm-6 col-md-3"

 }
"uniqueid":{

 "type":"url",

 "label":"Your Url",

 "value":"",

 "require":"false",

 "class":"col-sm-6 col-md-3"

 }
"uniqueid":{

 "type":"number",

 "label":"Your Phone Number",

 "value":"",

 "require":"false",

 "class":"col-sm-6 col-md-3"

 }
"uniqueid":{

 "type":"date",

 "label":"Date",

 "value":"",

 "require":"false",

 "format":"mm-dd-yy",

 "class":"col-sm-6 col-md-3"

 }
"uniqueid":{

 "type":"dropdown",

 "label":"Price",

 "value":{

 "Label Option 1": "Value Option 1",

 "Label Option 2": "Value Option 2"

 },

 "require":"true",

 "class":"col-sm-6 col-md-3"

 }
"uniqueid":{

 "type":"checkbox",

 "label":"label for checkbox",

 "value":{

 "Label Option 1": "Value Option 1",

 "Label Option 2": "Value Option 2",

 "Label Option 3": "Value Option 3"

 },

 "class":"col-sm-6 col-md-3"

 }
"uniqueid":{

 "type":"radio",

 "label":"label for radio",

 "value":{

 "Label Option 1": "Value Option 1",

 "Label Option 2": "Value Option 2"

 },

 "value_default":"Value Option 1",

 "class":"col-sm-6 col-md-3"

 }
"uniqueid":{

 "type":"message",

 "label":"",

 "value":"Please note: An One Page Event Manager",

 "class":"col-sm-12 col-md-12"

 }
Slideshow
1) Make Group: Slideshows >> Groups
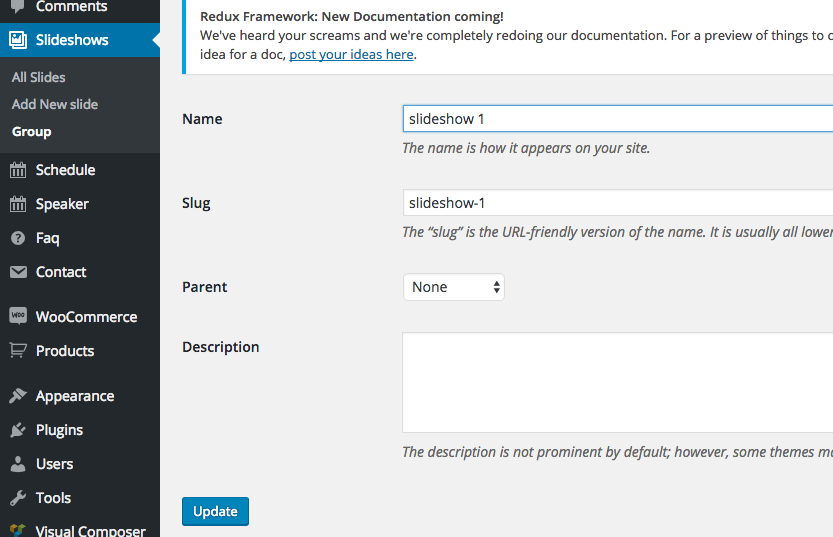
2) Make slide: Slideshows >> Add new slide
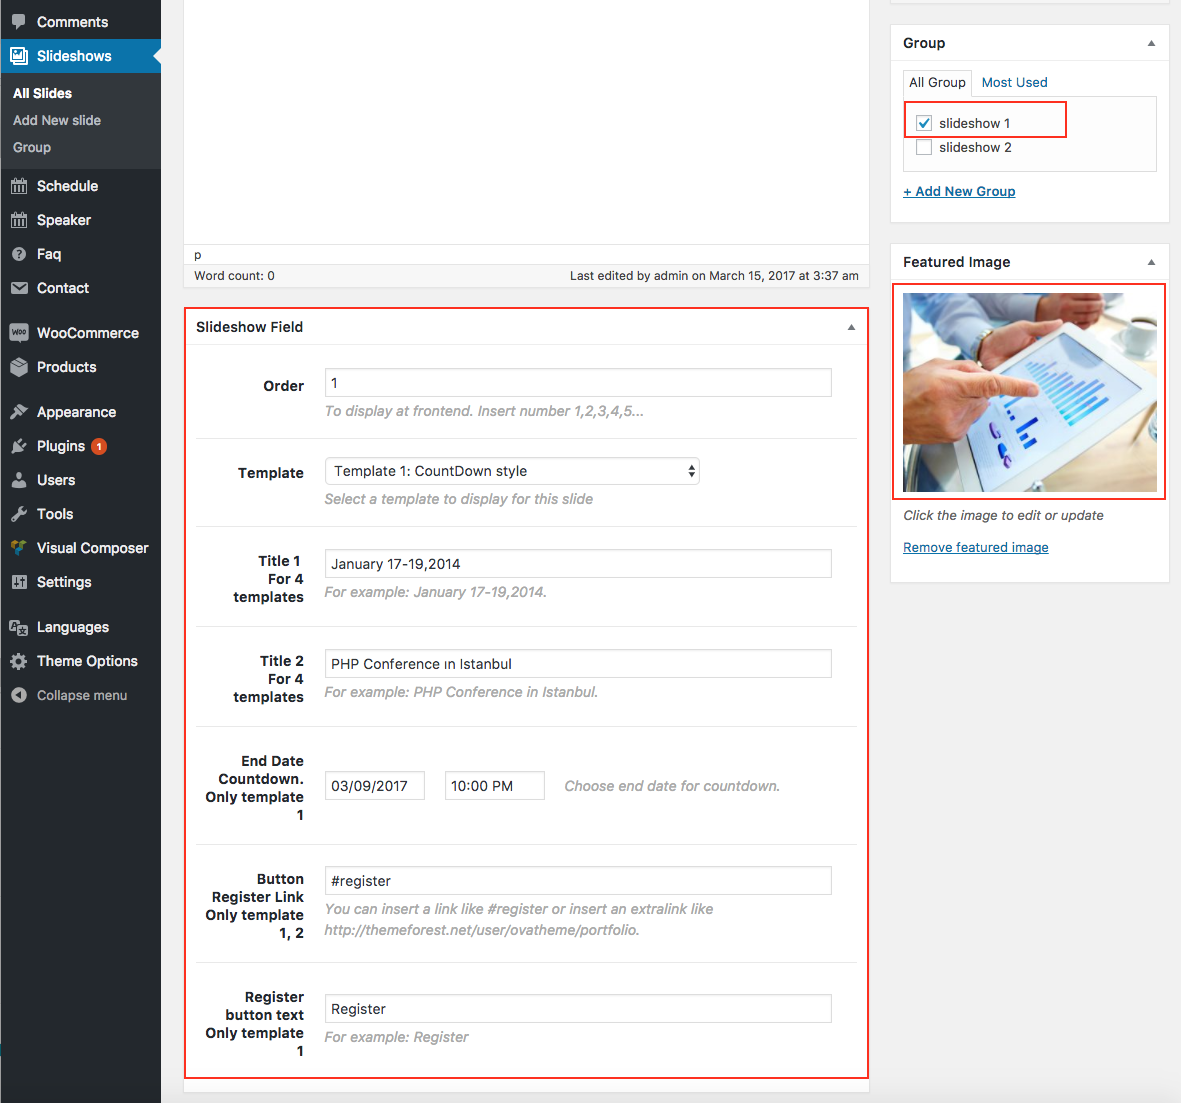
3) Display Slideshow
a) Slideshow setting: Display slideshow with single background
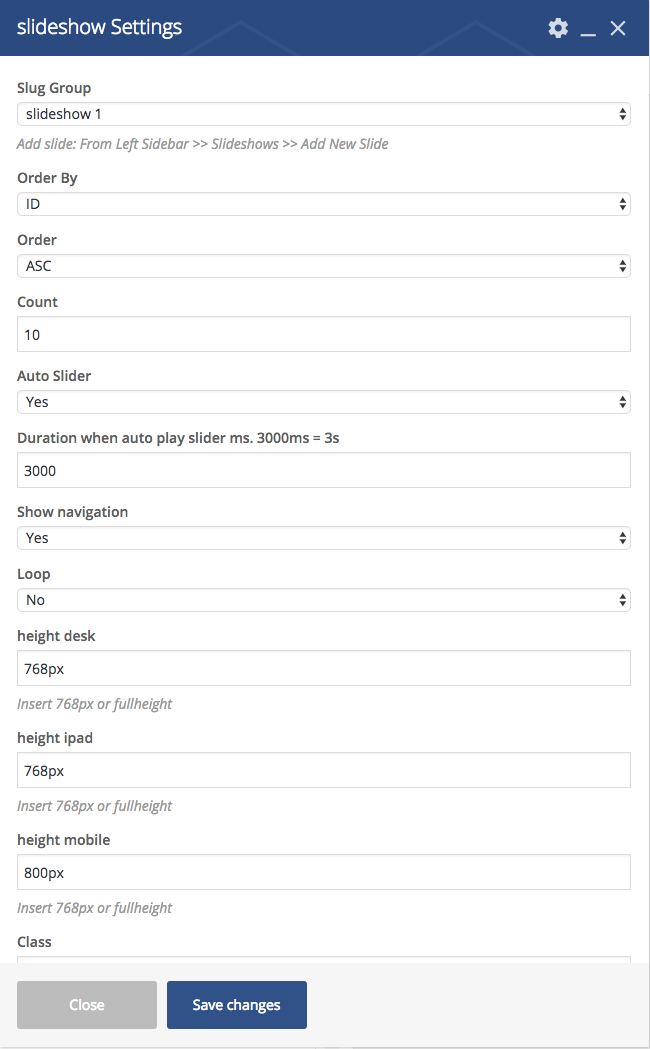
background in desktop
background in mobile
b) Slideshow two setting: Display slideshow with multi background

Schedule
- Schedule Frontend
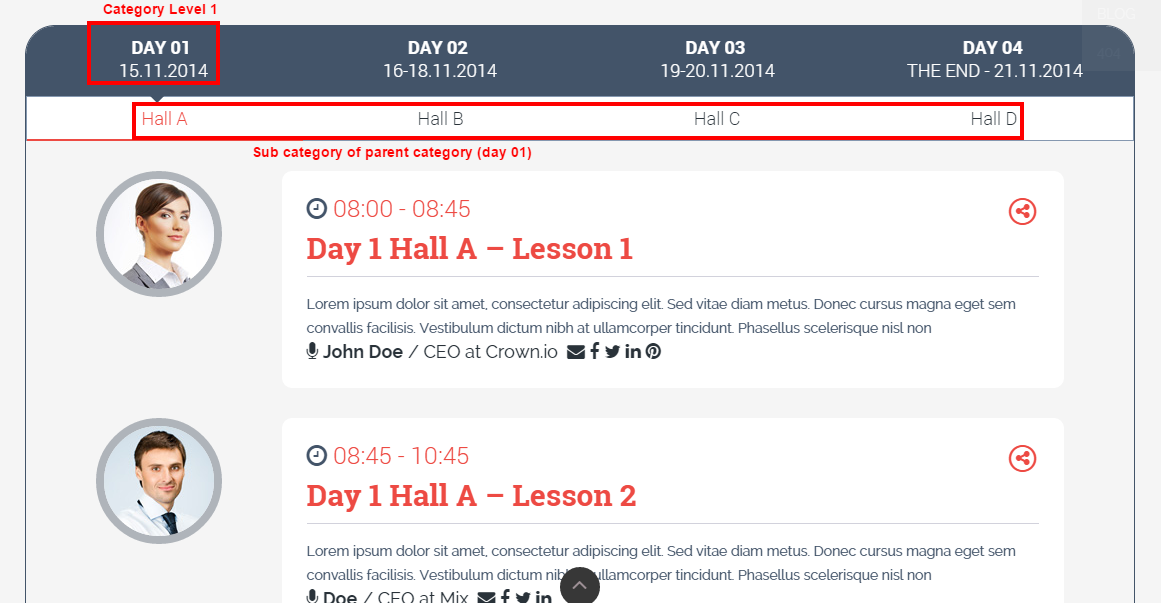
Step 1 – Create Categories:
- Create Category level 1:
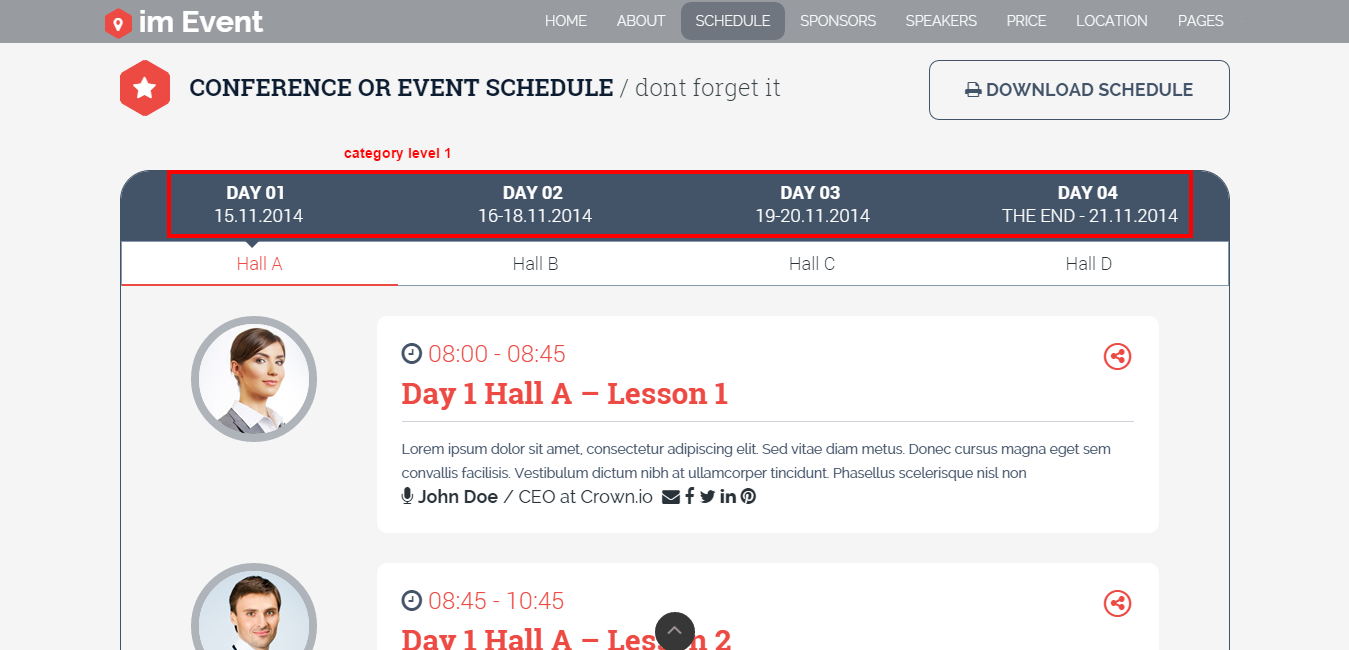
Schedule >> Categories >> Insert some fields:
Name: For instance Day 01
Parent: None
Description: For instance 15.11.2014
- Create Category level 2:
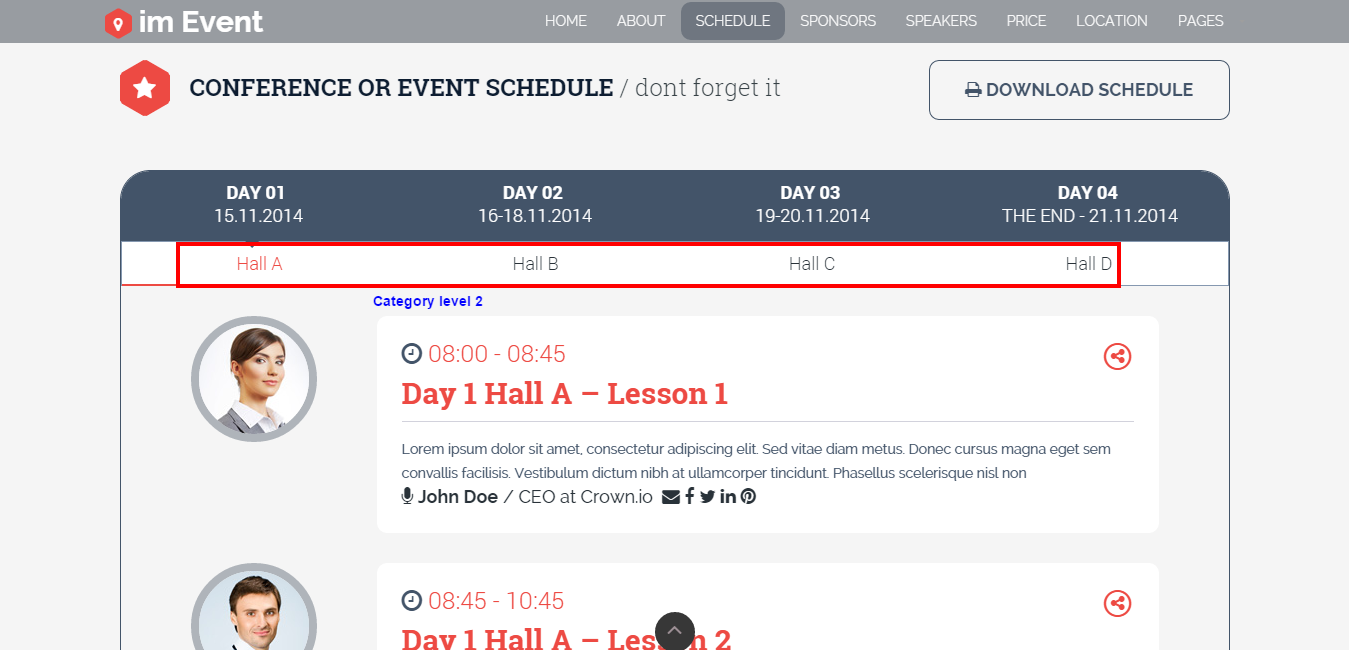
Schedule >> Categories >> Insert some fields:
Name: For instance Hall A
Parent: Select a category level 1
Description: empty
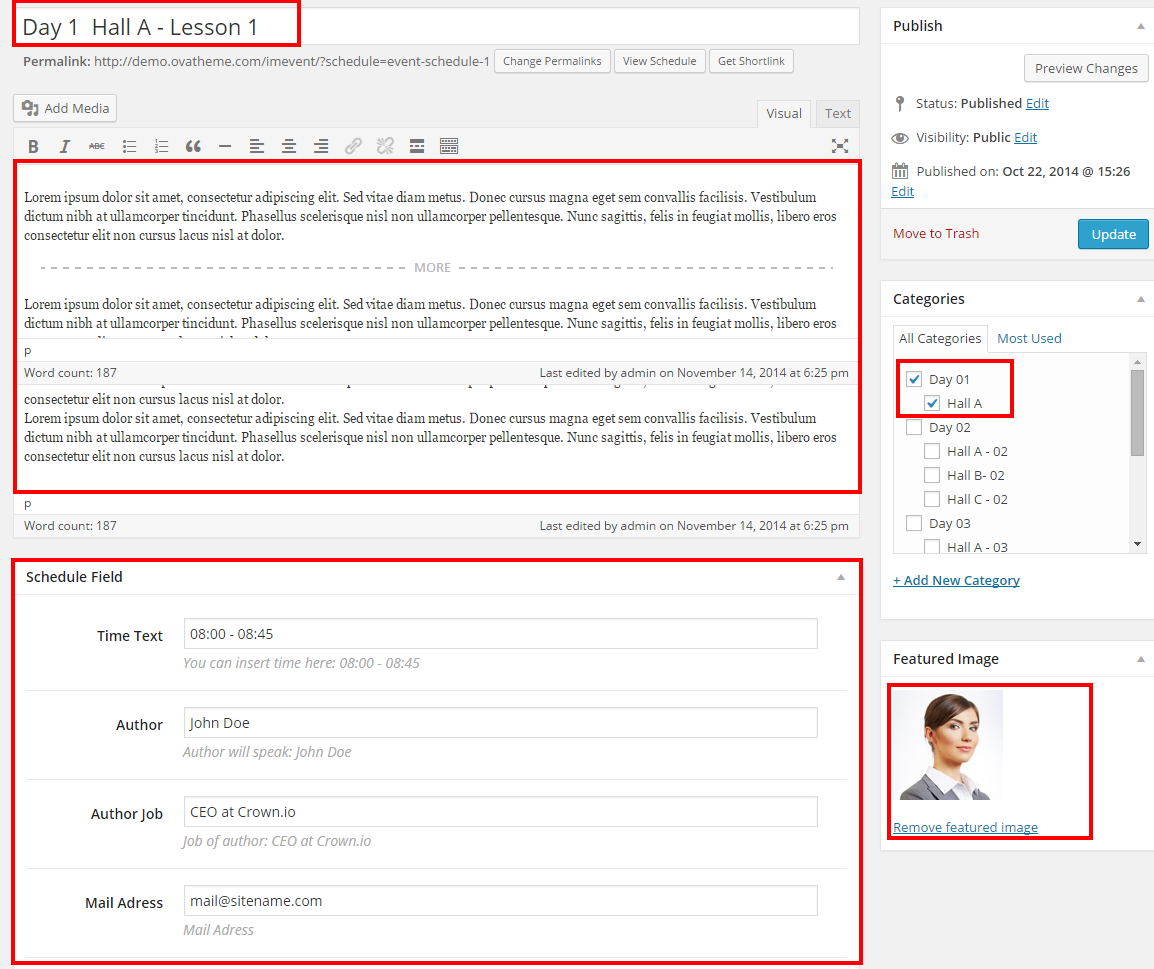
Step 2 – Create Schedule Item:
Schedule >> Add New Schedule >> View here
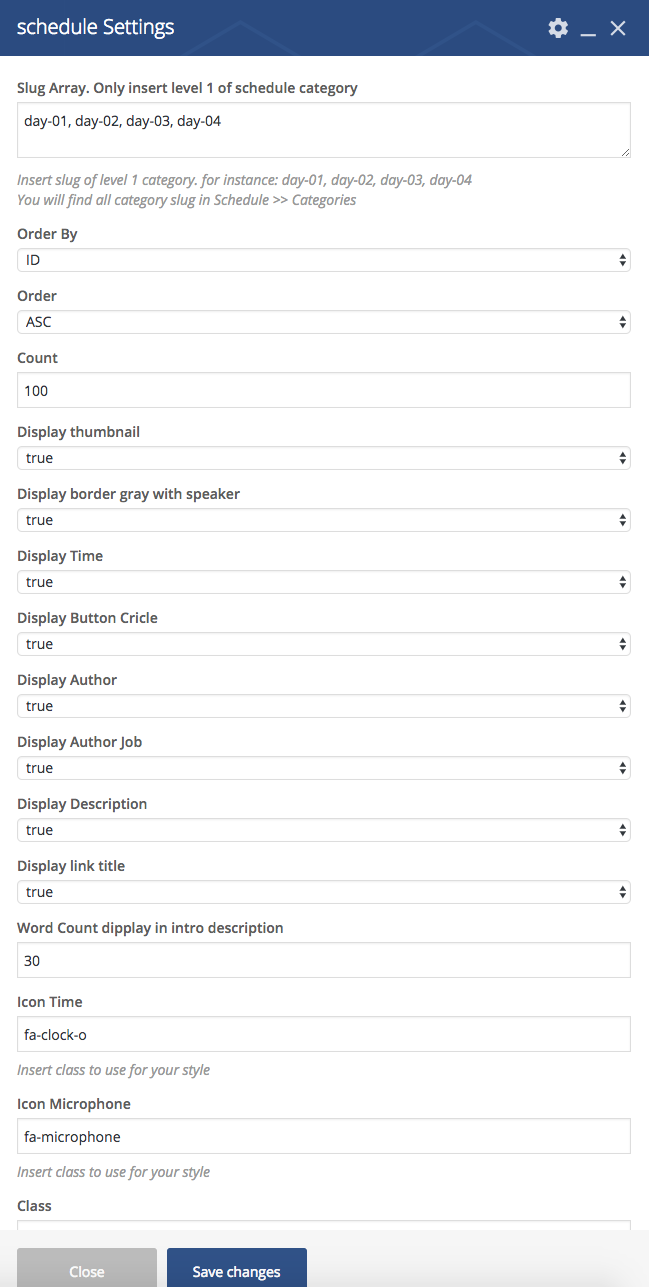
Step 3 – Display Frontend:
Use Schedule element visual composer
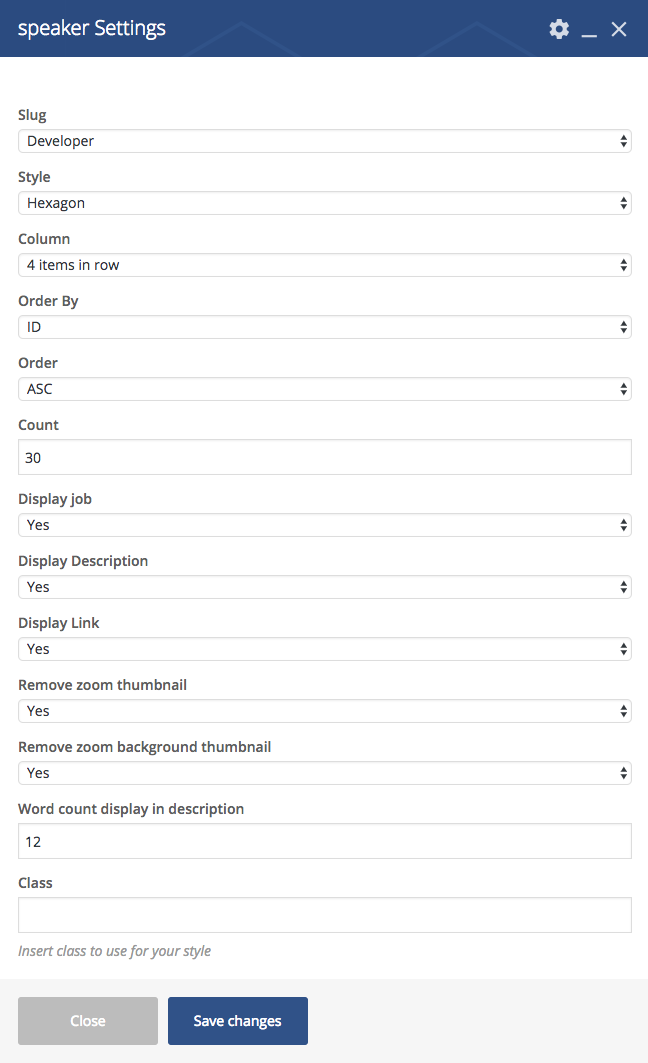
Speaker
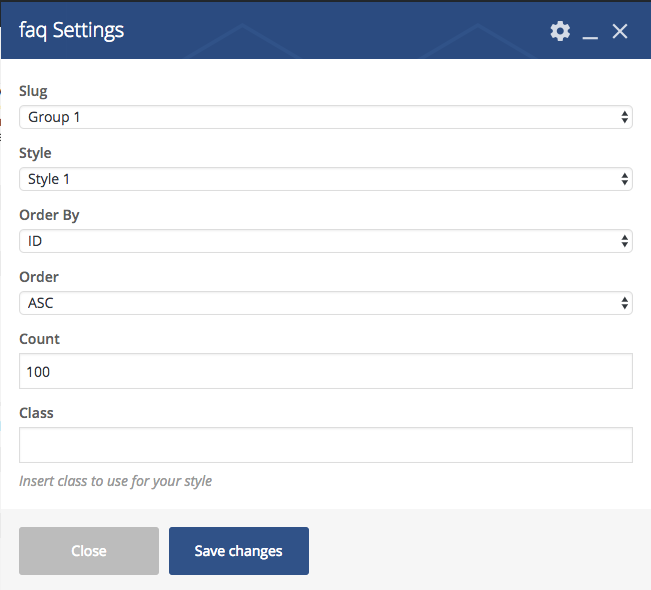
FAQ
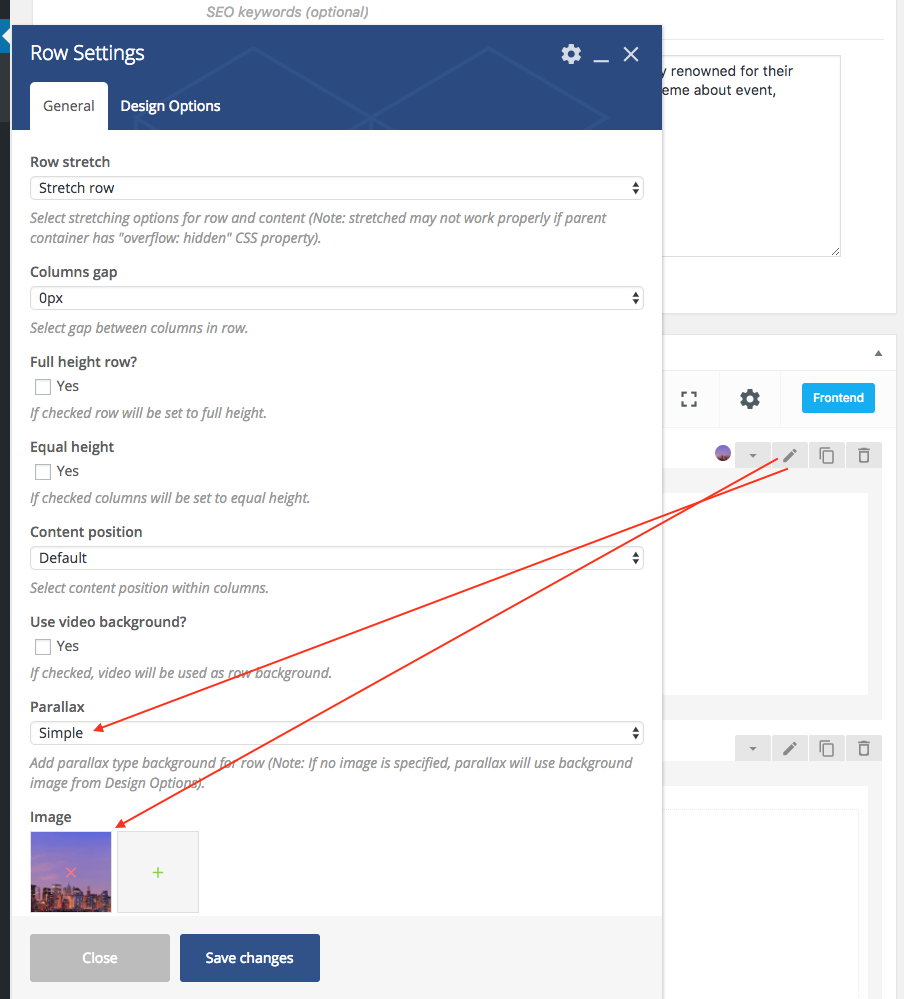
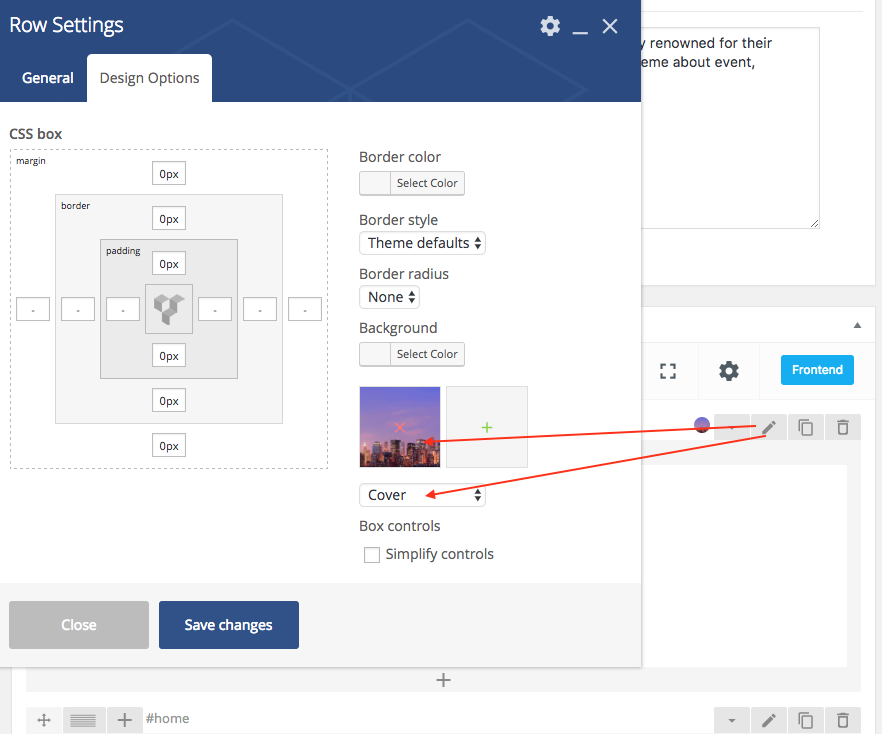
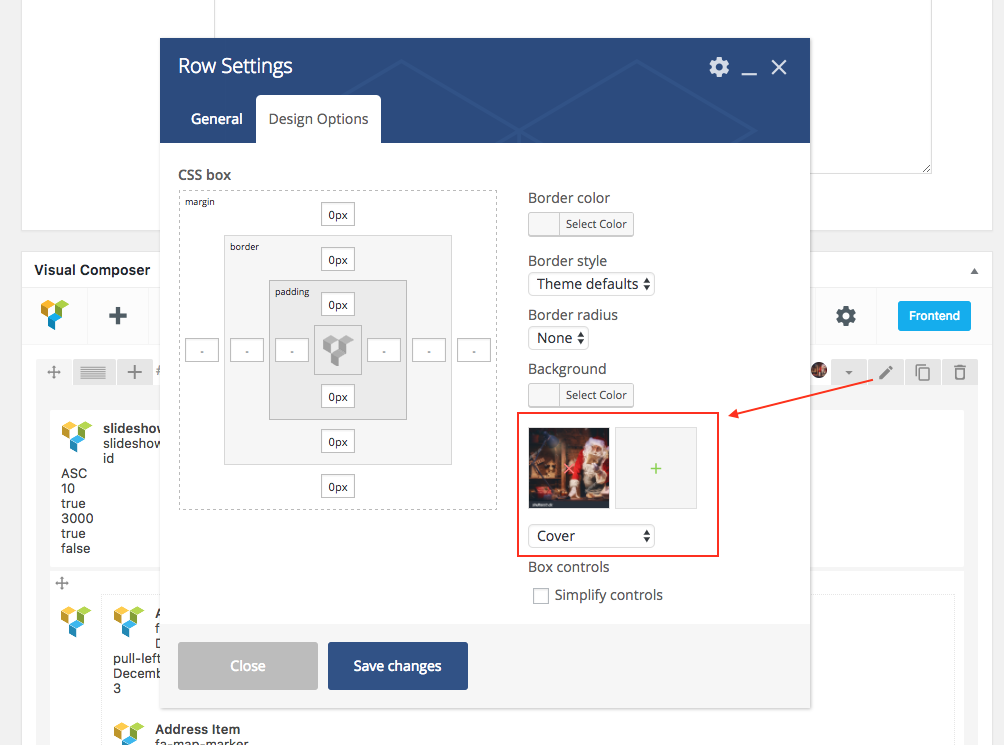
Background in Section
- Background in desktop
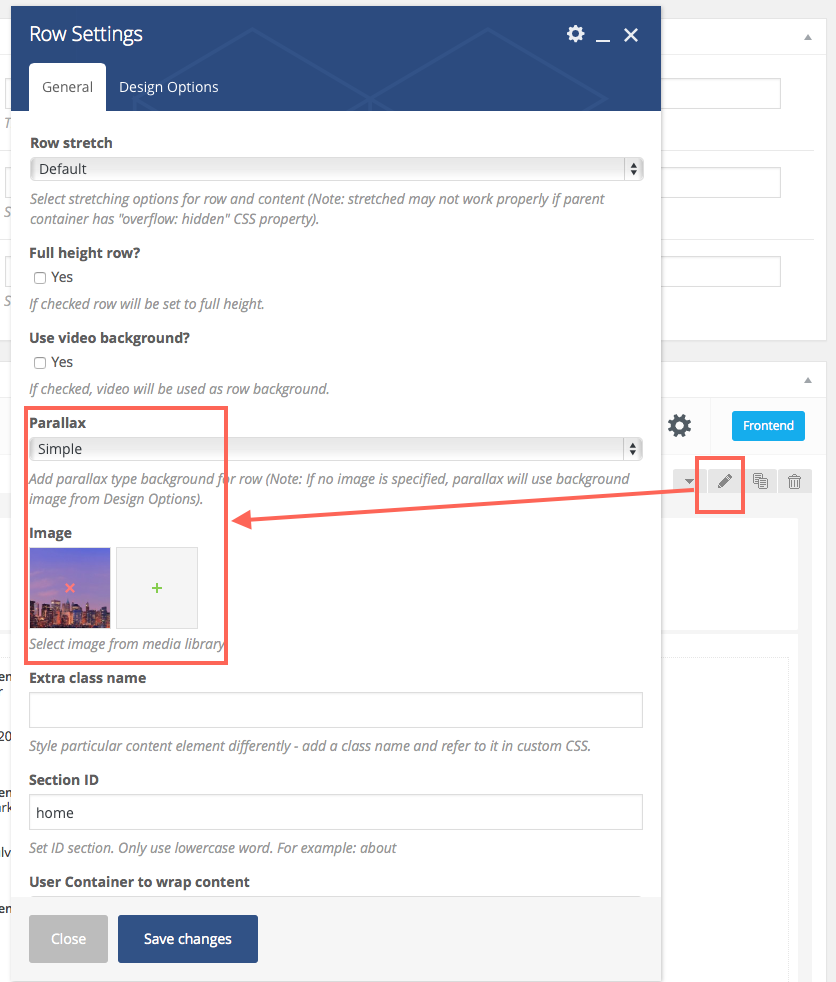
- Background in mobile
Contact Form
From Left Bar >> Contact >> Contact From >> Form tab and insert this code
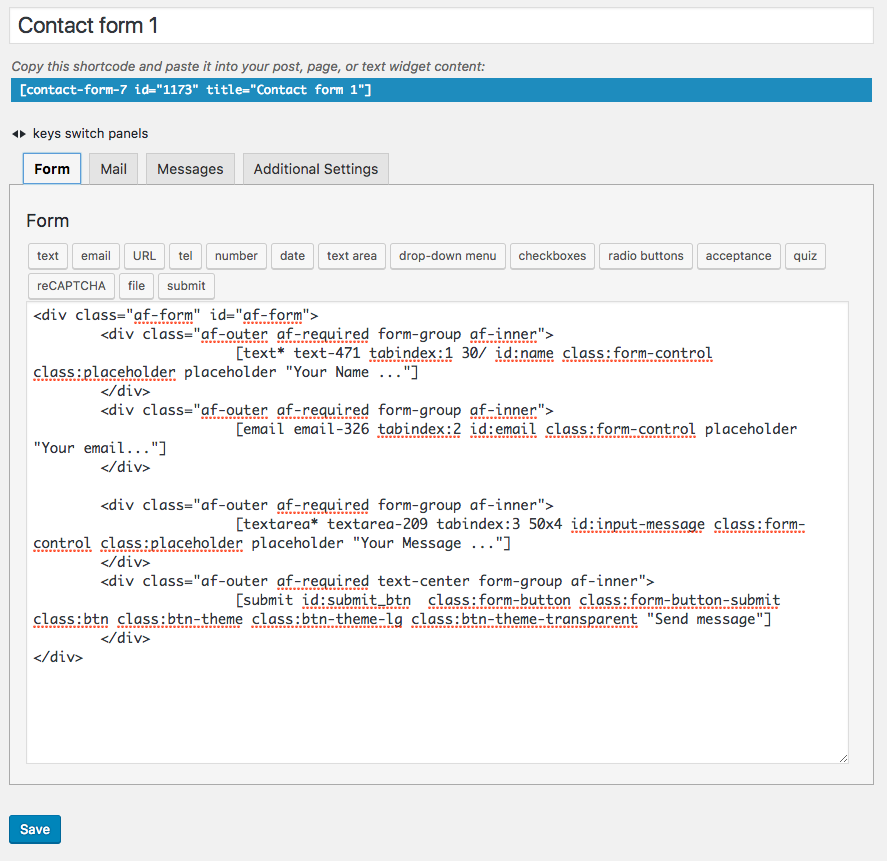
<div class="af-form" id="af-form">
<div class="af-outer af-required form-group af-inner">
[text* text-471 tabindex:1 30/ id:name class:form-control class:placeholder placeholder "Your Name ..."]
</div>
<div class="af-outer af-required form-group af-inner">
[email email-326 tabindex:2 id:email class:form-control placeholder "Your email..."]
</div>
<div class="af-outer af-required form-group af-inner">
[textarea* textarea-209 tabindex:3 50x4 id:input-message class:form-control class:placeholder placeholder "Your Message ..."]
</div>
<div class="af-outer af-required text-center form-group af-inner">
[submit id:submit_btn  class:form-button class:form-button-submit class:btn class:btn-theme class:btn-theme-lg class:btn-theme-transparent "Send message"]
</div>
</div>
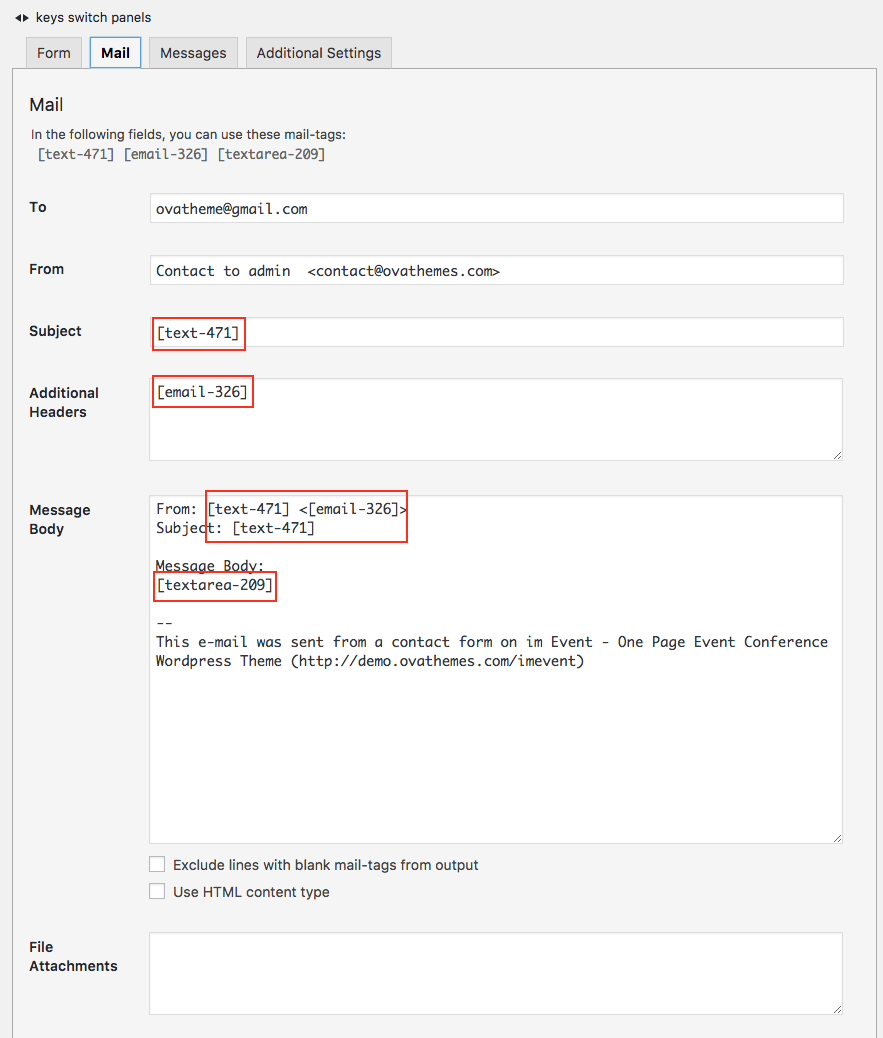
Note config in mail tab to receive content in mail:
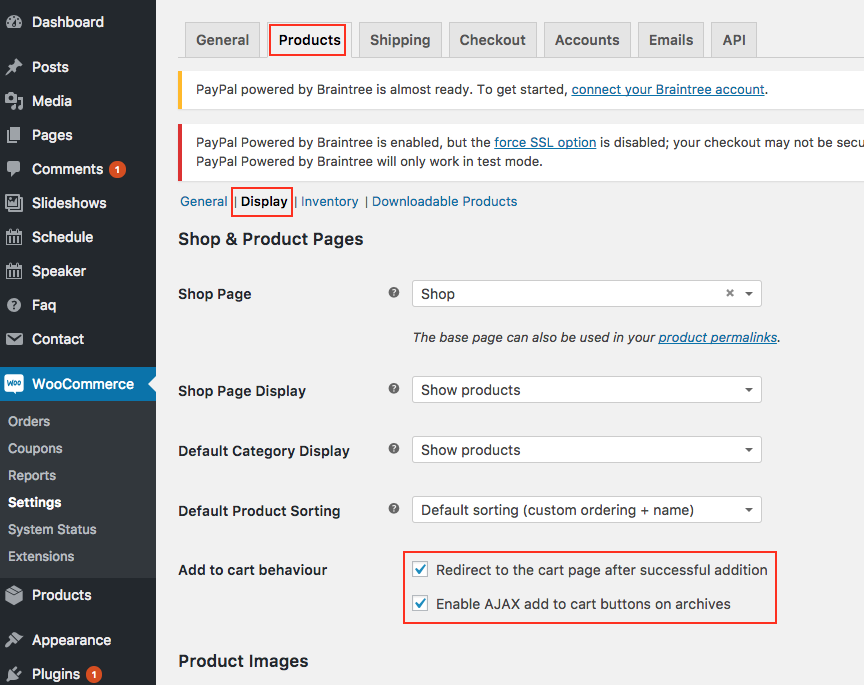
Create WooCommerce for booking Event
Step 1: Config in woocommerce: Go to Woocommerce >> Settings >> Products

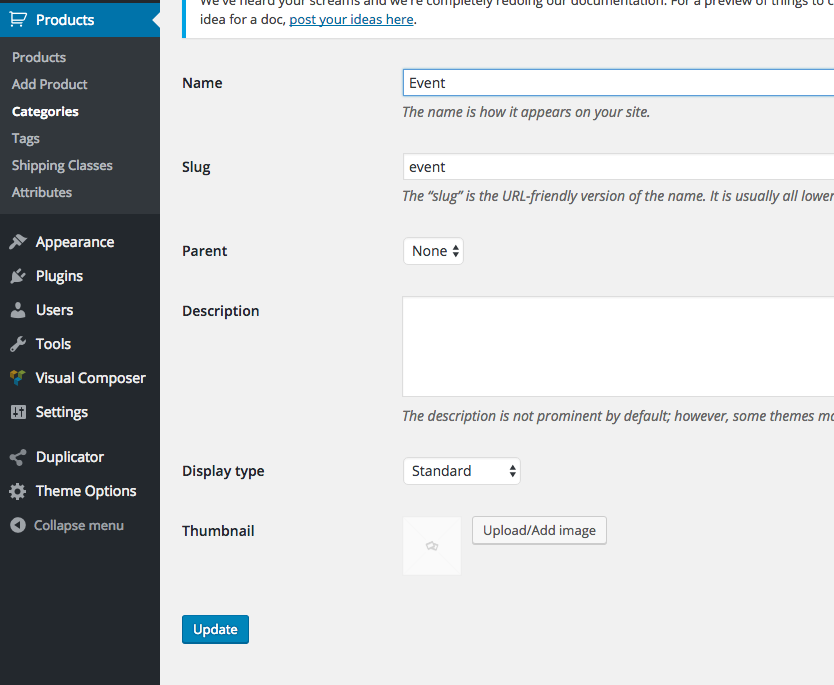
Step 2: Create Category
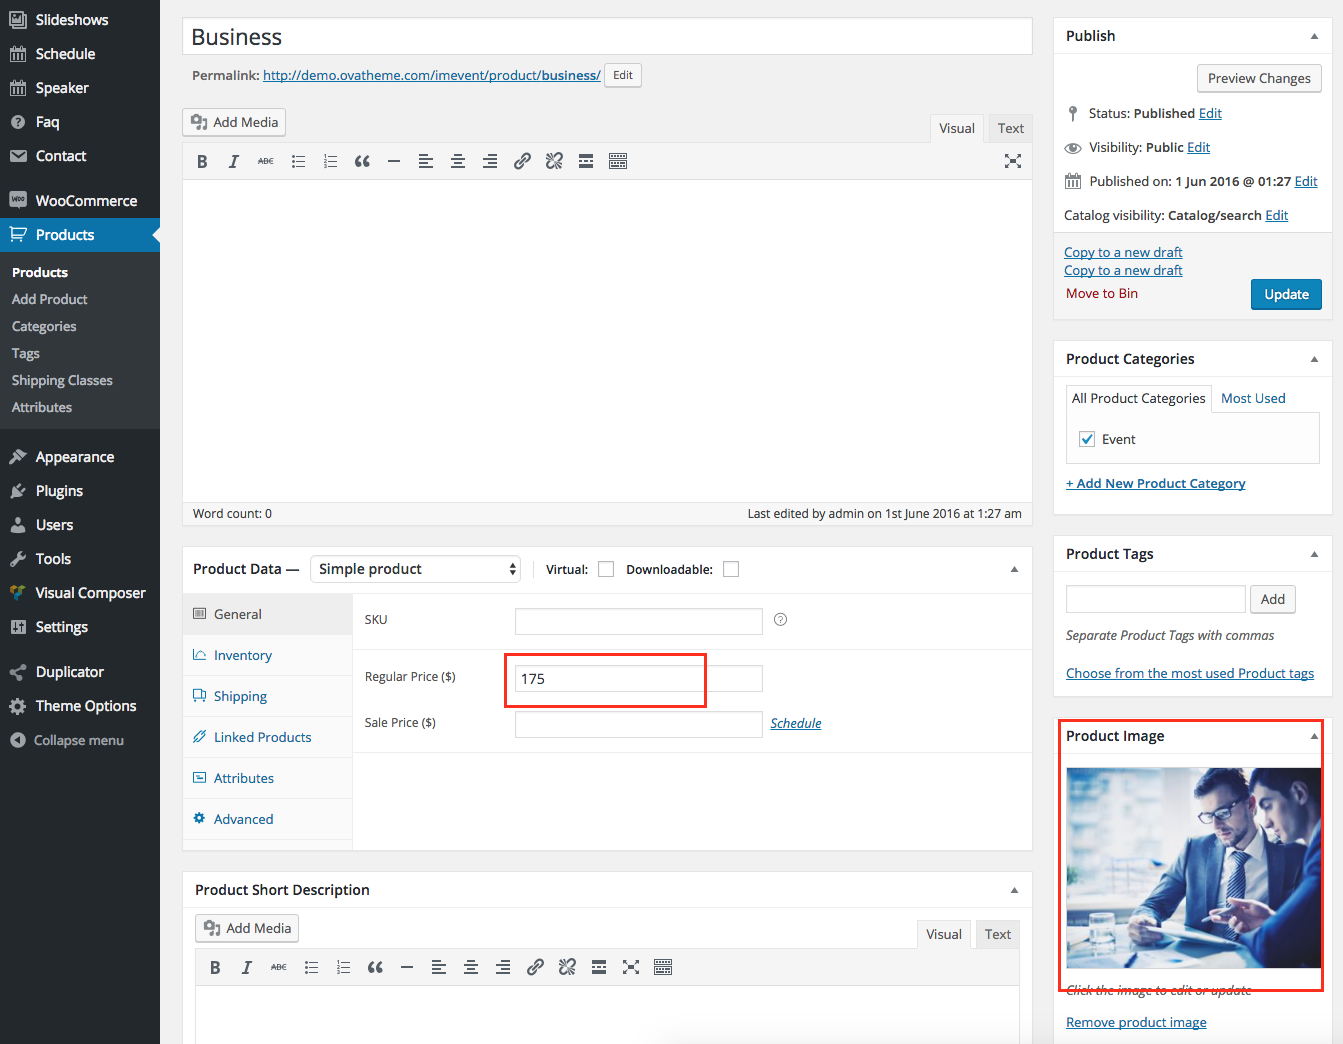
Step 3: Create Product
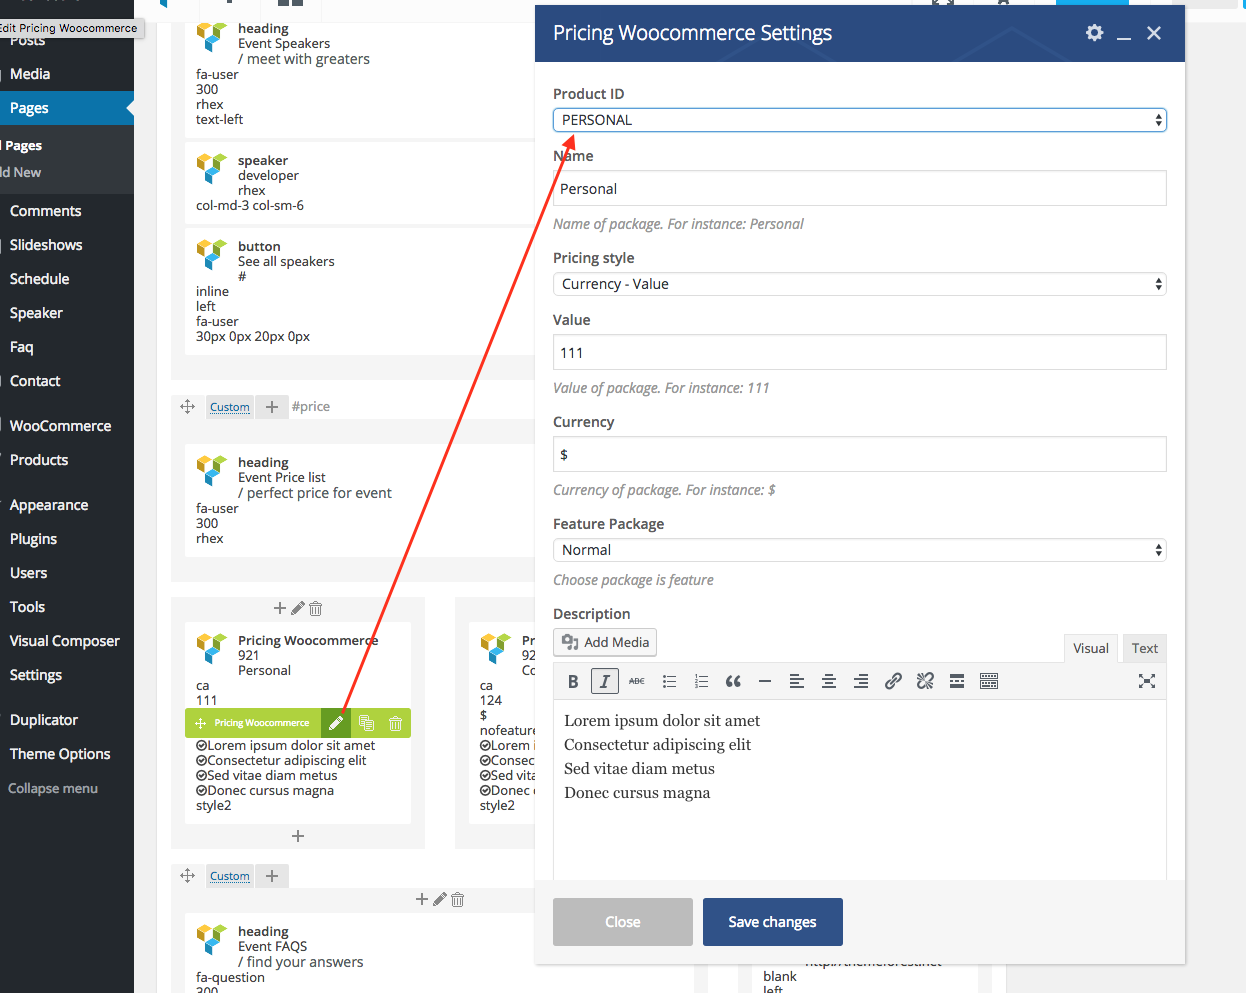
Step 4: Create Booking at frontend
Translations
The theme is compatible with WPML plugin, thus can be translated into multiple languages. Follow this link for guide. You can also use POEdit plugin for translation.
- Located the .po file in folder /languages.
- Open the file with POEdit and translate the texts into your preferred language.
- When complete, you’ll want to save the file twice, as two separate files – a .po file and a .mo file. When you save the files, you must name them according to your language code. Find a list of language codes at WordPress in your Language. As an example, the language code for English is en_EN, so you would save the translated files as en_EN.po first, then en_EN.mo.
- When that’s done, simply upload the files to your theme folder.
Codestyling Localization is a good alternative for POEdit. It also works with .po/.mo files and is very easy to use.